

Podcast recording may seem challenging to set up, especially for beginners, but Maono has made it easier with simple plug-and-play microphone options — including their latest model, the Maono PD200W, a hybrid dynamic wireless microphone. In this article, let’s explore the essential equipment needed to start a two-person home podcast studio and learn some helpful tips on how to prepare a home studio for podcasting.
Launching a two-person podcast from home has never been more achievable. With the rise of simple wireless microphone systems—even options like the best budget wireless microphone system, compact recording equipment, and affordable acoustic treatment—creators can now build a studio-quality setup without renting an expensive space. A wireless mic setup makes collaboration easier, minimizes cable clutter, and opens up more flexibility in microphone placement—especially helpful when recording with a co-host. This also applies to creators who use cameras; many podcasters who film their sessions also search for tools like the best DSLR wireless microphone or the best wireless mic for DSLR to match their audio and video workflow.
Also in this guide, you’ll learn exactly how to create a professional home podcast studio equipped with wireless microphones. We’ll walk through how to soundproof a small room, the essential gear you’ll need, best practices for wireless mic placement, and how to connect wireless systems to audio interfaces or mixers. We’ll also cover the best software and workflow strategies for smooth, consistent two-person recordings. Whether you’re a beginner or upgrading your setup, this guide provides everything you need to confidently start your two-host podcasting journey. Do a quick search using keywords: “microphone wireless near me,” “iPhone external wireless microphone” or “Android external wireless mic” if you’re using an iPhone or Android for quick local purchase if your setup is for mobile recording; or you can simply go to the official website: Maono.com.
How to Soundproof a Small Room for Podcast Recording at Home
Before you invest in microphones and studio gear, start with your recording environment. Small rooms often produce echo, unwanted reflections, and background noise. Soundproofing and acoustic treatment help create a clean and balanced sound that both hosts—and your listeners—will appreciate.
Here are the best ways to soundproof a home podcast room:
1. Choose a naturally quiet room
Interior rooms with few windows work best. Carpeted rooms or walk-in closets typically have fewer reflections and better isolation.
2. Use acoustic panels strategically
Place 1–2-inch-thick foam or fiberglass panels on key reflection points—typically behind each host, behind the microphones, and directly across from them. This prevents sound waves from bouncing back into the mics.
3. Add soft furnishings
Curtains, rugs, couches, and pillows naturally absorb sound. Even a thick blanket over hard walls can reduce echo.
4. Seal external noise sources
Weatherstrip doors, cover gaps, and close windows to minimize traffic noise, barking dogs, or air conditioning hum.
5. Consider bass traps in corners
These help control low-frequency build-up, especially important in small rooms where bass can resonate.
A well-treated room can instantly improve recording quality—even more than upgrading your gear.
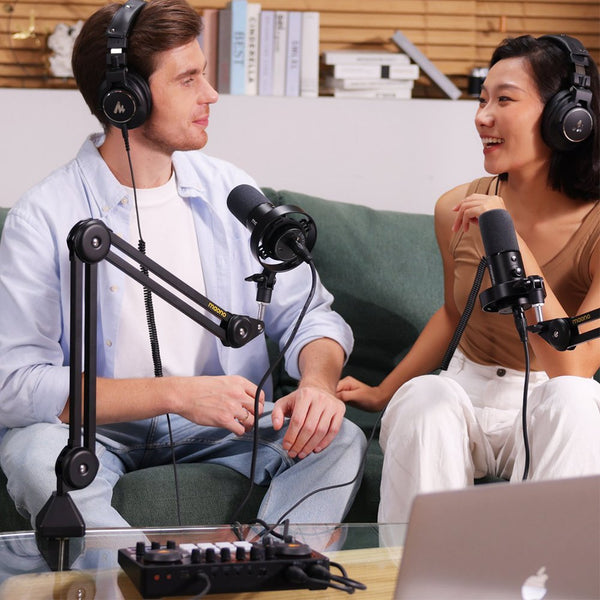
Essential Equipment Checklist for a Two-Host Home Podcast Studio
Setting up a two-person podcast requires equipment that ensures clarity, consistency, and smooth workflow. Here’s the must-have gear for a reliable wireless microphone setup:
1. Two wireless microphone systems
Choose a dual-channel wireless system or two single-channel systems. A hybrid dynamic wireless mic like the Maono PD200W can help minimize background noise and deliver broadcast-quality tone. Many creators also pair their podcast mics with cameras and look for the best wireless mic for DSLR or the best DSLR wireless microphone to maintain consistency in both video and audio production.
2. Receivers for each microphone
These connect to your mixer or audio interface. Some systems offer compact dual receivers with built-in noise cancellation.
3. Audio interface or podcast mixer
Look for at least two mic inputs. Podcast mixers often include built-in preamps, sound pads, noise suppression features, and multitrack recording.
4. Headphones for both hosts
Closed-back headphones allow hosts to monitor audio, catch plosives or clipping, and keep volume levels consistent.
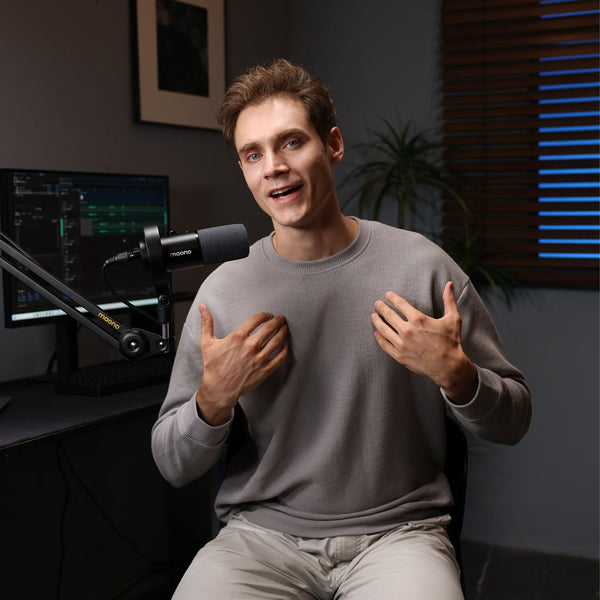
5. Mic stands or boom arms
Stable mic placement prevents handling noise. Boom arms save desk space and allow comfortable positioning for both hosts.
6. Pop filters or foam windshields
Even with wireless dynamic microphones, pop filters help eliminate harsh plosive sounds.
7. Laptop with recording software
Required for recording, editing, and exporting your podcast.
8. Acoustic treatment materials
Panels, curtains, rugs, and bass traps improve audio clarity.
With this setup, you’ll be ready for professional two-person podcasting right from home.
Wireless Mic Placement Techniques for Clear Two-Person Dialogue
Proper placement is crucial for achieving consistent, clean audio from two wireless microphones. Follow these key techniques:
1. Maintain consistent mic distance
Each host should speak 4–6 inches from the microphone. Wireless handheld or dynamic mics offer great off-axis rejection, helping you reduce room noise.
2. Angle microphones slightly off-center
This reduces plosives and improves clarity.
3. Avoid mics pointing toward reflective surfaces
Hard walls or windows create unwanted reverb. Position mics facing curtains or acoustic panels.
4. Keep hosts facing each other—but angle the mics away
This reduces bleed between microphones and keeps each voice isolated.
5. Use identical mic models when possible
Matching mics provide uniform sound tone, making editing and balancing much easier.
6. Avoid overlapping mic pickup zones
Wireless dynamic mics generally have cardioid patterns, so placing them correctly minimizes interference and cross-pickup.
If both hosts maintain consistent proximity and mic angles, your wireless setup will produce clear, balanced dialogue.
How to Connect Wireless Microphones to Audio Interfaces or Mixers
Connecting wireless microphones to an audio interface or mixer is easier than many beginners assume. Follow these steps:
1. Set up the wireless receiver
Power on the receiver and ensure it’s paired with the microphone transmitter. Many modern systems connect automatically.
2. Choose the correct output type
Wireless receivers typically have:
-
XLR outputs (preferred for best sound quality)
-
1/4-inch TRS outputs
-
USB outputs (for direct computer connection)
3. Connect to an audio interface or mixer
Plug each microphone receiver into separate channels. This gives better control over levels and processing for each host.
4. Set proper gain levels
Start with low gain and gradually increase until each host’s voice peaks at around -6 dB on the meter.
5. Activate monitoring
Use headphones to check for hum, interference, or clipping before recording.
6. For USB-only wireless receivers
Connect them directly to your laptop and choose the correct microphone input in your recording software.
A well-connected system ensures stable and noise-free recording, even in longer podcast sessions.
Recording Software and Workflow for Two-Person Wireless Podcasting
After connecting your mics and setting up your studio, you'll need a streamlined software workflow to ensure reliable recordings.
The most popular recording software options include:
-
Audacity – Free, beginner-friendly
-
Adobe Audition – Professional-grade editing tools
-
GarageBand – Great for Mac users
-
Reaper – Affordable and powerful
-
Hindenburg Journalist – Designed for podcasters
Recommended workflow for two-person wireless podcast recording:
1. Set separate recording tracks
Record each host’s mic on its own track for easier editing and level balancing.
2. Monitor live audio
Keep headphones on to catch issues like popping, clipping, or background noise.
3. Use noise reduction tools sparingly
Good mic placement and soundproofing reduce the need for heavy processing.
4. Add compression and EQ
Light compression smooths out volume differences. Basic EQ enhances clarity and warmth.
5. Export in high-quality formats
WAV for editing and MP3 (128–192 kbps) for podcast distribution.
6. Create a repeatable workflow template
This saves time and keeps your sound consistent across episodes.
With the right workflow, even beginners can achieve professional audio quality from home.
FAQs:
1. What are the best wireless microphones for a two-person podcast at home?
Look for wireless systems, dynamic mics, and models with built-in noise reduction, just like Maono PD200W.
2. How do I connect two wireless mics to one audio interface or mixer?
Use two separate wireless receivers, each plugged into its own channel.
3. Is a wireless microphone setup better than wired for home studios?
Wireless offers flexibility and mobility, while wired may provide a slightly cleaner signal. Both can work well.
4. Do I need soundproofing if I’m using high-quality wireless microphones?
Yes—acoustic treatment improves clarity and reduces echo.
5. How do I prevent signal dropouts or interference with wireless mics?
Keep receivers in line of sight and avoid overlapping frequencies.
6. What room size is ideal for a two-person podcast setup?
Small to medium rooms with soft furnishings work best.
7. Can I start a two-person podcast on a budget using wireless microphones?
Absolutely—there are many beginner-friendly wireless mic systems.
8. What other gear do I need besides microphones?
You’ll need a mixer or interface, headphones, mic stands, and recording software.
9. Which podcast mixers work best with wireless microphone systems?
Mixers with dual XLR inputs, built-in gain control, and noise suppression features are ideal.
10. How do I connect wireless microphones to a laptop?
Use the interface or mixer as the input device in your recording software.
11. What software should beginners use?
Audacity and GarageBand are simple and free.
12. How do I match audio levels between two wireless mics?
Adjust gain on your mixer or interface until both hosts peak evenly.
13. Do I need pop filters with wireless microphones?
They help reduce plosives—use foam windscreens or external pop filters.
14. How far can wireless microphones be from the receiver indoors?
Most systems work well within 10–30 meters depending on obstructions.
15. What backup recording options should I have?
Use a portable recorder or set up a secondary recording track.
16. Should I invest in acoustic foam or diffusers?
Foam reduces reflections; diffusers scatter sound. Both help.
17. How do I create consistent sound quality for multiple episodes?
Use the same settings, environment, and recording workflow each time.
Conclusion
Setting up a two-person home podcast studio with wireless microphones gives you flexibility, mobility, and professional-quality sound—all from home. By treating your room acoustically, choosing the right equipment, and mastering wireless mic placement, you’ll deliver clean, engaging audio in every episode. With the growing availability of wireless systems—from mobile-friendly choices like the iPhone external wireless microphone to camera-ready tools like the best wireless mic for DSLR—you can build a powerful studio setup that fits your workflow and budget.