Since the establishment of Maono, its USB microphone series has been favored by users from different countries. Among them, the Maono A04—is a USB condenser microphone that has become a top choice for laptop users and is frequently recognized as the best Maono USB microphone for laptop 2026. Earning the title of “Best Seller” on Amazon in the United States, Canada, and several other countries, the A04 continues to stand out. If you’re searching for an honest Maono microphone review, this section also serves as a Maono A04 review and setup tips reference, as the A04 remains one of the most reliable and widely trusted options available.
The world of USB microphones for laptop users has expanded significantly, offering more choices for creators, students, and professionals who need high-quality audio on the go. Among the top recommended models in the latest Maono USB microphone lineup are the MAONO PD200X and MAONO PD300X—dynamic USB/XLR microphones known for their versatile performance. These models complement the well-loved Maono microphone A04 and PM422, showcasing standout Maono PM422 USB microphone features such as onboard gain control, zero-latency monitoring, and a robust cardioid pickup pattern that enhances voice clarity for laptop-based setups.
The Maono PD200X offers a balanced, studio-ready sound with dual USB and XLR connectivity, making it ideal for podcasts, recordings, and virtual meetings. Meanwhile, the Maono PD300X enhances this with a robust all-metal design and multi-level noise reduction for even cleaner audio capture.
With these options, laptop users can easily elevate their online classes, streaming sessions, or virtual collaborations using plug-and-play simplicity combined with professional performance.
Why Choose a Maono Mic USB Microphone?
As remote meetings, online learning, and hybrid workflows continue to expand in 2026, choosing the best Maono USB microphone for laptop 2026 has become essential for achieving clear, professional-sounding audio. Maono USB microphones are designed with true plug-and-play convenience, connecting directly to Windows and macOS laptops through modern USB-C or USB-A ports without the need for extra drivers. This makes them ideal for users looking for a complete Maono USB mic setup guide for laptops that works seamlessly across platforms.
Whether you’re attending virtual classes, hosting video conferences, podcasting, or recording on the go, Maono condenser and dynamic microphones deliver rich, detailed voice capture that keeps up with upgraded laptop hardware standards and advanced USB audio technology in 2026.
Maono Mic Setup: Quick Start Guide for Laptop Users
Setting up your Maono USB mic is simple and beginner-friendly. Whether you’re using the Maono PM422 or A04, this USB microphone setup Windows/Mac laptop guide will get you started in minutes:
-
Connect via USB: Plug the USB-A or USB-C connector into your laptop.
-
Select as Input Device: Go to your sound settings (Windows/Mac) and choose “Maono Microphone” as your default input.
-
Adjust Gain & Volume: Use the gain knob or Maono Link software to control levels.
-
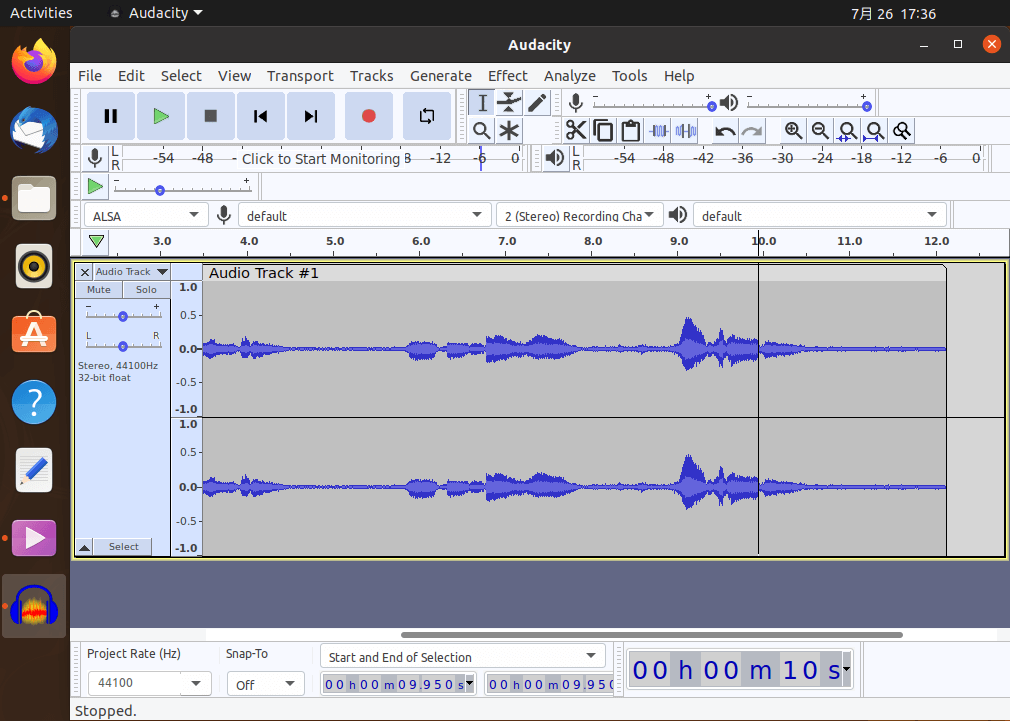
Test Recording: Open a recording app like Audacity or Zoom to test clarity.
-
Position Mic Correctly: Use a boom arm or tripod and keep the mic 6–12 inches from your mouth.
For beginners, the AU-A04 doubles as an affordable Maono mic for beginners, offering excellent sound without the complexity of professional studio gear.
Troubleshooting and Optimizing Your USB Microphone for Laptop: Solutions for Common Issues and Setup Tips
Even with plug-and-play convenience, occasional issues can arise. This section doubles as a practical Troubleshooting Maono USB mic on laptop resource, covering common problems such as device recognition, no sound output, background noise, and driver conflicts.
From adjusting USB power management settings to updating audio drivers and optimizing gain levels, these step-by-step solutions help ensure your Maono microphone performs reliably on modern Windows, macOS, and even Linux laptop systems.
By following these tips, users can quickly resolve setup issues and enjoy consistent, professional-quality audio for online classes, meetings, podcasting, and content creation in 2026.
This user guide is mainly divided into 5 parts, they are these 5 common issues and how to solve them:
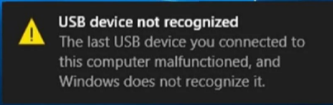
1. PCs do not recognize the USB microphones
2. PCs recognize the USB microphones but there is no sound
3. Noise problem of USB microphones
4. Tutorial for Equalizer, an audio enhancement&noise reduction software
5. USB microphone setup guide for Linux system
I hope the following guide can help you.
1. PCs do not recognize the USB microphones
Method 1: Disconnect the USB microphone from the PC and restart the PC
You can disconnect the USB microphone from the PC and restart the PC. After restarting, reconnect the USB microphone to the PC, and if it is not recognized by that particular USB port, try another port. If that microphone is recognized by a different USB port, there may be a hardware problem with one of the USB ports. It is probably something else if none of the USB ports recognize the microphone, so read on.
If the above method does not solve the problem, please turn off the laptop for half an hour (desktop computers can be turned off and unplugged the power cable), wait 15 minutes, and try again.
Method 2: Change the Property of the USB Root Hub
First, open “Device Manager”, expand “Universal Serial Bus Controllers”, and right-click “USB Root Hub”-“Properties”.
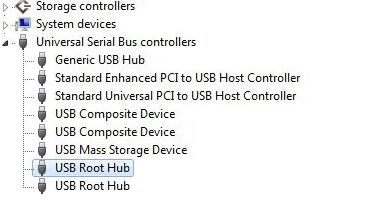
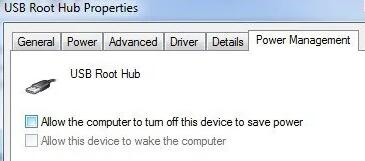
Second, click the “Power Management” tab, and uncheck the “Allow the computer to turn off this device to save power” box. If there is more than one USB root hub listed, you need to repeat the above steps for each one and then restart your PC.
Reconnect the USB microphone and check if it is recognized. If not, go back to the Power Management tab for each and check the box.
Method 3: Uninstall Hidden Devices
In the default situation, Device Manager does not display all devices installed on the system. Some hidden or ghost USB devices may conflict with the current USB microphone. To show hidden devices in Device Manager, first, open a command prompt and then enter the following two commands:
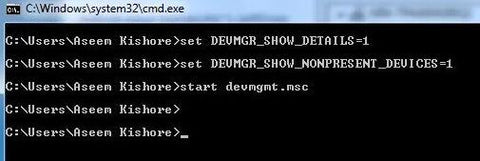
set DEVMGR_SHOW_DETAILS=1
set DEVMGR_SHOW_NONPRESENT_DEVICES=1
start devmgmt.MSc
After the Device Manager is loaded, you need to click “View” and then click “Show Hidden Devices”.
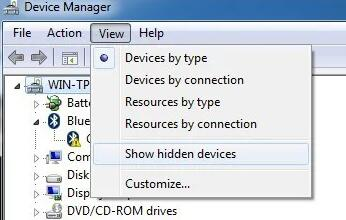
Then, expand “Imaging Devices”, “Universal Serial Bus Controllers”, and “Unknown Devices”. If you see a grayed-out device or an unknown device, right-click on it and select “Uninstall”.
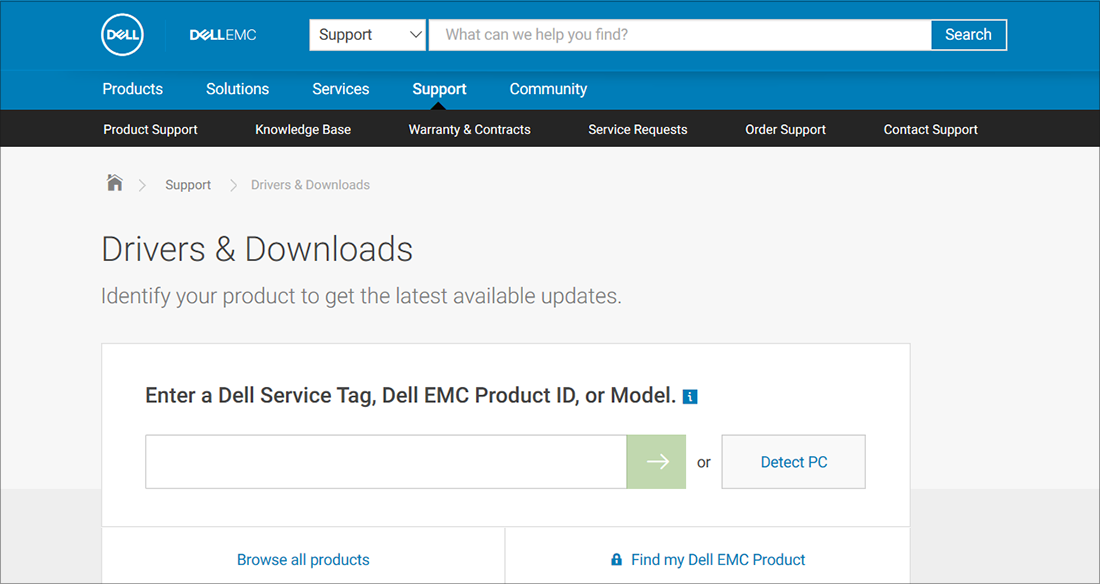
Method 4: Download the Audio Driver Provided by the Device Manufacturer’s Website
If the above steps do not solve your problem, visit the device manufacturer’s website and install the latest audio/sound drivers for your device. Below is an example of a sound device manufacturer’s driver download page.
If the audio worked before running the Windows update and it doesn’t work now, please roll back the audio driver.
Here are the steps:
1. Enter the Device Manager in the search box on the taskbar and select it from the results.
2. Select the arrow next to the “Sound, Video, and Game Controllers” to expand it.
3. Right-click the listing for your USB microphone, and select “Properties”.
4. Click the “Driver” tab, and then select “Roll Back Driver”.
Connect your mic to another PC, and if it does recognize the mic correctly, then reconnect it to the original PC. If the microphone is only recognized on the other PC, after connecting the USB mic to it successfully, then eject the USB correctly from that PC. The mic may suddenly start being recognized on the original PC.

2. PCs recognize the USB microphones but there is no sound
Method 1: Check the Speaker Output
If there are multiple audio output devices, check that you have selected the right one.
1. Select the speaker icon on the taskbar.
2. Select the arrow to open the list of audio devices connected to your PC.
3. Check the mute status.
4. Check if your audio is playing to your preferred audio device, such as an earphone or a speaker.
Method 2: Check Cables, Plugs, Jacks, Volume, and Speaker and Headphone Connections
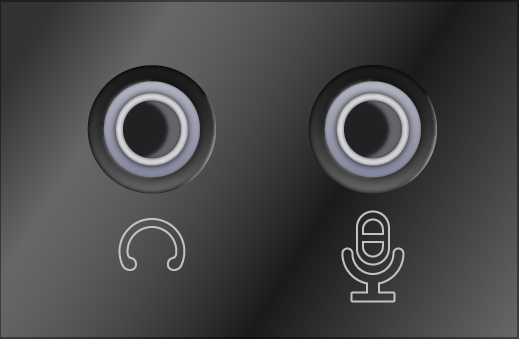
1. Check for loose wires at the speaker and headphone connections. Please remember to plug in all the wires.
2. Make sure the speaker is turned on and check the volume level.
3. Make sure the mute setting is not on and turn up all volume controls. (Keep in mind that some speakers and applications have volume controls. So check them all.)
4. Try to connect the speaker and headphones to different USB ports.
5. The speaker may not work when the headphones are connected to the PC. Unplug the headphones and see if it helps.
Method 3: Check the USB Microphone
The Settings app in Windows 10 has several options to disable your microphone system-wide and in all applications. Desktop applications will not be able to receive microphone input if your webcam is disabled in Settings.
App permissions in Settings-Privacy typically only affect new Store apps (also known as Universal Windows Platform apps or UWP apps). However, the webcam and microphone options also affect desktop apps.
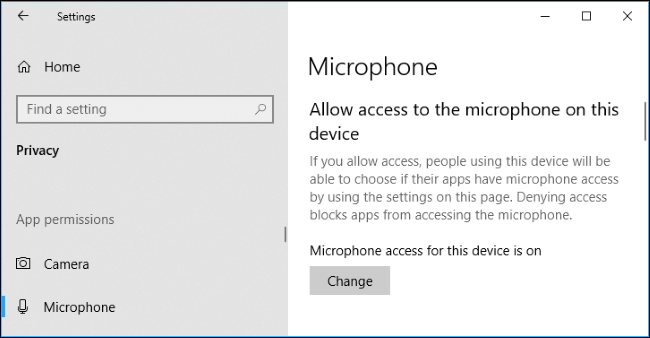
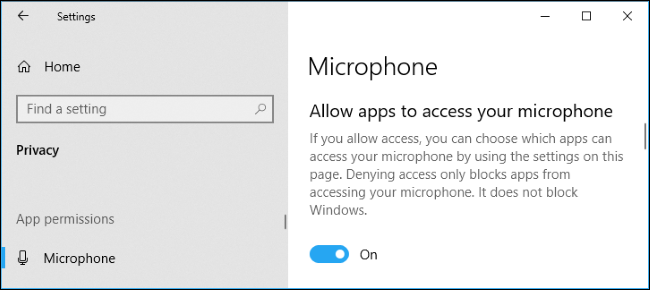
If your microphone is not working, go to “Settings”-“Privacy”-“Microphone”. Then check that it says “Microphone access for this device is on”. If it shows “off”, please change it to “on”. If access is off, Windows and all applications on the system will not be able to access the audio from the microphone.
Next, please remember to set “Allow apps to access your microphone” to “on”.
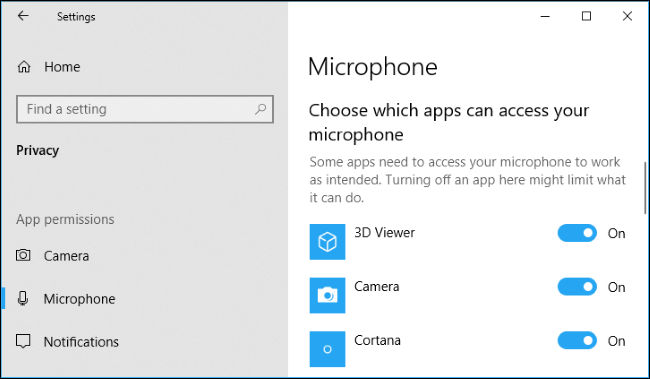
Under “Choose which apps can access your microphone”, make sure that the application that needs to access your microphone is not set to “off”. If it shows “off”, please change it to “on”.
Only new applications from the Store are displayed here. However, the legacy desktop applications from outside the Store will never be displayed in this list and will always have access to your microphone as long as the “Allow apps to access your microphone” is set to “on”.
Method 4: Select to replace Sample Rate and Bit Depth
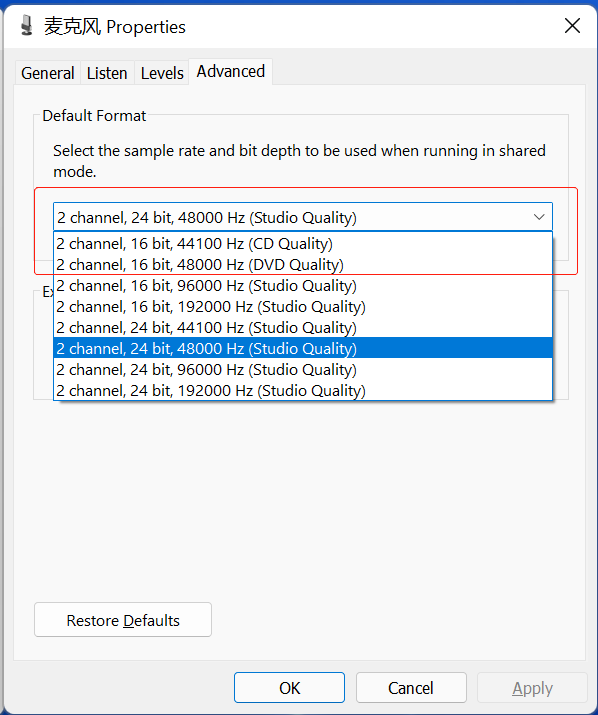
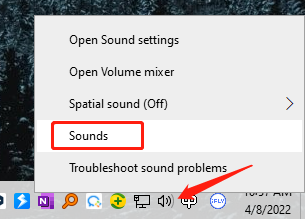
1. Right click on the Sound icon and click the “Sounds”.

2. Click the “Recording”-“Properties”-“Advanced”.
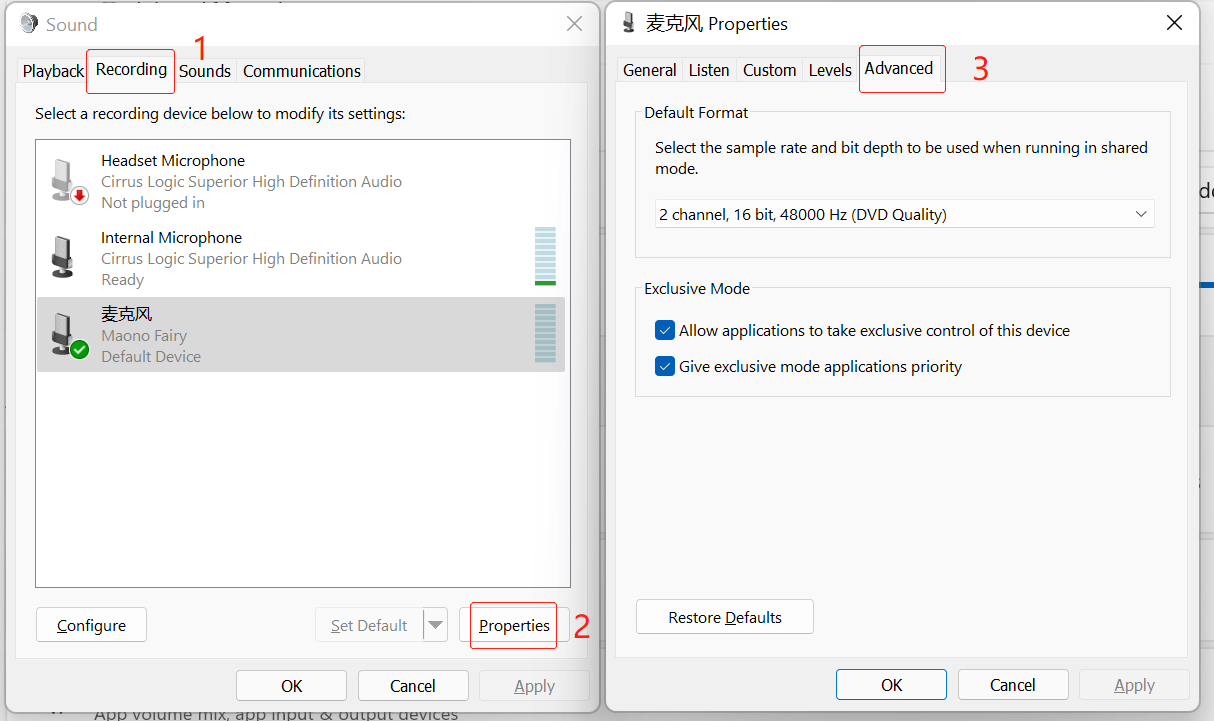
3. Select to replace sample rate and bit depth and then test to see if it works.
Method 5: Adjust the sound level
1. Right-click the Sound icon and click the “Sounds”
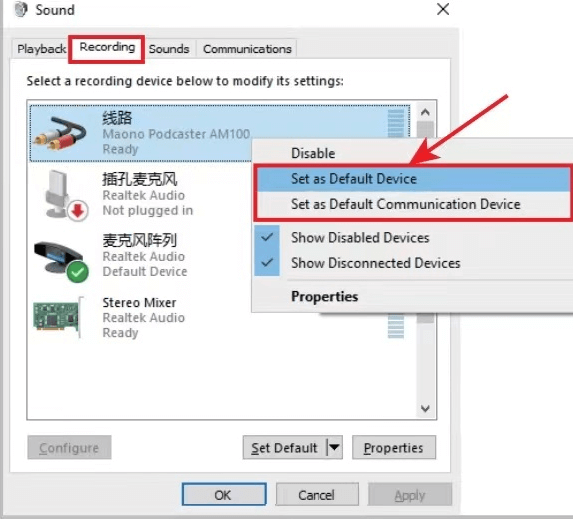
2. Set the microphone as a default recording device in the “Recording” of the “Sounds” setting.
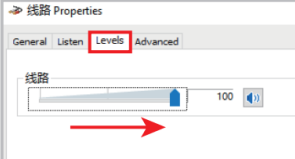
3. Double click “Maono Microphone” and go to “Properties”, then select “Levels” and set it to 100.
Method 6: Check sound settings
Make sure your audio devices are not muted and not disabled.
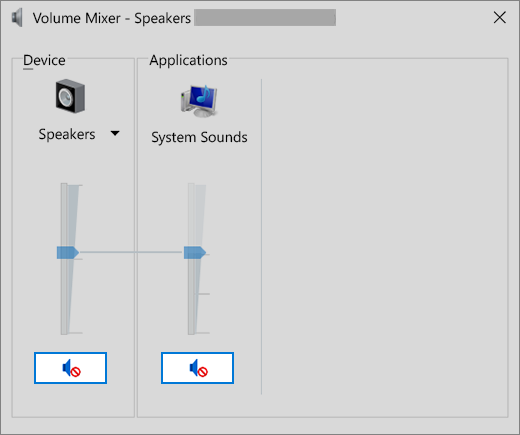
1. You need to right-click the Speaker icon on the taskbar, then open Volume Mixer.
2. You will see a series of volume controls for your devices. Ensure that none of them are muted. You will see a red circle with a line next to the volume control if any of them are muted. In this case, select the volume control to unmute.
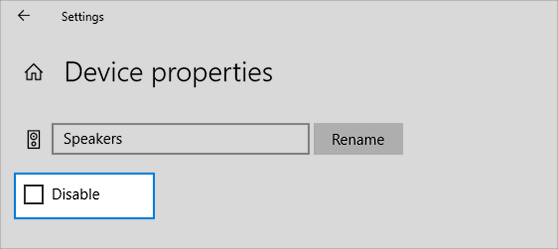
3. Make sure your devices have not been disabled by mistake. Click Start-Settings-System- Sound.
4. Next, select your audio device, and then select Device Properties. Make sure select Device Properties for both output and input devices.
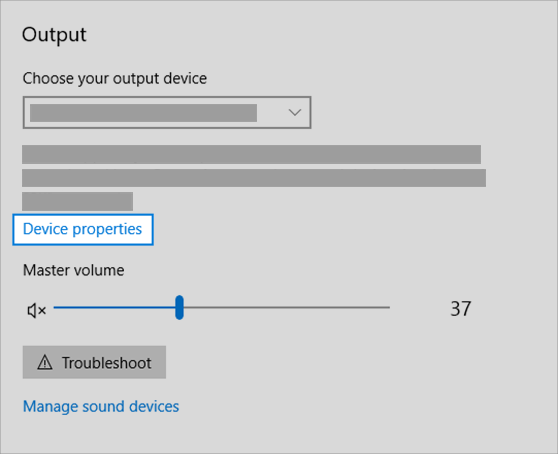

5. Ensure that the Disable check box for output and input devices is cleared.
Method 7: Fix the audio drivers
Outdated or malfunctioning drivers may cause hardware problems. Be sure the audio driver is up to date, and update it if necessary. If this doesn’t work, please uninstall the audio driver (it will automatically reinstall). If this doesn’t work, please use the generic audio driver that comes with Windows. If you meet audio problems after updating, please roll back your audio driver.
A. To automatically update the audio drivers
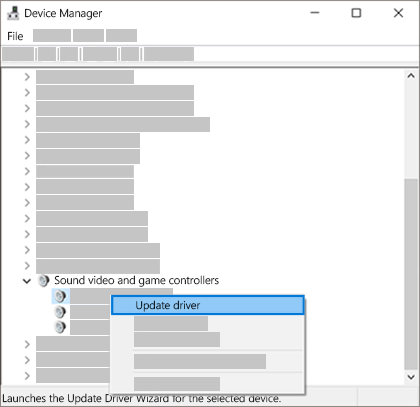
1. Enter Device Manager in the search box on the taskbar, and then select it from the results.
2. Expand the Sound video and game controllers.
3. Right-click on the list of sound cards or audio devices (headphones, speakers, etc.), select Update driver, and then select Search automatically for updated driver software. Complete the update according to the guide.
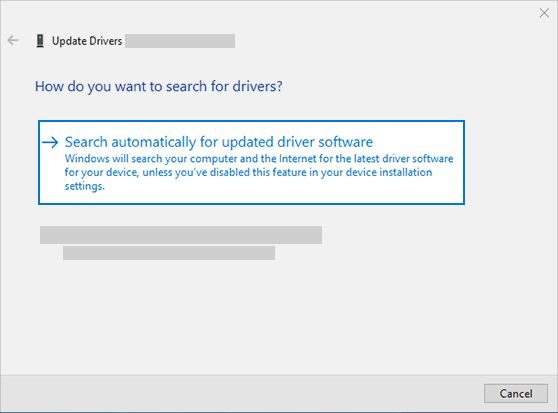
If Windows does not find a new driver, find one on the device manufacturer’s website and follow the guides. If this doesn’t work, please uninstall your audio driver.
B. To uninstall your audio driver
1. Enter Device Manager in the search box on the taskbar, and then select it from the results.
2. Expand the Sound video and game controllers.
3. Right-click the listing for your sound card or audio device and select Uninstall device. Next, select the check box of Delete the driver software for this device, and then click Uninstall.
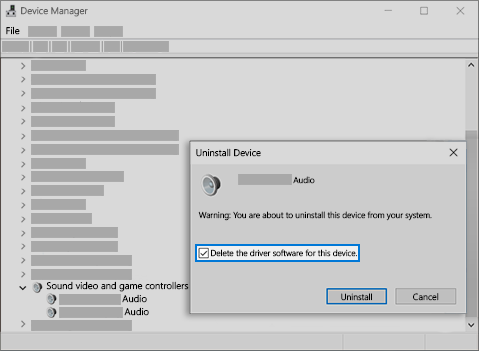
4. Restart your PC. Please remember to save your files and any other current work before restarting. This restart will let the PC to reinstall the audio driver automatically. Select “Start”-“Power”-“Restart” to restart.
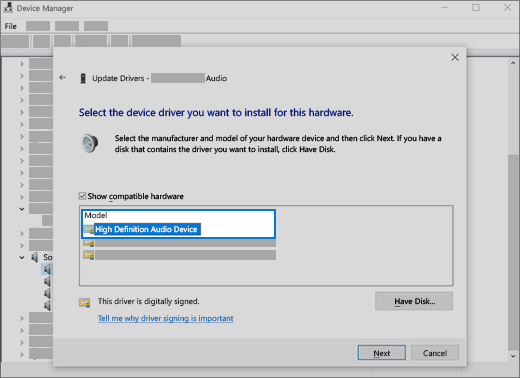
If the above steps don’t work, please use the generic audio driver that comes with Windows according to the following steps.
1. Enter Device Manager in the search box on the taskbar, and then select it from the results.
2. Expand the Sound video and game controllers.
3. Right-click the listing for your sound card or audio device, then select “Update driver”-“Browse my computer for driver software”-“Let me pick from a list of device drivers on my computer”.
4. Next, select the audio device for which you want to update the driver, select “Next”, and then update it according to the guides.
If the above steps do not solve your problem, please visit your device manufacturer’s website and install the latest audio or sound drivers for your device. The image below is an example.

If your audio doesn’t work, but it was working before you run the Windows Update, please roll back your audio drivers.
C. To roll back the audio driver
1. Enter “Device Manager” in the search box on the taskbar, and then select it from the results.
2. Expand the “Sound video and game controllers”.
3. Right-click the listing for your sound card or audio device, then select “Properties”.
4. Select the “Driver” tab, then select “Roll Back Driver”.
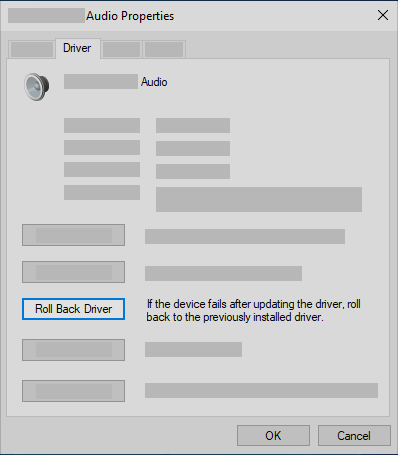
5. Follow the guides and then select “Yes” if you want to roll back the audio driver.
If rolling back the audio driver does not work or is not an option, you can try restoring your PC from a system restore point.
D. To restore your PC from a system restore point
When Microsoft installs updates on your system, we create a system restore point in case something goes wrong. Please try to restore from that point to see if it solves your sound problem. For more information, please check "Restore from a System Restore Point" in the Recovery options in Windows 10.
3. Noise problem of USB microphones
Is your microphone producing a buzzing, hissing, or humming noise? Self-noise is produced by almost all microphones. It can be very noticeable at times and very subtle at others. The buzzing, hissing, or humming sounds may become more noticeable as you add EQ, compression, and other audio effects.
A. How to Stop Your Microphone From Buzzing?
Your microphone may be making noise for a variety of reasons. Noise can be caused by cable issues, electrical issues, or ambient noise in the room.
1. Check that all cables are properly connected or replace the cables to see if the noise problem persists
If the problem persists, please read the troubleshooting guide below to assist you in determining the source of the problem.
2. Check that your recording environment is quiet
Dynamic microphones are directional and less prone to noise problems, but for condenser microphones, this is a big problem, as these types of microphones are more sensitive and more likely to pick up ambient noise.
There is a way to help you determine if your recording environment is quiet. Sometimes you don’t notice the noise, but you will start to notice the slight buzzing once you start mixing.
You can increase the gain of your microphone and start walking around the recording room with the microphone. Monitor the output using headphones. If you find a noise that interferes with your recording, turn off the equipment that is making the noise. If you can’t turn it off, try to keep the microphone as far away from the noise-causing equipment as possible while recording.
Buzzing from air conditioners, lights, fans, or some electronic devices is common. This will affect your recording.
3. Check the cables
You’ve checked your room for background noise and then turned down the preamp gain. You can replace the cables of the microphone and the audio interface with other cables and see if the noise is still there. This can be a direct solution to your audio problem and can save you a lot of time.
This a common mistake made by beginners. When you buy a new cable for your microphone, you need to check the shielding and connectors of the cable, as this is where the quality of the recording will be most affected. Another thing to keep in mind is that if your cable is damaged, it will affect the audio quality. So check your cables regularly for damage.
4. Check your audio interface and preamp or change another USB port.
With XLR mics, if you use preamps or audio interfaces, some preamps and audio interfaces may produce unhealthy signals that can cause humming or buzzing background noise. Make sure your gain is not set too high, try turning your mic gain down and see if the problem is fixed.
For USB microphones, you can try plugging the USB cable into another port on your PC to check if there is still a noise problem.
5. Check your audio software
Sometimes it can be a digital audio workstation that causes the problem. Make sure that all input controls are not too high. You can also download a free digital audio workstation like Audacity and see if the problem still exists.
6. Faulty Hardware
Nowadays, there are relatively few static hardware problems, but they may still happen. For many reasons, hardware wears out and can suddenly break or degrade. The problem is often electrical. It may have been exposed to static electricity which can cause the hardware to degrade over time, causing hardware problems.
The only way to fix the hardware is to have it repaired or replaced. If your microphone still produces a hissing sound, try recording at a low level with all the input options on your audio interface or preamp. If it doesn’t work, try replacing the microphone and see if that solves the problem.
B. The Solutions for Recordings With Background Noise
1. Noise Suppressor Plug-ins
Some digital audio workstations, such as DAW, have noise suppressor plug-ins in their software. It usually helps to remove the noise made by the microphone.
Logic Pro X has a plug-in called Noise Gate. It improves vocal clarity, removes noise, and prevents sounds from passing below a certain threshold. Signals can only be passed at audio levels above the specified threshold. If the signal is below the threshold, the signal will be blocked. This will effectively block the noise.
Another tool is the X-Noise audio plug-in from Wave. Each digital audio workstation has its own plug-in. It's a good idea to research whether your DAW has any suitable plug-ins.
2. EQ can be used to remove the hissing or buzzing sounds
There is no way to completely remove the noise without destroying the audio as it is recorded in the audio wave, but rest assured you can reduce the buzzing or hissing sounds using EQ. While this may interfere with the recording and reduce the sound quality, it is a method that can be tried.
C. Why is the microphone buzzing?
If the microphone is making a buzzing sound, it could be a loose cable connection or a faulty cable. If you have tried to replace the cable and the problem still exists, it may be a microphone that has been damaged internally. If your microphone is still under warranty, please contact us to see if it can be replaced or repaired. Sometimes it can also be a problem with your digital audio workstation, so be sure to check your software to see if it is the source of this problem.
D. Why is the microphone making the whistling sound?
This whistling sound, also called audio feedback, is due to the endless loop produced when the microphone picks up the sound from the speakers (stage monitors or PA speakers) and sends it back to the speakers for amplification and pickup, causing a specific frequency to be boosted, depending on the resonance of the room and speakers, etc.
The solutions to the whistling sound produced by the microphone:
1. Orient the speaker away from the microphone, or place it further away.
2. Lower the speaker volume or microphone gain.
3. Use a unidirectional cardioid microphone, which has a rear-repelling effect, meaning no sound is picked up from behind. Then you can use a speaker facing you in the middle of the recording room.
4. Deliberately create feedback by placing the microphone close to the speaker. When the audio feedback occurs, check the frequency on the real-time analyzer and use a channel EQ or graphic EQ to cut it.
5. You can also use a feedback reducer to improve this situation.
4. Tutorial for equalizer, an audio enhancement & noise reduction software
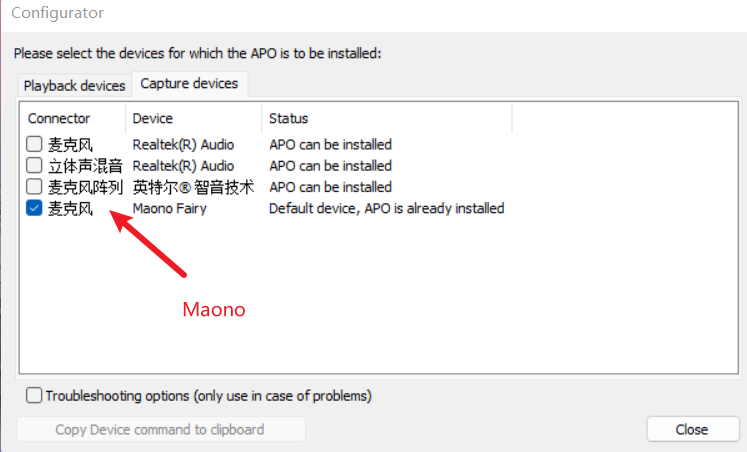
1. Install the ‘Equalizer’.

2. Click the selected Microphone and speaker.
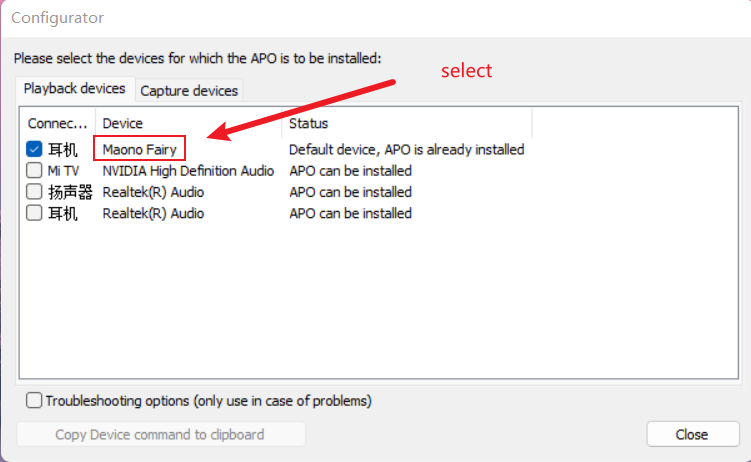
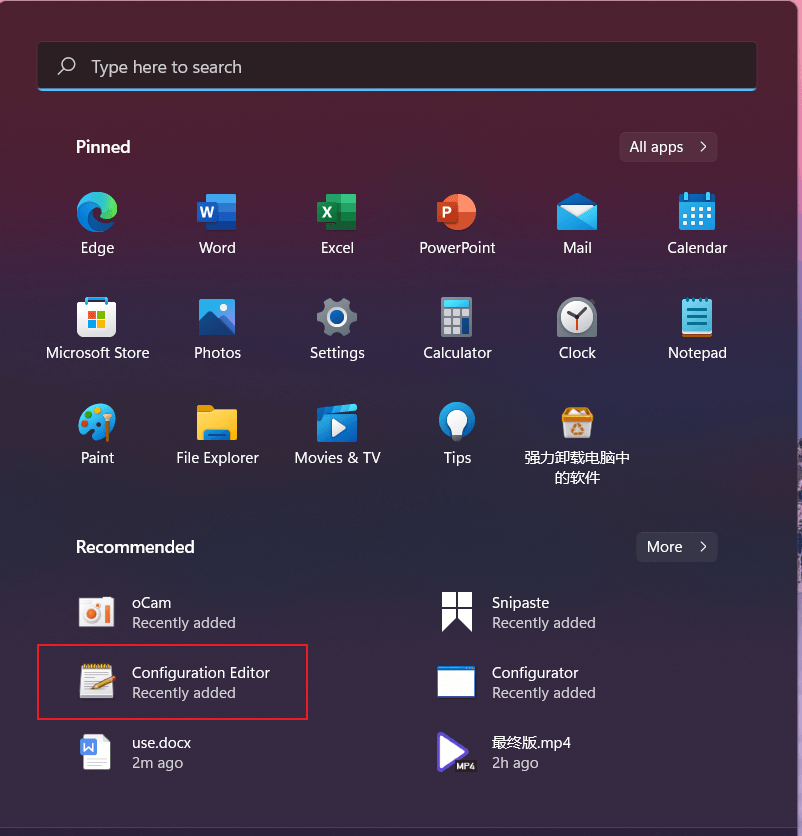
3. Restart your PC.
4. Click the ‘Configuration Editor’.
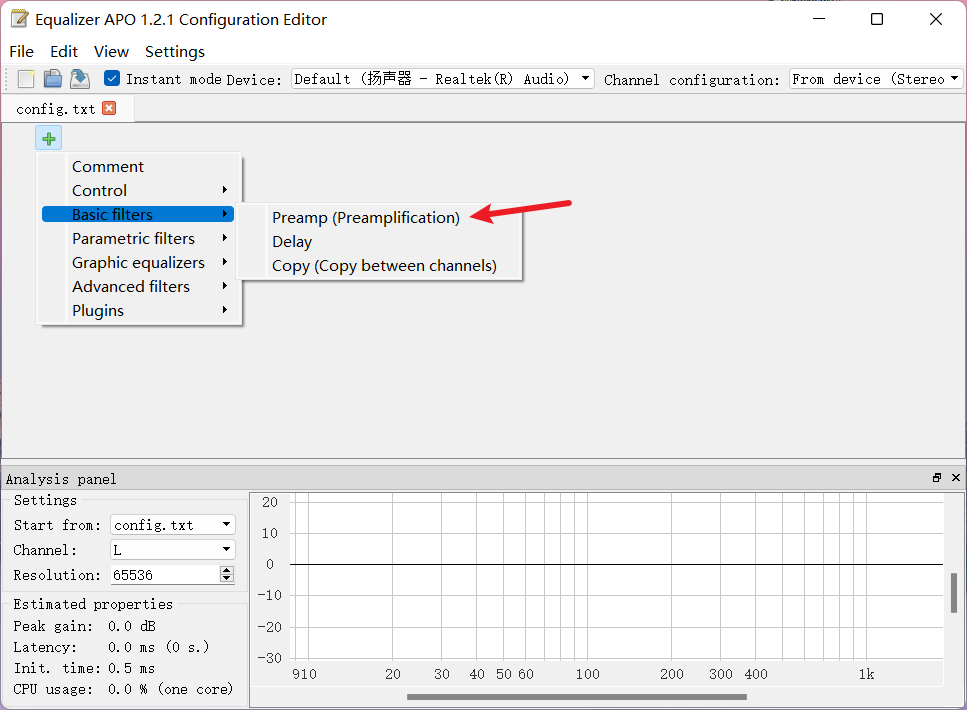
Raise your voice:
1. Add ‘Preamp (Preamplification)’ in ‘Basic filters’.
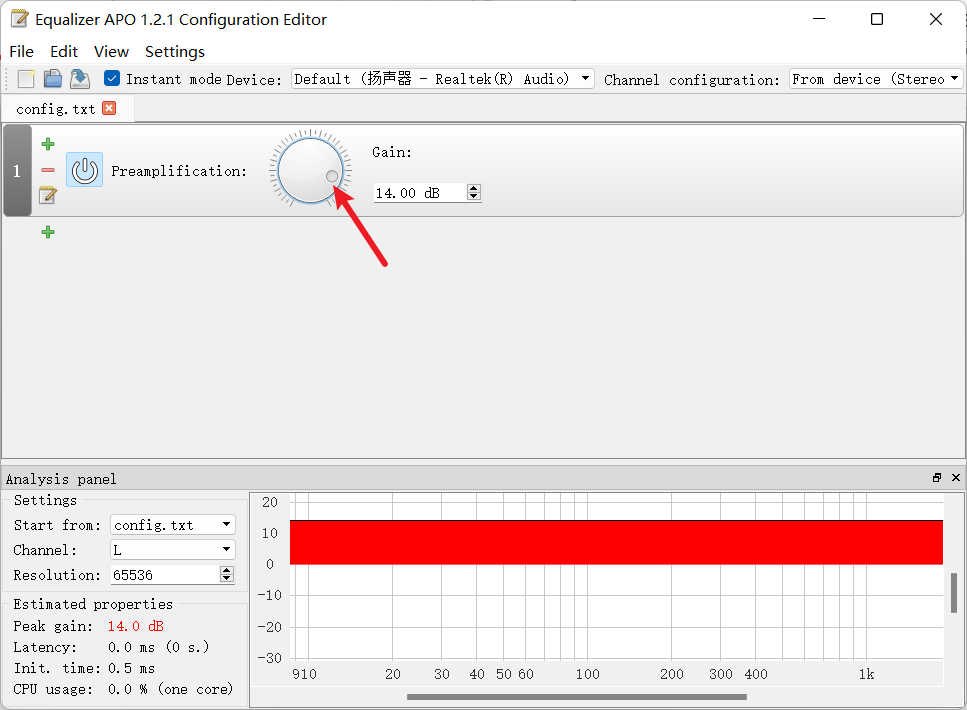
2. Please turn the knob clockwise to enhance your voice.
Noise cancellation for your voice:
1. Select add ‘VST plugin’
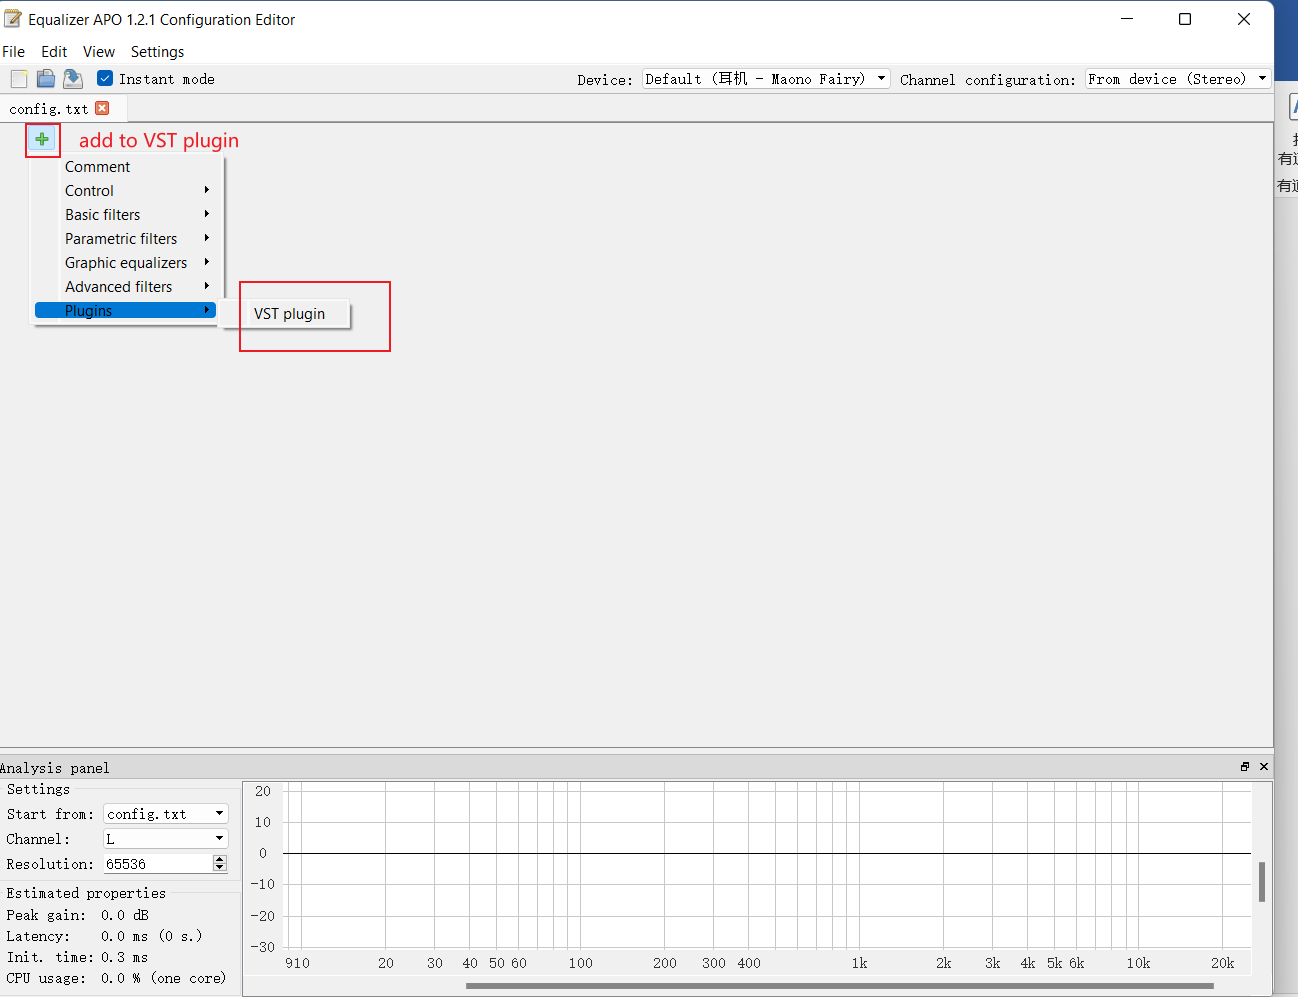
2. Click the folder
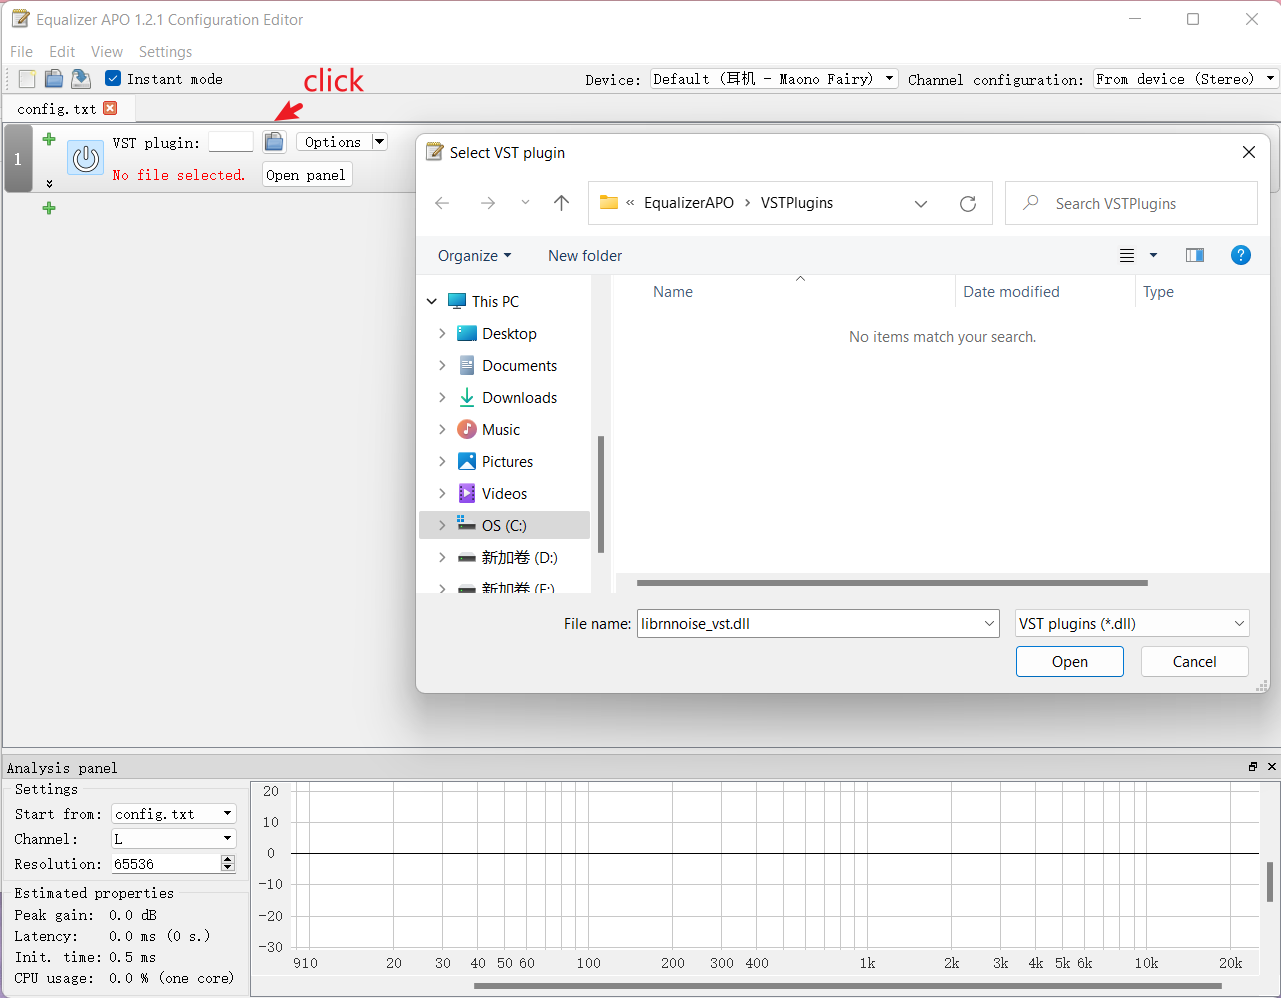
3. Copy profile to the application list
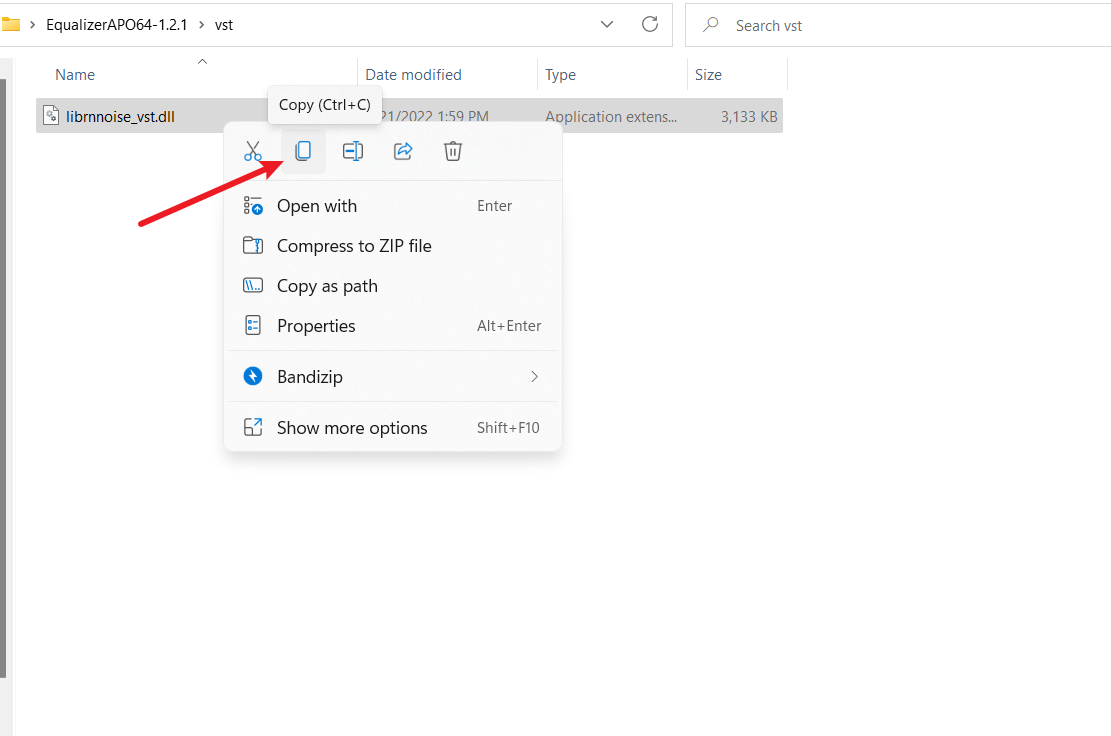
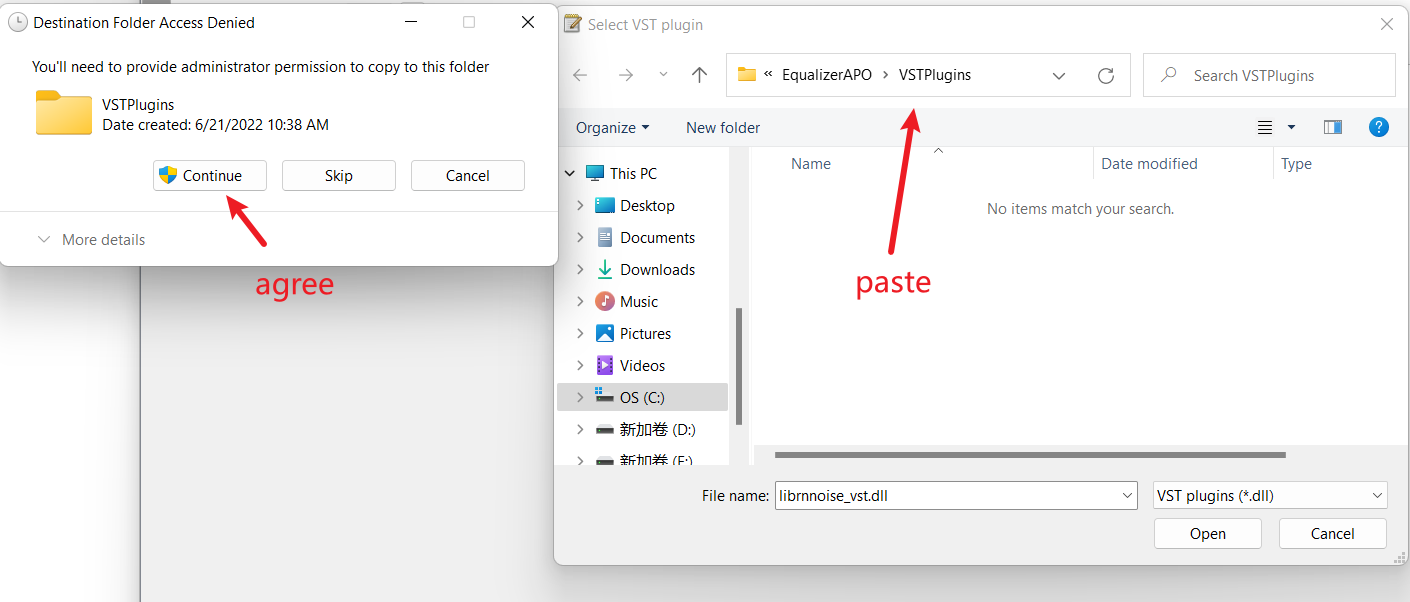
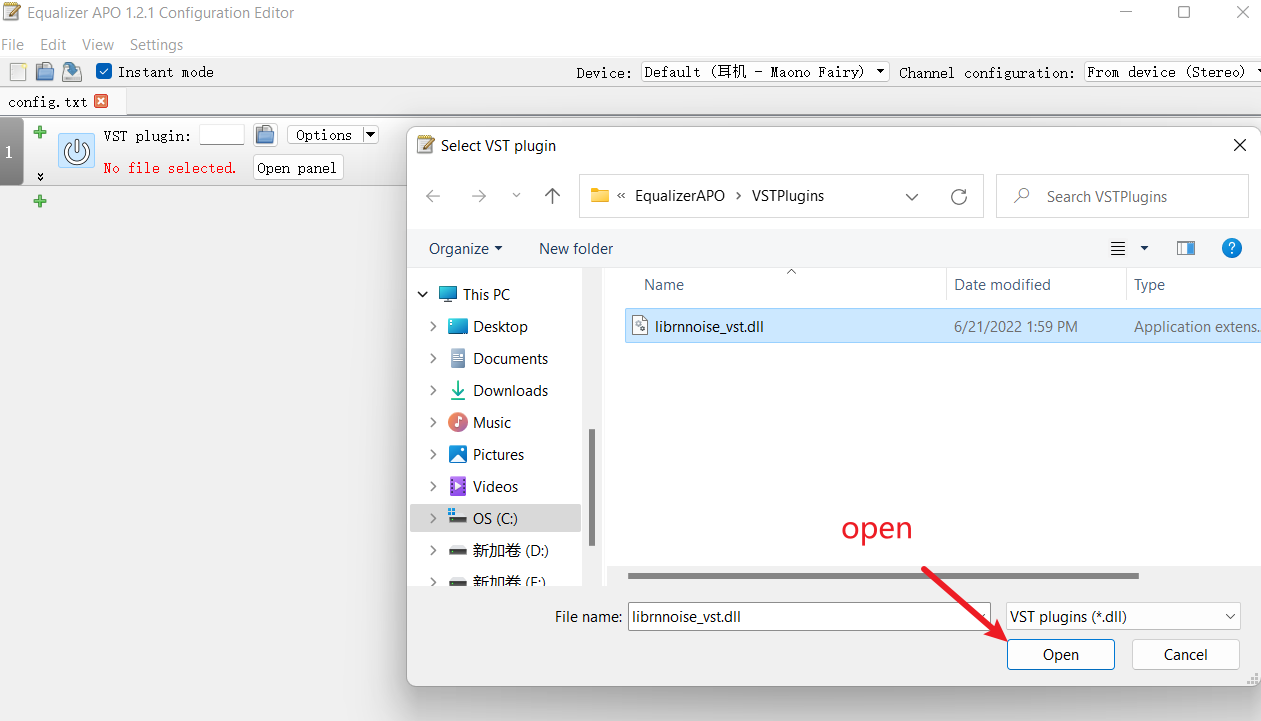
4. This is the successfully set up interface
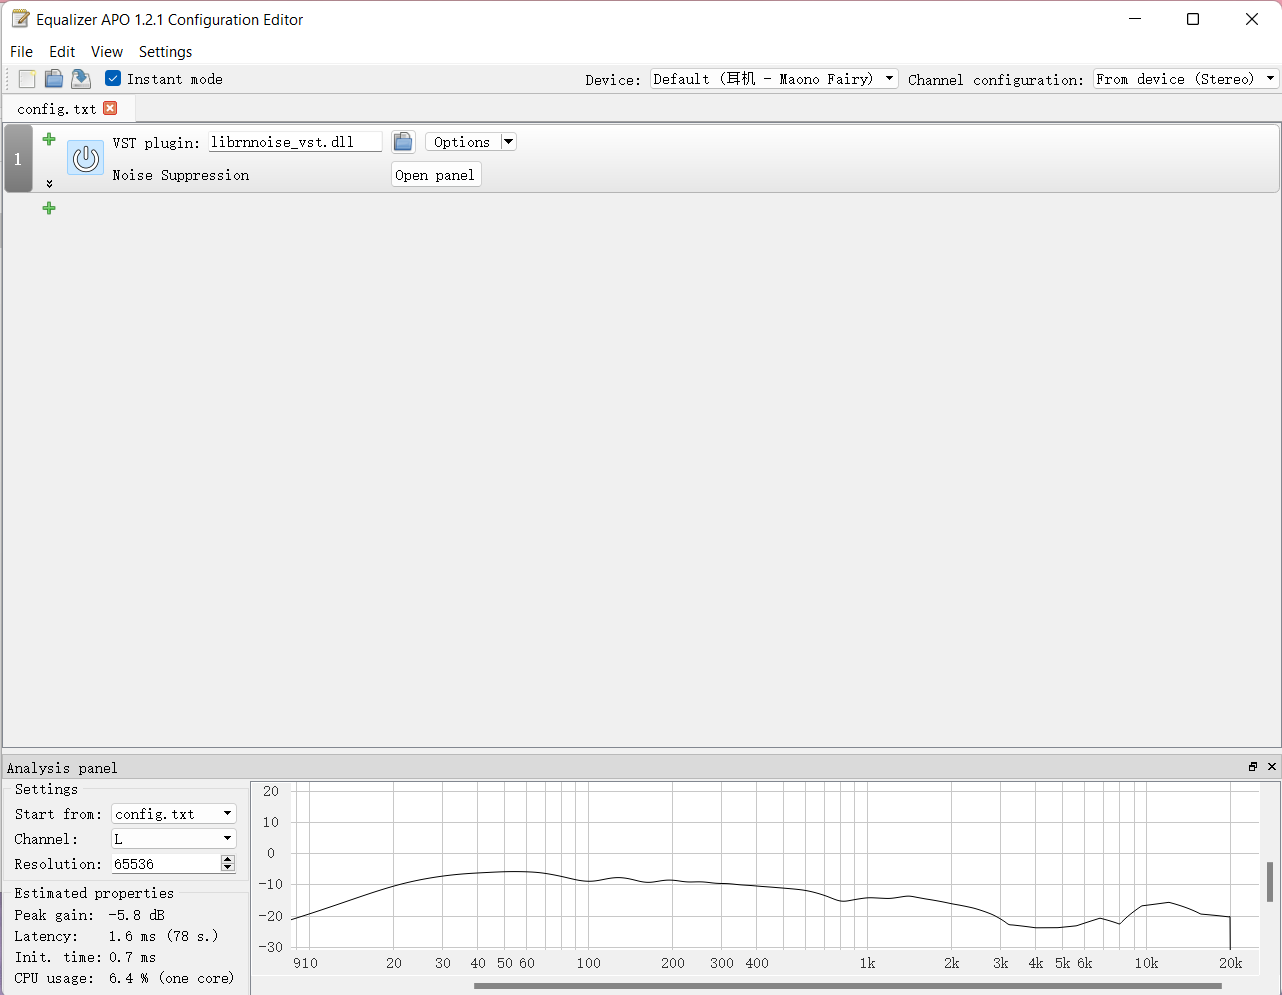
*Both functions can be used simultaneously
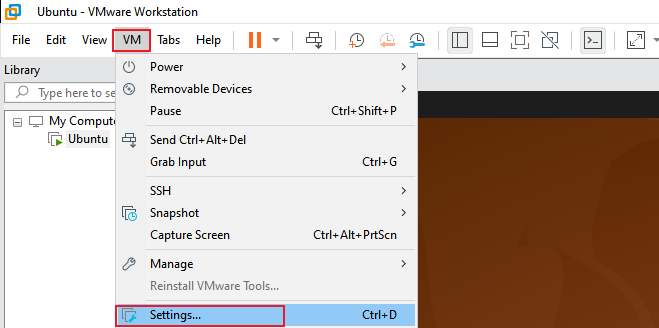
5. How to set up a USB microphone on a Linux system?
*The host computer is available to use the microphone before using VMware (Linux).
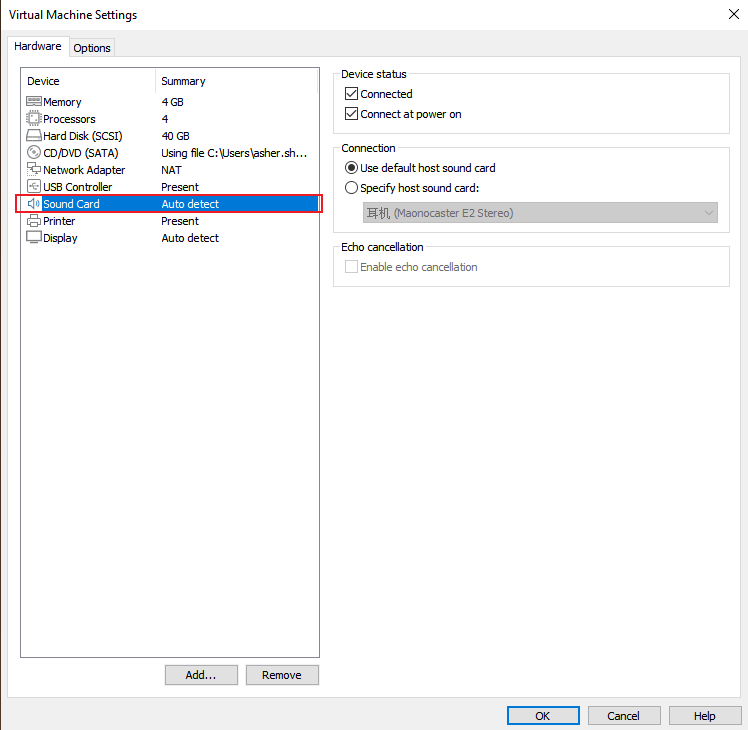
1. Open ‘VMware’-then select ‘Settings’.
2. In the USB controller tab, choose USB 2.0 in the ‘USB compatibility’ and click ‘OK’.
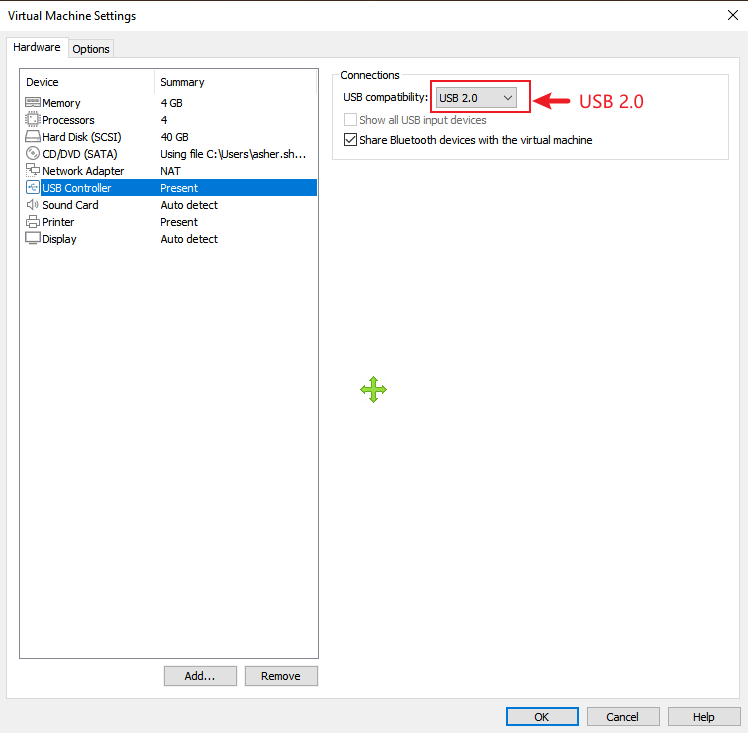
3. In the sound card, select ‘Use default host sound card’.
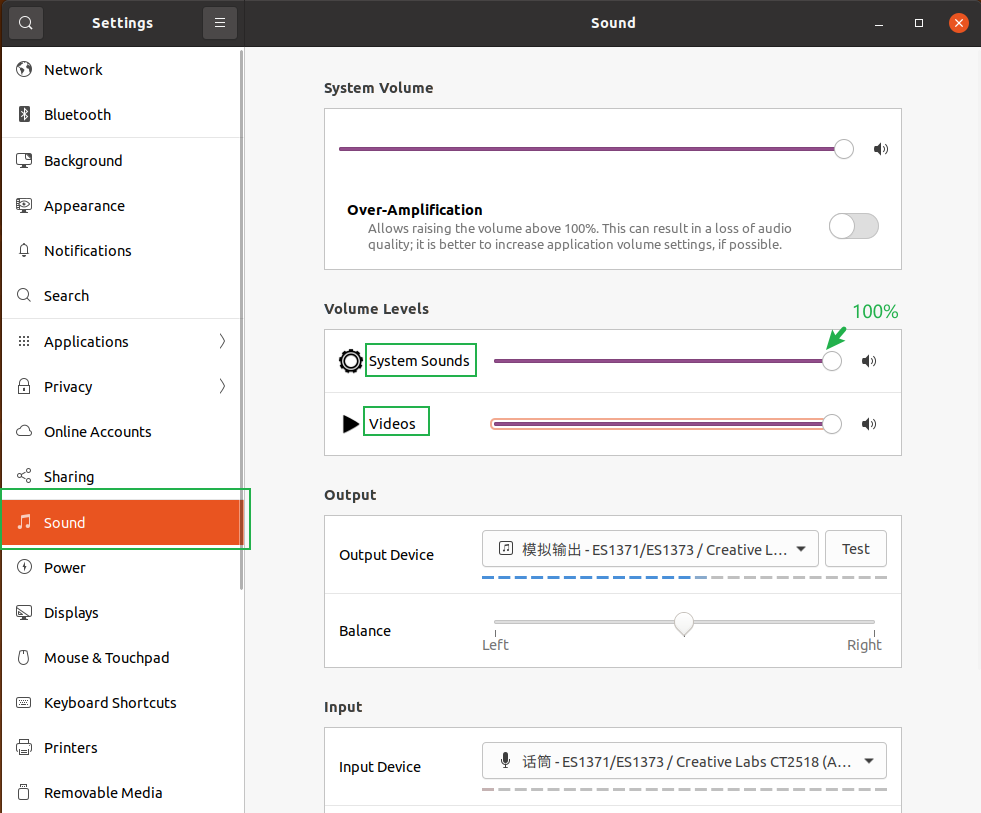
4. Output: After entering the Linux (Ubuntu) system, go to Settings and click on the Sound tab. Please adjust the volume level to 100%.
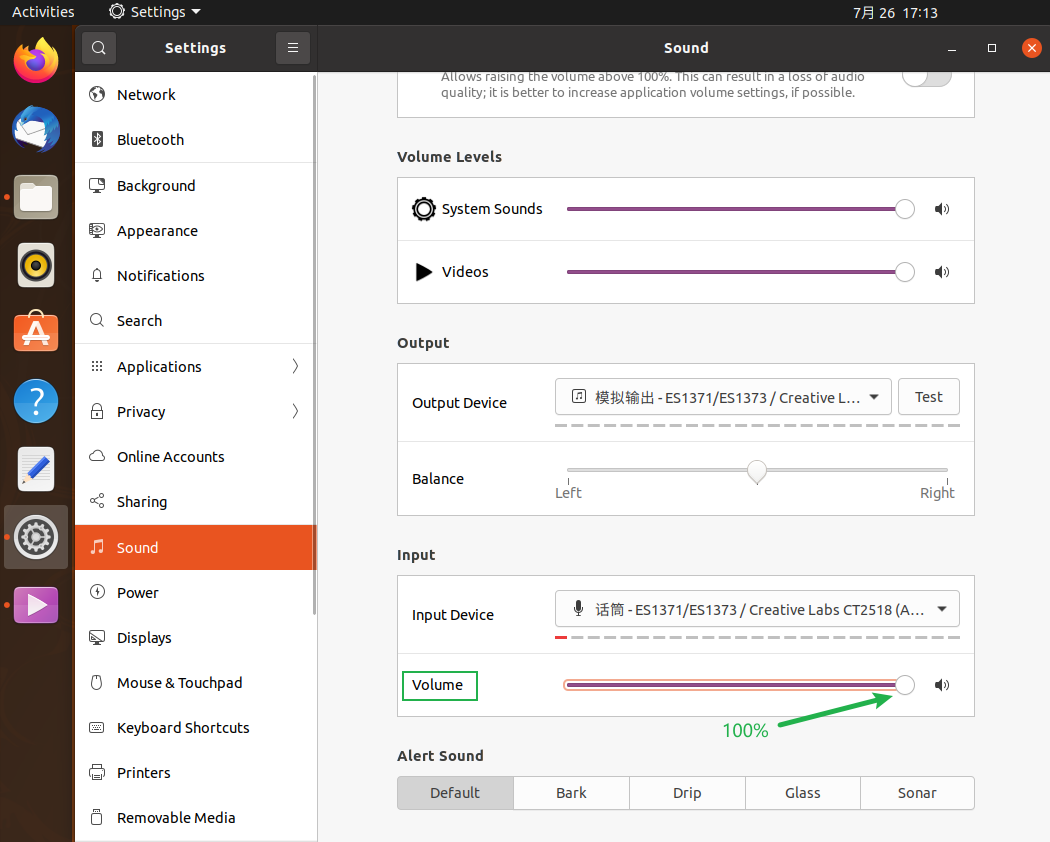
5. Adjust the Volume level to 100% in ‘Input’.
6. Speak to the microphone to test if it works.
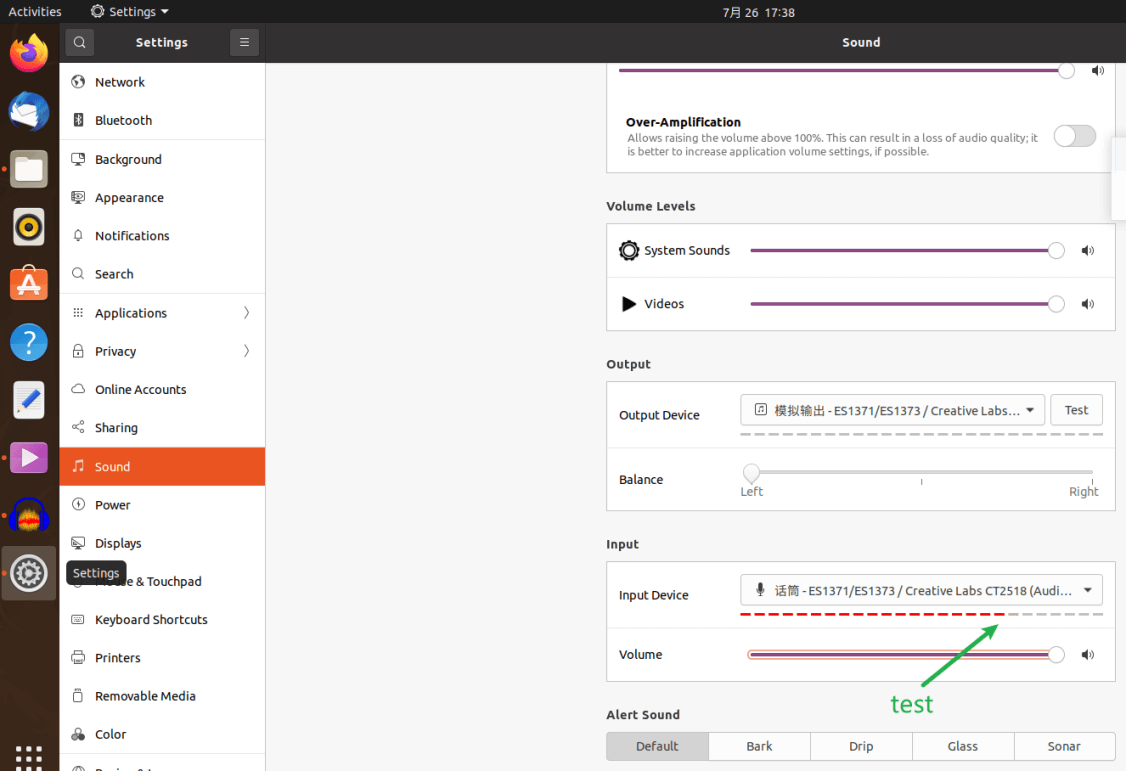
7. If it works, you can record your voice using Audacity.
How USB Microphones Work with Laptops: A Quick Guide
USB microphones are a popular choice for laptop users due to their simplicity, affordability, and high-quality audio. Unlike traditional microphones that require separate audio interfaces or sound cards, USB microphones are plug-and-play devices. They connect directly to your laptop via a USB port, and the sound is processed through the laptop's built-in software or third-party recording applications.
When you plug in a USB microphone, your laptop recognizes it as an audio input device, and you can immediately start recording or streaming. This eliminates the need for complex setups, making it perfect for beginners, podcasters, content creators, and professionals on the go.
Advantages of USB Microphones: Best Mic for Laptops
-
Ease of Use: USB microphones are incredibly user-friendly. There's no need for external audio interfaces, mixers, or phantom power. Just plug it in, and you're good to go.
-
Portability: Since they don't require additional equipment, USB mics are ideal for laptop users who need to record or broadcast in different locations. They're compact and easy to carry.
-
Cost-Effective: USB microphones tend to be more affordable than traditional XLR mics (which require additional gear like mixers and audio interfaces), making them a great choice for budget-conscious users.
-
Good Sound Quality: Many USB microphones, like the Maono microphone AU-A04 or A04, offer high-quality sound that rivals more expensive, professional setups. This is what makes it one of the best mics for laptops; also making them ideal for podcasts, voiceovers, streaming, and gaming.
Comparing USB Microphones with Other Types of Microphones
-
USB vs. XLR Microphones:
- USB microphones are great for simplicity and convenience. They are ideal for users who want quick setup without extra equipment.
- XLR microphones, on the other hand, provide higher audio quality and versatility. However, they require additional gear, such as an audio interface or mixer, to connect to your laptop. XLR mics are typically preferred in professional studios.
- USB/XLR microphone
A USB/XLR microphone is a hybrid mic that combines the convenience of USB connectivity with the professional versatility of XLR. The USB connection allows you to plug directly into a computer for quick plug-and-play recording, making it ideal for beginners, streamers, and podcasters. The XLR output connects to audio interfaces, mixers, or professional studio gear, giving you higher-quality audio, better control, and more flexibility for advanced setups. This dual connectivity makes USB/XLR microphones a future-proof choice, letting creators start simple and upgrade their setup without needing to replace the mic.
The Maono PD300X is a dynamic USB/XLR microphone designed for versatility, offering both USB/USB-C and XLR connections. It features a cardioid polar pattern, a 24-bit/192 kHz sample rate, a frequency response of 40 Hz to 16 kHz, and can handle sound pressure levels above 130 dB. Built with a rugged full-metal body and an integrated shock mount, the PD300X is made for durability and stability. It also includes 5-layer noise reduction, a multifunction control knob for gain and monitoring, and compatibility with Maono Link software for EQ presets and firmware upgrades.
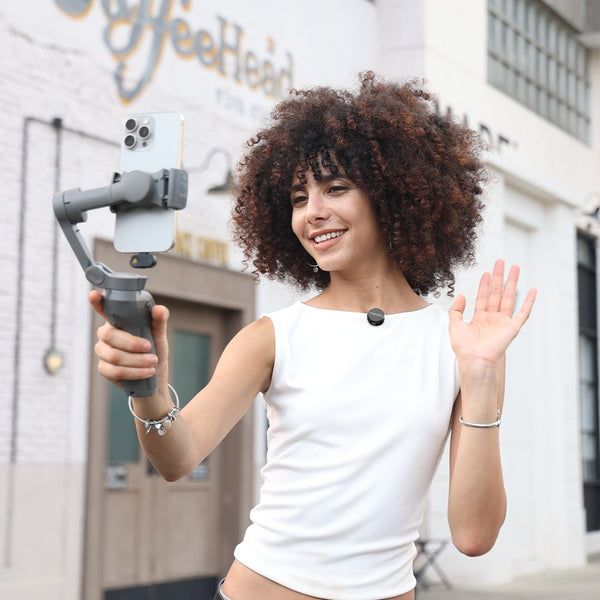
2026 Relevant Use Cases: How Maono USB Mics Perform in Real-World Scenarios
As remote work, virtual learning, and mobile content creation continue to dominate in 2026, laptop users need versatile microphones that keep up with updated platforms and hardware standards. Maono’s USB/XLR lineup — including MAONO PD200X, PM422, A04 Professional Podcaster USB microphone, and PD300X — delivers reliable performance across popular communication and creative workflows. These microphones are compatible with Windows, macOS, and laptops featuring the USB-C ports widely adopted in 2026 devices.
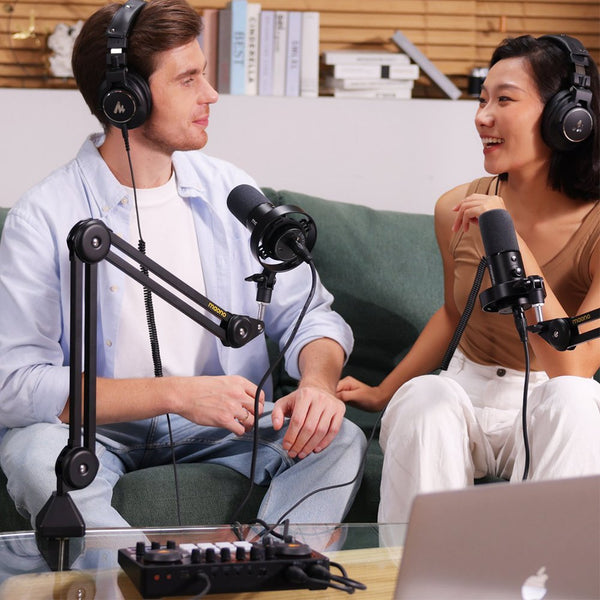
Zoom, Teams, Skype (and Their 2026 Updates)
Whether you’re leading a lecture, attending a thesis defense, or joining a team meeting, clear audio is essential. Maono USB mics connect directly via USB-C or USB-A adapters, making them recognized instantly as the audio input device in apps like Zoom or Microsoft Teams. This ensures crisp voice capture with minimal setup — simply select your Maono mic as the input in the app settings. Their cardioid pickup patterns focus on your voice and reduce ambient noise, helping you stay intelligible even in lively environments.
Remote Work and Study
For professionals and students working or studying from home, having dependable audio improves communication and reduces fatigue during long calls. These Maono mics provide professional-level sound quality without requiring external interfaces. Whether recording a presentation or participating in a class discussion, the plug-and-play USB connection means you’re ready in seconds. Dynamic mics like the PD200X and PD300X handle variable room acoustics well, while condenser options like the A04 and PM422 give clear detail for articulate speech. Their compatibility with current OS updates ensures stability with the latest system audio protocols.
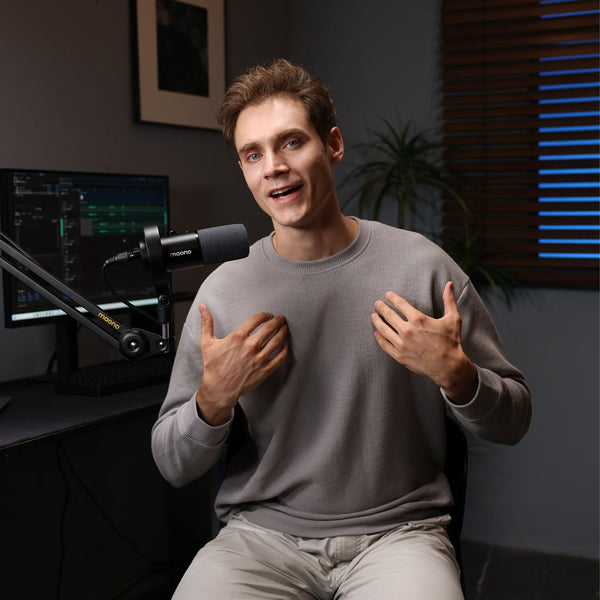
Podcasting on Laptops
Laptop podcasters benefit from both simplicity and depth of control. Maono USB mics pair easily with recording software such as Audacity, OBS Studio, or any DAW on laptops, providing high-quality audio capture for episodes, interviews, and live streams. The PD300X and PD200X, with their robust metal builds and high sample rates, offer richer sound profiles suitable for professional content creation. With onboard controls (gain, mute, monitoring) or software-based tuning via Maono Link (when supported), creators can tailor their sound without needing extensive gear.
Whether you’re speaking in a class, leading a webinar, or producing a podcast on your laptop, these Maono microphones meet the demands of 2026 remote communication and content workflows with versatile connectivity, strong OS compatibility, and reliable performance.
More Use Case Scenarios:
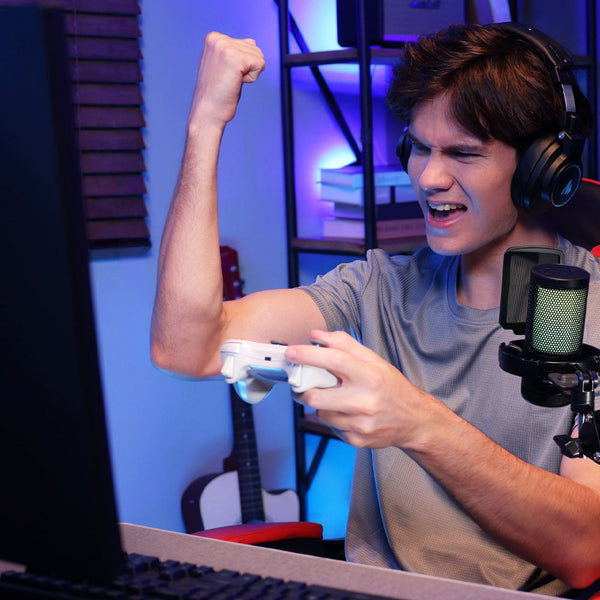
Maono PD300X is an excellent choice for streamers and podcasters who want a professional yet easy-to-use mic.
The Maono PD200X is another dual USB/XLR dynamic microphone that balances performance and affordability. With a cardioid polar pattern, 24-bit/48 kHz sample rate, and the same 40 Hz to 16 kHz frequency response as the PD300X, it provides reliable sound quality for podcasts, streaming, and recording. It supports SPL handling above 130 dB and offers intuitive controls, one click mute with LED indicators, strong metal construction, and seamless integration with Maono Link software for EQ and gain adjustments in USB mode. Known for its balanced, studio-ready sound at a budget-friendly price, the PD200X is an accessible option for beginners who want a step up from entry-level gear.
Use Case Scenarios: For podcasts, streaming, and music recording
XLR Microphone - is a professional grade mic, uses a 3-pin cable, and requires an external device such as audio mixer or an audio interface.
For those seeking a dedicated studio microphone, the Maono PM500 (AU-PM500) is a large-diaphragm condenser mic with a 34 mm gold-spluttered capsule. It features a cardioid polar pattern, wide 20 Hz to 20 kHz frequency response, and a sensitivity of –35.3 dBu, with a dynamic range of about 120 dB. This XLR-only mic requires +48V phantom power and is built with a premium zinc alloy body, multi-layer protective coatings, and professional accessories like a shock mount and pop filter.
Use Case Scenarios:
Designed for capturing rich vocal detail and smooth instrument tones, the PM500 is best suited for studio recording, voice-overs, and professional content creation where clarity and precision are essential.
3. USB vs. 3.5mm Microphones:
-
- 3.5mm microphones are often found in headsets or budget mics, and while they can work for casual use, they usually offer lower audio quality and are more susceptible to interference.
- USB microphones generally provide clearer, more professional sound and better noise rejection, making them a better choice for serious recording or streaming.
Comparison Table for the best Maono USB microphone for laptop 2026
|
Model |
Connectivity |
Pickup Pattern |
Key Feature |
Best For |
|
MAONO PD200X USB XLR Dynamic Microphone |
USB & XLR |
Cardioid |
Dual connectivity with plug-and-play USB or pro XLR options and real-time monitoring |
Podcasters, streamers, laptop users needing flexibility |
|
MAONO PM422 Podcast USB Microphone |
USB |
Cardioid |
Onboard gain, mute, and headphone volume controls with zero-latency monitoring |
Content creators, professionals with laptop setups |
|
MAONO A04 Professional Podcaster USB microphone |
USB |
Cardioid |
Simple plug-and-play setup with accessories (stand, shock mount, pop filter) included |
Students, beginners, remote workers |
|
MAONO PD300X Dynamic Microphone |
USB & XLR |
Cardioid |
High-resolution 24-bit/192 kHz audio with multi-level noise reduction and rugged build, USB& XLR connectivity |
Streamers, podcasters, advanced laptop audio setups |
Summary:
-
Connectivity and usage scenarios vary from simple USB plug-and-play (ideal for laptops) to dual USB/XLR options for hybrid or more professional environments.
-
All four models use a cardioid pickup pattern, which is excellent at isolating voice for recordings, streaming, conferencing, and online classes.
-
PD300X offers the highest sample rate and expanded audio depth, making it great for users who want higher fidelity in both streaming and recording applications.
Quick Spec Comparison of Top Maono Mic Models:

Summary
USB microphones for laptops offer an excellent balance of ease of use, affordability, and sound quality. They're perfect for casual users, content creators, and professionals looking for a hassle-free solution without sacrificing performance. Whether you're recording a podcast, attending a virtual meeting, or streaming, a USB microphone can deliver great results with minimal setup.
Real-World User Experiences with Maono PD300X and PD200X
The Maono PD300X and PD200X have received strong praise from real-world users for their impressive sound quality at an affordable price. According to ThePhonograph.net, “After testing the MAONO PD300X we were surprised to find that this budget microphone was able to provide a smooth, natural tone with a cozy and inviting flavor.”
Similarly, Adam Harkus from The Blogging Musician described the Maono PD200X as “the best mic I’ve ever owned,” highlighting that for home recording, it not only captures vocals and acoustic guitar perfectly but also “adds a little condenser mic-style magic that gives your performances more emotion, confidence, and quality.” Together, these reviews emphasize Maono’s ability to deliver professional-grade performance with both the PD300X and PD200X, making them standout options for creators and musicians alike.
Best Maono USB Microphones for Laptop Use in 2026
If you're looking for the best best USB microphones with the Maono mic setup for your laptop, the Maono PD200X and Maono PD300X series are highly recommended options for 2026 for its versatility and dual connectivity (can be used as USB for plug and play or XLR); the Maono A04 and Maono PM422 USB microphones are also both reliable mics that deliver pro sound quality, ease of use, and also professional-grade features — all while being perfect for on-the-go laptop users looking for a computer microphone with USB connectivity.
PD200W - The Maono PD200W is a versatile hybrid podcasting microphone that delivers studio-grade quality and features USB, XLR and wireless (2.4GHz) connectivity.

PD200X – Maono PD200X is a dynamic USB/XLR mic with cardioid pattern, rugged metal build, plug-and-play USB connectivity.
PD300X – The Maono PD300X is one of Maono’s best-sellers in the podcasting microphone category, with 5-level noise reduction and 3-in-1 smart knob function with a custom mute button - perfect for both beginners and pro.
Maono A04: Plug-and-Play Simplicity
-
This USB microphone for laptop use features a simple USB connection that makes it instantly compatible with both Windows and macOS laptops.
-
Cardioid pickup pattern reduces background noise, ideal for home recording, Zoom meetings, or podcasting.
-
Comes with a complete kit including a tripod stand, shock mount, and pop filter — perfect for setting up anywhere.
-
The Maono A04 USB computer microphone, known for its budget-friendly price and reliable performance, making it great for students, remote workers, and beginners.
Maono PM422: Pro Features for Power Users
-
-
The Maono PM422 microphone for PC USB offers the same USB plug-and-play ease of use, but adds more control with onboard buttons for gain, mute, and headphone volume.
-
Zero-latency monitoring lets users hear themselves in real time without delay.
-
Built with a metal body and comes with a sturdy boom arm kit, ideal for a professional-looking laptop desk setup.
-
20Hz - 20kHz frequency response provides studio-level clarity, making it perfect for content creators, singers, and streamers.
Both A04 and PM422 models are compatible with Windows and macOS and require no audio interface, making them ideal for fast, mobile-friendly recording. Whether you're podcasting, streaming, or attending virtual meetings, these USB microphones help elevate your audio with minimal effort.
Frequently Asked Questions:
1. What makes a good USB microphone for laptop use?
A good USB microphone for laptop use should offer clear sound quality, easy plug-and-play setup, and reliable compatibility with your laptop's operating system. Features like noise cancellation, adjustable gain control, and cardioid or omnidirectional pickup patterns can enhance audio clarity and recording versatility.
2. How to set up a USB microphone on a laptop?
To set up a USB microphone, simply plug it into your laptop’s USB port. The laptop should automatically recognize the microphone as an input device. If necessary, go to your sound settings (Control Panel on Windows or Sound Preferences on macOS) and select the USB microphone as the default input device. Then, adjust the microphone settings in your recording software or app.
3. What are the top options available?
Maono A04 Review:
Some of the best mic for laptops include:
- Blue Yeti – Known for its excellent sound quality and multiple pickup patterns.
- Razer Seiren X – Popular for streaming, offering clear sound and a compact design.
- Maono microphone AU-A04 - The Maono A04 is a budget-friendly, high-quality mic with good noise rejection. It offers a sampling rate of 192kHz/24bit and offers ease of use with its plug-and-play feature and USB connectivity. Also, it uses a cardioid polar pattern to capture sound or voice with clarity, richness, and professional-quality.
- Audio-Technica ATR2500x – A solid choice for podcasts and professional audio recordings.
4. Why should they choose a USB microphone over other types?
USB microphones are easy to use, requiring no additional gear like audio interfaces or mixers. They offer good sound quality at an affordable price and are ideal for users who want a hassle-free setup for podcasting, streaming, or video calls. Unlike 3.5mm mics, USB mics provide clearer audio with better noise rejection and a more professional sound.
5. How to install and use Maono microphone software?
- Visit the official Maono website and download the microphone software for your specific model.
- Install the software by following the on-screen prompts.
- Connect your Maono USB microphone to your computer.
- Open the software to adjust settings like gain, EQ, and noise reduction for optimal performance.
6. What software works best with Maono USB microphones?
Maono USB microphones work seamlessly with popular recording and streaming software, including:
- Maono link software for microphones DM30RGB, PD400X, PD200X/PD200XS, PD100X, PM450S, A04
- Arena Software - for Maono USB microphones and this can only be used on Windows.
- Noise Reduction Software for Maono DGM20 or GamerWave microphone
- Audacity for recording and editing.
- OBS Studio for live streaming.
- GarageBand (Mac) and FL Studio for music production.
- Zoom and Google Meets for virtual meetings.
These tools ensure compatibility and easy plug-and-play functionality.
7. What are the Maono microphone software features and compatibility?
Maono microphone software enhances user experience by providing:
- Audio Customization: Fine-tune gain, EQ presets, and noise reduction for clear sound.
- Platform Integration: Compatible with OBS Studio, Audacity, and DAWs for streaming and recording.
Comparison Table for Maono Microphone software vs. Generic Software Solutions:

Step-by-Step Setup with Software Tools
- Install the Maono microphone software from the official site.
- Connect your Maono USB microphone to your computer (plug-and-play).
- Open your preferred software (e.g., Audacity/OBS) and select the Maono mic as the input device.
- Use Maono software to adjust gain, EQ, and apply noise reduction for the best audio output.
Troubleshooting Tips
- If the microphone isn’t detected, check USB connections and ensure drivers are up-to-date.
- Restart the software and select the Maono microphone in audio input settings.
- Lower gain levels if background noise is too prominent.
8. Does the Maono mic need phantom power?
-
Not all Maono mics need phantom power. Dynamic USB/XLR ones (like PD200X, PD300X) generally don’t require phantom power when used via USB, because the USB port powers them.
-
XLR condenser models, such as the Maono PM500, do require external phantom power (48V) or an audio interface/mixer that supplies it.
9. Can a Maono mic work with Mac / Windows / Chromebook?
-
Yes. Many Maono USB mics are plug-and-play with Mac & Windows without needing extra drivers. For example, the A04 mic is explicitly compatible with Mac, Windows and also works via USB on phones/computers with appropriate adapters.
-
Chromebooks usually support USB audio devices, so USB Maono mics should work provided the Chromebook supports USB audio class devices. (No specific Maono spec page says “Chromebook tested,” but USB compatibility is broad.)
-
For XLR condenser mics like the PM500, you’ll need an audio interface or phantom power source, which also needs to be compatible with your OS/device.
10. Is Maono mic good for podcasting?
-
Yes, Maono mics are well-suited for podcasting. The USB/XLR line (e.g. PD200X, PD300X) offers flexibility, good dynamic sound, and ease of setup — great for streamers or podcasters who want robust sound but minimal setup.
-
Their condenser models (like PM500) provide richer detail, which helps with voice clarity and high-quality recordings. For studio podcasting or voice-overs, these offer more fidelity.
-
Also, Maono provides software tools (Maono Link) for USB models, which can enhance EQ, filtering, and overall sound quality—helpful when producing podcast episodes.
11. What makes the best Maono USB microphone for laptop 2026 different from older models?
The best Maono USB microphones for laptops in 2026 combine plug-and-play USB connectivity with updated features like dual USB/XLR hybrid options, higher sample rates, rugged builds, and advanced noise control compared to older models that focused mainly on basic plug-and-play performance. Newer models like the Maono PD200X and PD300X add professional-grade controls, enhanced cardioid pickup, and seamless compatibility with modern laptop hardware, making them more versatile for remote work, online classes, and content creation.
12. Are Maono USB mics compatible with the latest laptops in 2026?
Yes. Maono USB microphones are designed for plug-and-play use with Windows and macOS laptops, and work easily with USB-C ports common on 2026 machines. Just plug the mic into a USB-C or USB-A port (via adapter if needed), and it will be recognized automatically in system settings and conferencing apps without extra drivers.
13. Which Maono USB microphone is best for Zoom calls and online classes in 2026?
For Zoom calls and online classes, reliable clarity and ease of setup matter most. Models like the Maono PD200X strike an excellent balance of voice clarity, cardioid pickup, and plug-and-play simplicity, making them ideal choices in 2026. The PD200X delivers broadcast-style audio quality while remaining simple to use on laptops.
Conclusion
In conclusion, the Maono USB microphone series delivers a reliable, high-quality audio solution for laptop users who need simplicity without sacrificing performance. Designed with laptop creators in mind, Maono combines user-friendly microphone software, durable hardware, and true plug-and-play convenience—making recording, streaming, gaming, and online communication effortless. With clear sound reproduction, budget-friendly pricing, and flexible connectivity, models like the Maono PD200W, PD300X, and PD200X stand out as top choices, especially thanks to their hybrid USB/XLR functionality that suits both beginners and growing professionals.
Whether you’re producing content, joining virtual meetings, or streaming games, Maono USB microphones—including popular options like the A04 and PM422—consistently deliver professional-level audio quality for laptop setups.
Ready to elevate your sound anywhere you work or create? Upgrade your setup with a Maono USB microphone and enjoy crisp, dependable audio wherever your laptop takes you.