Click the link below to download Maono Link:
FAQs
- How to download Maono Link?
- How to use the Al voice modulation feature of DM40?
- How to register an account on Maono Link?
- How to register an account on Maono Link?
- How to use AI voice modulation in Maono Link?
- How to apply AI voice modulation in live streaming?
- How to charge the DM40 microphone?
- How to use the microphone monitoring switch?
- Can I use the DM40 microphone’s wireless and wired modes simultaneously?
- Does the DM40 microphone require charging?
- How to adjust the noise reduction levels on the DM40?
- How to connect the DM40 microphone for mobile live streaming? ?
- How to connect the DM40 microphone to a computer? ?
- How to check the battery status?
- What should I do if the wireless connection is unstable?
- PM450 User Guide
- DM50 User Guide
- Maono Link Download
- PM450 User Guide
- DM50 User Guide
- Firmware upgrade 1.0.7 failed can choose this tool
- Cantilever bracket will not install?
- Microphone recording sound is very low
- USB Device not Working on Mac
- Fix Sound Problems on PC
- USB not Recognized
- What is the sampling rate and bit depth of the microphone
- How to turn off the microphone RGB lighting?
- How to set the microphone after connecting to the computer?
- Correct the whistling sound coming from a mic?
- USB Microphone not Working on Mac
- Microphone does not work without sound on windows
- How to connect DM30 to Android and iOS?
- Microphone has obvious current sound
- Microphone has obvious humming sound
- What are the power consumption parameters of DM30
- Microphone and Maono Link are not connected successfully
- How to create your own scene configuration?
- How to reset parameters?
- Drag the slider can not find the appropriate value?
- How to download maono arena
- How to download maono link
- How to create your own scene configuration?
- How to reset parameters?
- Drag the slider can not find the appropriate value?
- Why does the app show "Please Connect a USB Device" when using the PD100X, and how do I fix it?
- How to download maono arena
- How to download maono link
- What is the difference between the USB and XLR (Cannon) connection modes of PD100X?
- What is the purpose of adjusting the monitor mix ratio through Maono Link?
- Does PD100X require phantom power of 48V?
- Why doesn't the light come on and the knob not respond in XLR mode with PD100X?
- What should I do if there is noise or static when using PD100X?
- How to download maono arena
- How to download maono link
- What is the difference between the USB and XLR (Cannon) connection modes of PD100X RGB?
- What is the purpose of adjusting the monitor mix ratio through Maono Link?
- Does PD100X RGB require phantom power of 48V?
- Why doesn't the light come on and the knob not respond in XLR mode with PD100X RGB?
- What should I do if there is noise or static when using PD100X RGB?
- What is the sampling rate and bit depth of the microphone?
- Does the PD200X need to turn on 48v phantom power?
- Correct the whistling sound coming from a mic?
- How to set the microphone after connecting to the computer?
- Microphone is not recognized on the PC?
- USB Microphone not Working on Mac
- Microphone does not work without sound on windows
- How to connect PD200X to Android and iOS
- Use PD200X feel small sound
- Microphone has obvious current sound
- What is the low-cut function of the microphone and what does it do
- What are the power consumption parameters of PD200X
- Why the microphone XLR mode can not use the knob to control the sound, switch the sound effects
- Microphone has obvious humming sound
- Microphone and Maono Link are not connected successfully
- What is the purpose of 192kHz/24bit?
- What are the differences between the USB and XLR connection modes of the PD300X?
- What is the purpose of adjusting the monitoring mix ratio in Maono Link?
- How do I use the custom EQ feature in Maono Link?
- Does the PD300X require 48V phantom power?
- Why isn’t Maono Link compatible with Windows 7 for the PD300X?
- Why don’t the lights and knobs on the PD300X work in XLR mode?
- How can I troubleshoot noise or static issues with the PD300X?
- What is the sampling rate and bit depth of the microphone?
- Does the PD400X need to turn on 48v phantom power?
- Correct the whistling sound coming from a mic?
- How to set the microphone after connecting to the computer?
- Microphone is not recognized on the PC?
- USB Microphone not Working on Mac?
- Microphone does not work without sound on windows?
- How to connect PD400X to Android and iOS?
- Use PD400X feel small sound?
- Microphone has obvious current sound
- What is the low-cut function of the microphone and what does it do
- What are the power consumption parameters of PD400X
- Why the microphone XLR mode can not use the knob to control the sound, switch the sound effects
- Microphone has obvious humming sound
- Microphone and Maono Link are not connected successfully
- PS22 Routing Tool(Driver must be installed to use PS22)
- PS22 software driver installation failed
- PS22 Return to Initial Version
- PS22 has no Bluetooth function, no reverb, no noise reduction function.
- PS22 doesn't have software driver for MacOS version.
- What DAWs are available and how do I download them?
- What does the 3.5mm jack on the PS22 do?
- How do I connect a smartphone to the PS22?
- The power indicator is off
- Cannot boot
- No sound from accompaniment music
- No sound from headphones
- No sound from the microphone
- No sound in live broadcast
- Echo issues
- Side chain function not working
- The noise reduction effect is not good
- Can not be used on iPhone
- This audio interface can not be used with a USB/XLR to XLR/USB C microphone even though using an adapter
- Can not be used with guitar
- Before powering on
- How to connect to a computer
- How to connect to the smartphone
- How to set the volume of preset sound effects and customize sound effects
- The light on the audio interface can be turned off
- Bluetooth transmission is a one-way transmission
- If you can monitor your voice, but your audience cannot hear your voice
- For now, the monitoring function cannot be turned off
- How to upload custom sound effects
- Cannot boot
- The sound card is dead, how to charge it?
- Sound card recording without sound
- I want to input the accompaniment via Bluetooth, how does it work?
- Side chain function not working
- Why is there little or no sound with shure sm7B and Rode PodMic dynamic microphones
- Can I connect my USB microphone to the Maonocaster E2
- Can I use Bluetooth headphones with the Maonocaster E2?
- Do you need to use a Gain Booster when using dynamic mics with the Maocaster E2?
- Can not be used on iPhone
- How to connect to a Guiter
- How to connect to a computer
- How to record sound effects, how long is the time to record sound effects?
- What software can be used with the sound card on Windows 10?
- On/Off switch of buttons backaround light
- Microphone gain switch setting
- Voice cracked
- How to adjust the knobs on the audio interface
- Can't hear sound through headphones
- The sound you hear from the headphone is different from the recorded sound from the smartphone/computer
- How to input accompaniment via Bluetooth
- When you live stream, the audience can't hear the music, but you can hear it through headphones
- The sound recorded by mobile phone/computer is the only vocal from microphone, no music sound
- 1. How to fix the issue of LED flashing on audio interface buttons such as "Side Chain"/"Noise Reducer"/"Voice Changer"/"Direct Monitor"
- 2. When you live stream, the audience can't hear the music, but you can hear it through headphones
- 3. How to connect to the computer
- 4. How to connect Android phones, iPhone 15 and above, and USB-C ports iPads
- 5. How to connect an iPhone with a lighting port
- 6. How to use the various knobs, buttons, and faders on an audio interface
- 7. Why is there no sound even though the microphone has been successfully connected to the G1 NEO?
- 8. To solve the problem of current noise in the audio interface
- 9. How to use the "Direct Monitor" and "Loopback" compound buttons
- 10. Can't hear sound through headphones
- 11. Cannot boot
- 12. Voice cracked
- 13. How to record sound effects, how long is the time to record sound effects?
- 14. How to input accompaniment via Bluetooth
- 15. Can I connect my USB microphone to the Maonocaster G1 NEO?
- 16. Can I use Bluetooth headphones with the Maonocaster G1 NEO?
- 17. How to use the headset
- 18. Is it necessary to use an additional gainer when using a dynamic microphone
- 19. Why does the headset work properly when I plug both a headset and a microphone into the G1 NEO, but the microphone does not work?
- 20. Side chain function not working?
- 21. G1 Neo sound card is not recognized/cannot be recognized when used on a computer
- To solve the problem of current noise in the audio interface
- Voice cracked
- How to connect speakers?
- Microphone gain switch setting
- Microphone gain switch setting
- How to adjust the knobs on the audio interface
- Can't hear sound through headphones
- The sound you hear from the headphone is different from the recorded sound from the smartphone/computer
- Cannot boot
- How to connect to the computer
- How to input accompaniment via Bluetooth
- When you live stream, the audience can't hear the music, but you can hear it through headphones
- The sound recorded by mobile phone/computer is the only vocal from microphone, no music sound
- Why is there little or no sound with shure sm7B and Rode PodMic dynamic microphones
- Is it necessary to use an additional gainer when using a dynamic microphone
- Can not be used on iPhone
- How to connect to a Guiter
- How to record sound effects, how long is the time to record sound effects?
- What software can be used with the audio interface on Windows 10?
- Side chain function not working?
- Can I connect my USB microphone to the Maonocaster AMC2 NEO?
- Can I use Bluetooth headphones with the Maonocaster AMC2 NEO?
- 使いたい:パソコンで音楽を再生、スマホ(iphone)で配信をする
- Why is there a delay in hearing the sound in headphones
- Where do I download the software for mac?
- Can I bring two headsets for face-to-face interview for this product?
- Are you able to save recording to an SD card?
- USB Device not Working on Mac
- Fix Sound Problems on PC
- USB not Recognized
- USB Device not Working on Mac
- Fix Sound Problems on PC
- USB not Recognized
- USB Device not Working on Mac
- Fix Sound Problems on PC
- USB not Recognized
- Microphone does not work without sound on windows
- What is the value of the sampling rate of the microphone
- How to set up the connection computer
- Correct the whistling sound coming from a mic?
- Microphone is not recognized on the PC
- USB Microphone not Working on Mac
- How to use Maono Link software with Wave T1 Mini?
- How to pair Wave T1 Mini with a phone?
- Wave T1 Mini battery life is less than 8 hours. Why?
- Wave T1 Mini isn’t working after connecting to a phone.
- How to connect Wave T1 Mini Camera Version to a camera?
- How to reduce background noise when using Wave T1 Mini with a camera?
- How to adjust volume and gain for Wave T1 Mini?
- How to charge Wave T1 Mini?
- Does the Type-C version support iPhone 15/16?
- What is the maximum transmission range of Wave T1 Mini?
- How to pair transmitter and receiver?
- Does Wave T1 Mini support noise reduction? How to enable it?
- Audio volume is too low. How to fix?
- How to play recorded audio/video externally?
- Can the Camera Version connect to a phone?
- Why isn’t the 2-second hold photo function working?
- Guide Manual
- How to connect Wave T5 to a mobile phone?
- How can Wave T5 be worn?
- How to connect the Wave T5 Camera Edition to a camera?
- What to do if there is noticeable background noise when using Wave T5 with a camera?
- How to adjust the volume and gain settings on the Wave T5?
- How to charge Wave T5?
- Does the Wave T5 Type-C mobile version support iPhone 15 & 16?
- What is the maximum transmission distance of the Wave T5?
- What is the purpose of the Magnetic sheet necklace included in the Wave T5 packaging?
- How to pair the Transmitter and Receiver of Wave T5?
- Does Wave T5 support noise cancellation? How to enable it?
- How to use the Windscreen with Wave T5?
- What should I pay attention to when using the Back clip on Wave T5?
- What if the volume of the Wave T5 is too low? How to adjust?
- Why doesn't the level display in Maono Link change with gain adjustments?
- How to upgrade the firmware on Wave T5?
- How to play back recorded audio or video from Wave T5?
- Can the Camera Edition connect to a mobile phone?
- Why isn't the "Hold 2s Mute Button to Take Photo" feature working?
- How to check the battery status of Wave T5:
- How to solve the connection light keeps blinking, but no successful connection
- Can I use it on my camera via an adapter cable?
- How to charge the charging box
- Wireless microphone charging how no response
- What does the low-cut function do?
- How do I connect the Maono WM821's windshields?
- Why the microphone is not connected successfully, the sound is not input to the phone
- WM821 recording sound is very small, how to adjust
- What is the difference between the WM821's Merged(MIX) and Split(AB) recording modes?
- How to solve the connection light keeps blinking, but no successful connection
- Can I use it on my camera via an adapter cable?
- Can the WM820 B2 and C2 microphones record a separate channel?
- Can I use the adapter to transfer C2 to Apple phone?
- How to download Maono Link?
- How to use the Al voice modulation feature of DM40?
- How to register an account on Maono Link?
- How to register an account on Maono Link?
- How to use AI voice modulation in Maono Link?
- How to apply AI voice modulation in live streaming?
- How to charge the DM40 microphone?
- How to use the microphone monitoring switch?
- Can I use the DM40 microphone’s wireless and wired modes simultaneously?
- Does the DM40 microphone require charging?
- How to adjust the noise reduction levels on the DM40?
- How to connect the DM40 microphone for mobile live streaming? ?
- How to connect the DM40 microphone to a computer? ?
- How to check the battery status?
- What should I do if the wireless connection is unstable?
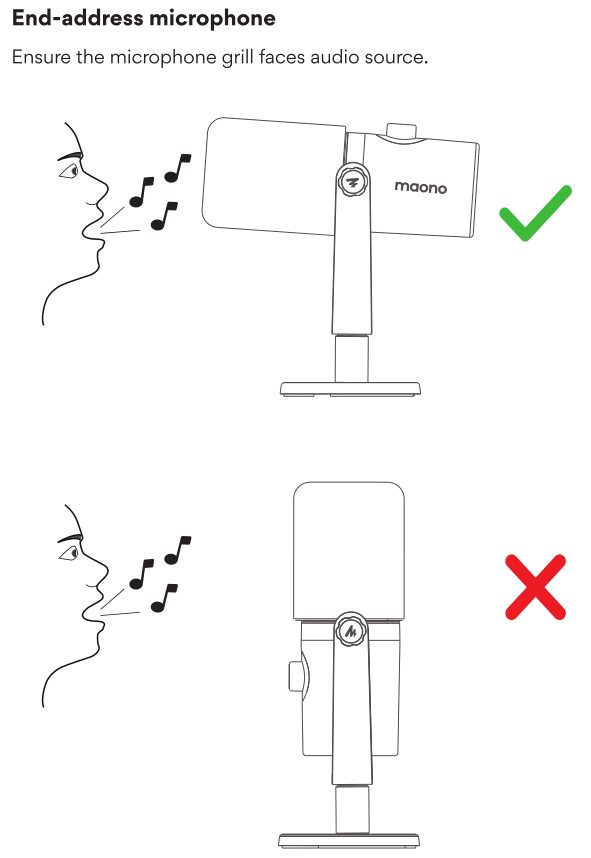
How to download Maono Link?
How to use the Al voice modulation feature of DM40?
Click the link below to view the content
How to register an account on Maono Link?
Click the link below to view the content
How to register an account on Maono Link?
- Enter your phone number.
- Click “Send Verification Code” and input the code once you receive it.
- Set a password that meets the requirements.
- Re-enter the password to confirm.
- Read and agree to the User Agreement and Privacy Policy by ticking the checkbox after review.
- Click “Register.” Once registration is complete, log in with your newly created account.
How to use AI voice modulation in Maono Link?
- Navigate to the "AI Voice Modulation" page in Maono Link.
- Select a modulation character and click the checkmark in the top-right corner.
- Register and log in to your Maono Link account.
- On the AI Voice Modulation page, click the “Preview” button. Connect your headphones to the bottom port of the DM40 microphone to listen to the modulation effect.
How to apply AI voice modulation in live streaming?
In your live streaming software, set the audio input device to the virtual audio device provided by Maono Link, labeled as “Maono AI Microphone.” When you speak through the DM40 microphone, the modulated voice will be applied in the streaming software.
How to charge the DM40 microphone?
Use a Type-C cable to connect to the charging port at the bottom of the DM40 microphone. While charging, the indicator light will display yellow. Once fully charged, it will turn green.
How to use the microphone monitoring switch?
After plugging in headphones, you can monitor the audio captured by the microphone and any audio played from your phone or computer. If you don’t want to hear your own voice through the microphone, you can disable microphone monitoring without affecting other sounds.
Can I use the DM40 microphone’s wireless and wired modes simultaneously?
Yes, the DM40 supports simultaneous use of both wireless and wired modes.
Does the DM40 microphone require charging?
Yes, the DM40 has a built-in battery that needs to be charged via the Type-C port. While charging, the indicator light will turn yellow and will change to green when fully charged. Typically, a 1–2 hour charge provides 6–8 hours of use.
How to adjust the noise reduction levels on the DM40?
Touch the noise reduction control area on the top of the microphone to toggle between three levels (low, medium, and high). You can select the appropriate level based on ambient noise. Additionally, the DM40 supports custom noise reduction settings via software for more precise adjustments.
How to connect the DM40 microphone for mobile live streaming? ?
For Type-C port devices (Android and iPhone 15 or later):
Use the wireless receiver to connect directly to the phone.
For Lightning port devices (iPhone 14 or earlier):
Use an Apple adapter to connect the microphone to your phone, or use the Apple-compatible live-streaming cable (supports charging while in use) to connect the DM40 microphone to your iPhone.
How to connect the DM40 microphone to a computer? ?
Turn on the microphone and plug the wireless receiver into the computer. If your computer lacks a Type-C port, use the adapter included in the package. Then follow these steps:
Windows 10
- Right-click the sound icon in the bottom-right corner and select “Sounds.”
- Under the “Playback” tab, select DM40 and set it as the default device.
- Switch to the “Recording” tab, select DM40, and set it as the default device.
- Double-click “Maono DM40 RX” and adjust the volume level to 100.
- Click “OK” to complete the setup.
Windows 11
- Right-click the sound icon in the bottom-right corner and select “Sound settings.”
- Scroll down and click “More sound settings.”
- Under the “Playback” tab, select DM40 and set it as the default device.
- Switch to the “Recording” tab, select DM40, and set it as the default device.
- Double-click “Maono DM40 RX” and adjust the volume level to 100.
- Click “OK” to complete the setup.
MacOS (Apple devices ?)
- Click the Apple icon ? in the top-left corner of your desktop.
- Open “System Preferences” (or “System Settings”).
- Select “Sound” from the menu.
- Under the “Input” tab, select “Maono DM40 RX” and adjust the input volume to maximum.
- Under the “Output” tab, select “Maono DM40 RX” and adjust the output volume as needed.
How to check the battery status?
|
Battery Status |
Indicator Light |
|
Microphone battery < 20% ? |
☀️ (flashes 2 times every 30 seconds) |
|
Charging⚡ |
? |
|
Fully charged? |
? |
What should I do if the wireless connection is unstable?
If you encounter an unstable wireless connection, it is recommended to take the following steps:
1. Check the surrounding environment and eliminate interference from other wireless devices (such as routers, Bluetooth devices, etc.).
2. Try adjusting the position of the receiver or microphone to ensure they are away from electronic devices that may cause interference.
3. If the issue persists, consider changing the USB port of the receiver or using a signal booster to improve connection quality.
- PM450 User Guide
- DM50 User Guide
- Maono Link Download
PM450 User Guide
Coming soon
DM50 User Guide
Coming soon
Maono Link Download
Click the text below to navigate to the download page
- PM450 User Guide
- DM50 User Guide
PM450 User Guide
Coming soon
DM50 User Guide
Coming soon
- Firmware upgrade 1.0.7 failed can choose this tool
- Cantilever bracket will not install?
- Microphone recording sound is very low
- USB Device not Working on Mac
- Fix Sound Problems on PC
- USB not Recognized
Firmware upgrade 1.0.7 failed can choose this tool
If you keep getting stuck in the software firmware upgrade as shown below, please use the following upgrade tool to solve your problem

Cantilever bracket will not install?
please check the cantilever model installation video
Microphone recording sound is very low

USB Device not Working on Mac
Please check the documentation
Fix Sound Problems on PC
Please check the documentation
USB not Recognized
Please check the documentation
- What is the sampling rate and bit depth of the microphone
- How to turn off the microphone RGB lighting?
- How to set the microphone after connecting to the computer?
- Correct the whistling sound coming from a mic?
- USB Microphone not Working on Mac
- Microphone does not work without sound on windows
- How to connect DM30 to Android and iOS?
- Microphone has obvious current sound
- Microphone has obvious humming sound
- What are the power consumption parameters of DM30
- Microphone and Maono Link are not connected successfully
What is the sampling rate and bit depth of the microphone
48kHz/24Bit
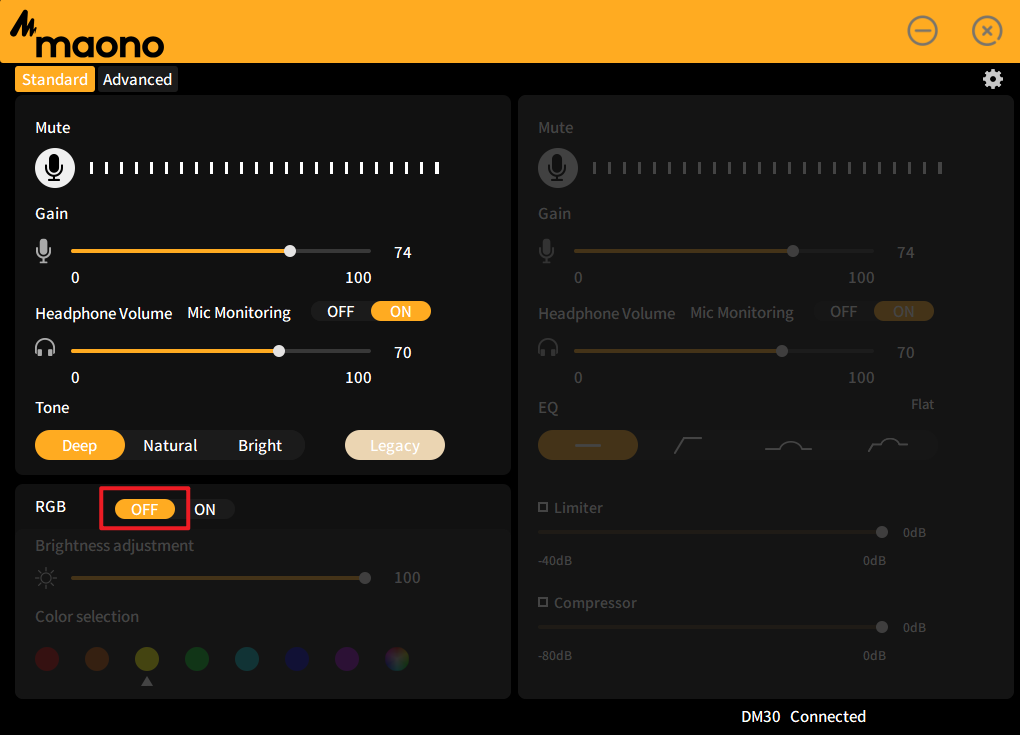
How to turn off the microphone RGB lighting?
- Button at the bottom of the microphone to switch to light off mode
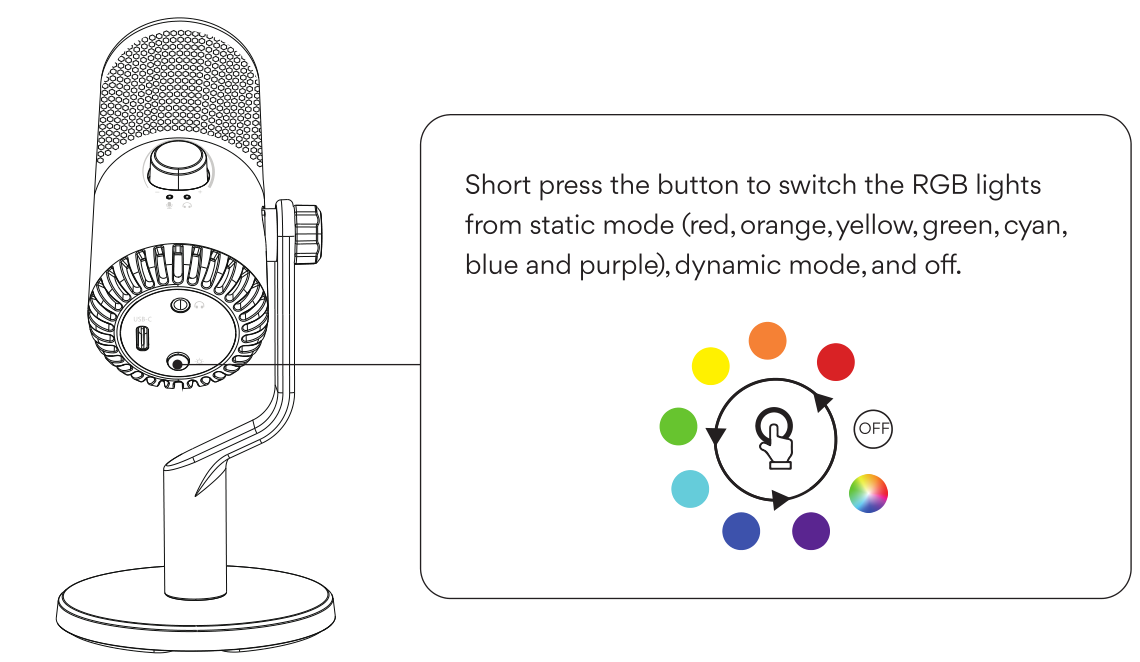
- Control the lights via Maono Link and turn them off with one click
Software Download:
https://www.maono.com/pages/maono-link-software
How to set the microphone after connecting to the computer?
Please check the documentation
![]()
Correct the whistling sound coming from a mic?
- That whistling sound is called an Audio feedback and caused because of an endless loop caused when the mic picks up the sound of the loudspeakers and sends it back to the loudspeakers to amplify and picks up again
- Ways to correct /avoid feedback
- Face the speakers away from the mic or place farther away.
- Lower their volume or mic gain
Use unidirectional cardioid mics which have a rear rejection that means no pickup from back side. Then you can use stage monitors facing you in the middle of the stage. And mic won't pickup them.
- Ring out the speaker - deliberately create feedback by taking the mic closer to the speaker. When feedback happens, check the frequency on a real-time analyser and cut it using channel eq or graphic eq.
- Use a feedback reducer
- Microphone is not recognized on the PC?
- Shut down and restart the computer and leave it for 20 minutes before connecting again
- Update the driver in the device manager, uninstall the driver and re-insert the microphone
- Use on another computer to see if it can be loaded, loaded out again after inserting the computer that can not be identified
- Use the driver master, the brand comes with the software or the brand's official website to update the driver (such as Lenovo, Dell) to avoid the impact of missing drivers

USB Microphone not Working on Mac
Please check the documentation

Microphone does not work without sound on windows
- Please turn the recording knob to a reasonable range
- Please adjust the Mic gain knob to a reasonable range
- Open microphone permission in privacy settings
- Is the microphone device selection correct, please refer to the detailed documentation.
Please see the documentation for details

How to connect DM30 to Android and iOS?
- Android can be connected through OTG adapter or USB-C to USB-C data cable
- iOS can be connected through the adapter cable provided by our company
Microphone has obvious current sound
- Unplug the microphone data cable, replace the USB port and reconnect it (desktop computer to the USB behind the chassis, do not use a hub or docking station)
- Stay away from audio and electronic products to avoid electronic signal interference. Change to a quiet environment to use the microphone, avoid external ambient sound being picked up by the microphone, troubleshoot the problem first
- Turn off the use of third-party software, use the recorder that comes with the computer to test
- May be the computer or plug board leakage, you can choose to replace a computer test
Microphone has obvious humming sound
- Microphone gain is too high, the microphone is sensitive, resulting in picking up more ambient sound, please reduce the microphone gain, it will improve the sound quality
- DM30 is a condenser microphone, picking up sensitive sound, the microphone brings more sound details at the same time, will pick up ambient sound, please keep a distance from your computer, cooling fan rotation and operation will generate noise
- USB interface or data cable is bad, please replace the connection cable or USB jack (desktop computer, please connect to the USB port behind the chassis)
What are the power consumption parameters of DM30
5V / 100mA - 230mA
Microphone and Maono Link are not connected successfully
- Please check the connection of the audio cable to the computer, unplug it and reconnect it
- Check whether the microphone can be used normally on the computer
- How to create your own scene configuration?
- How to reset parameters?
- Drag the slider can not find the appropriate value?
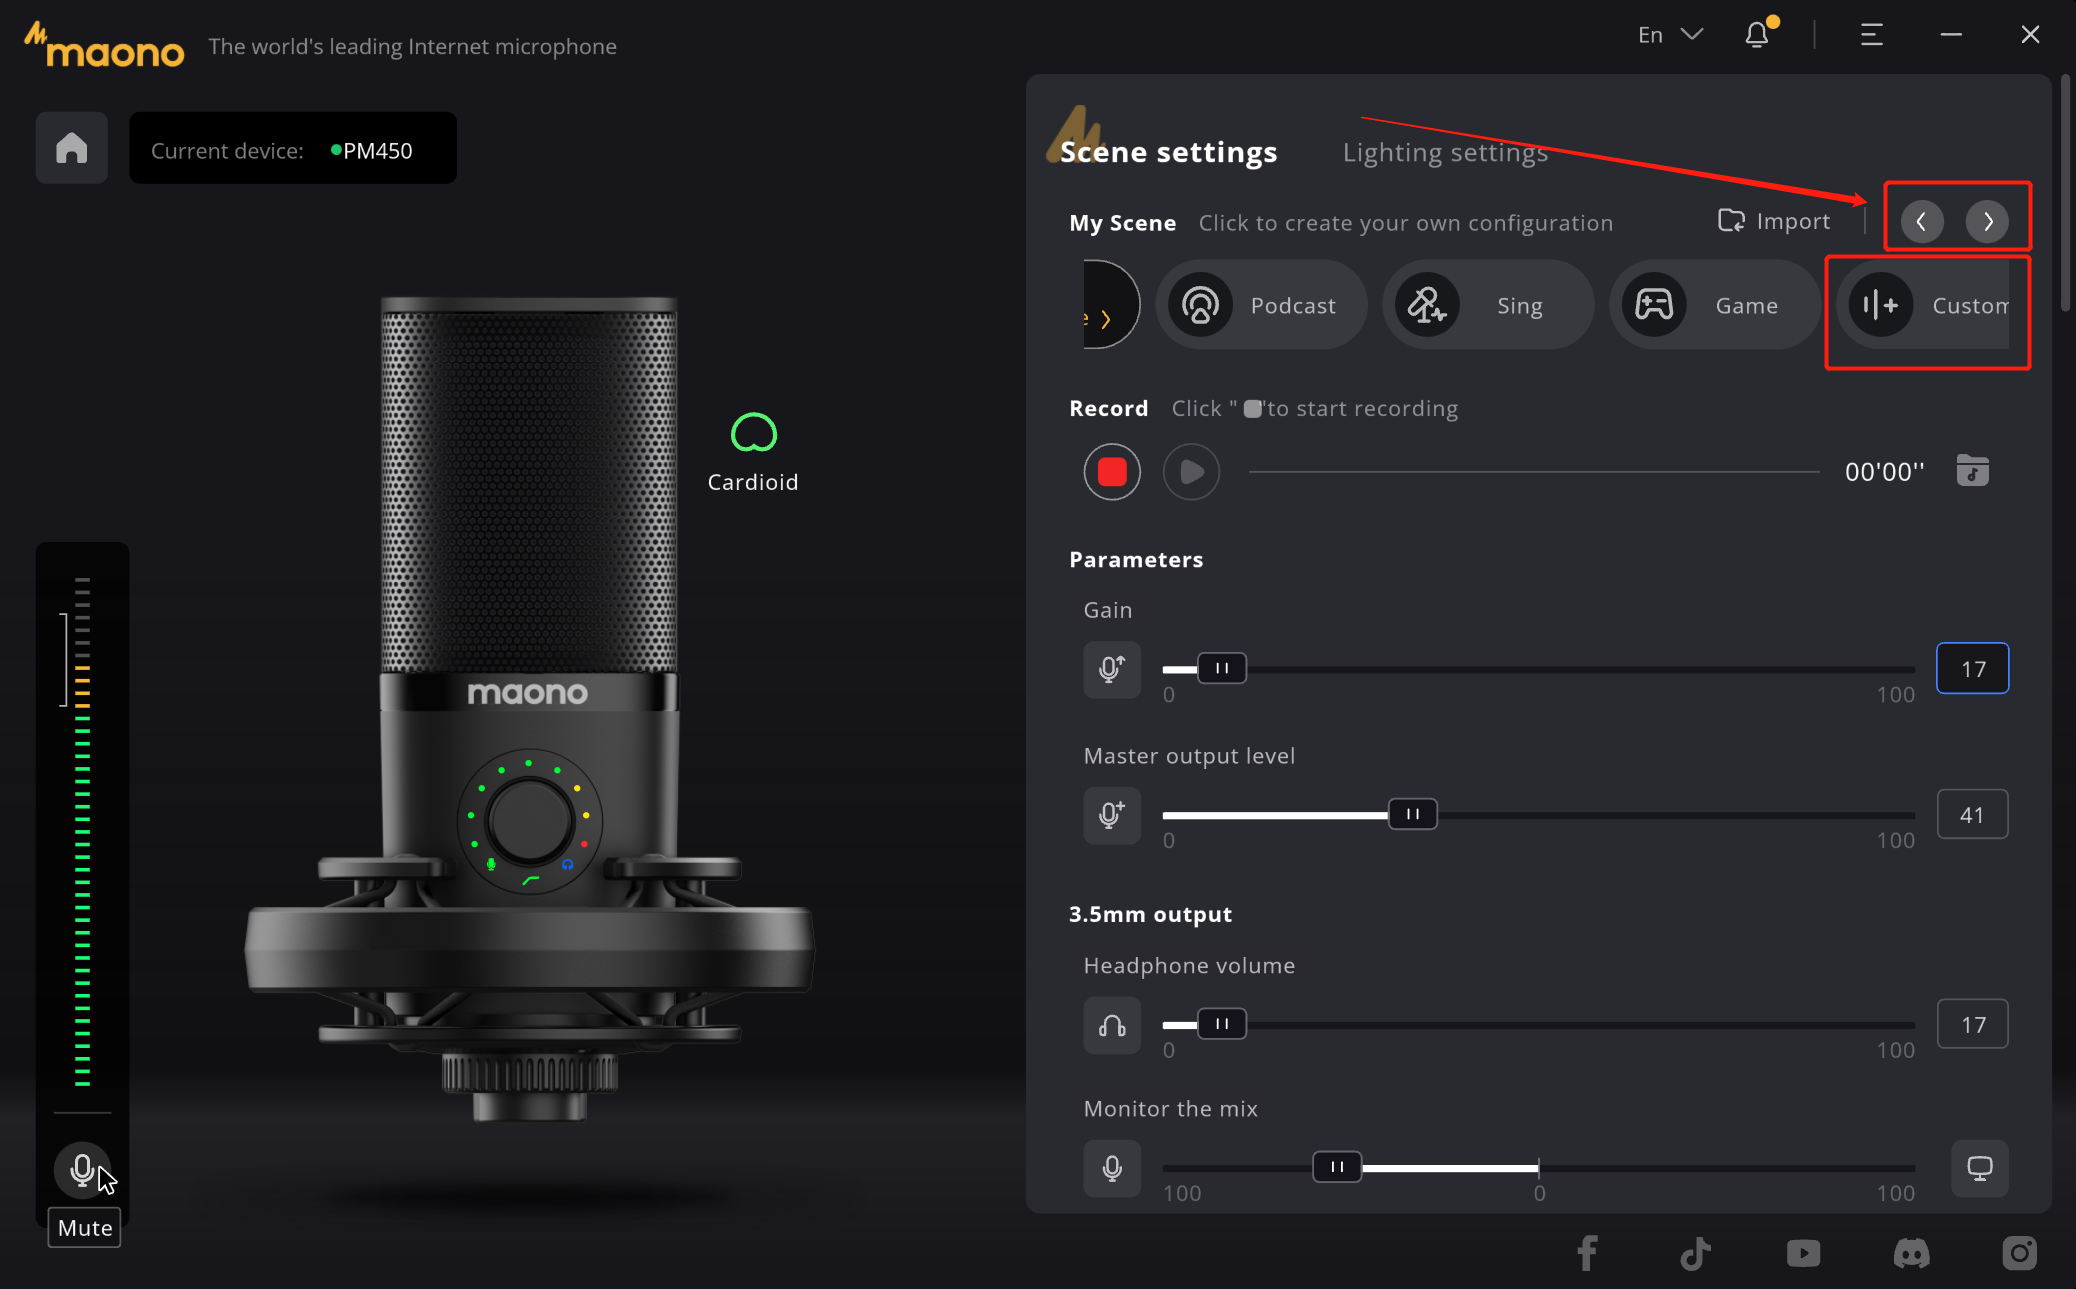
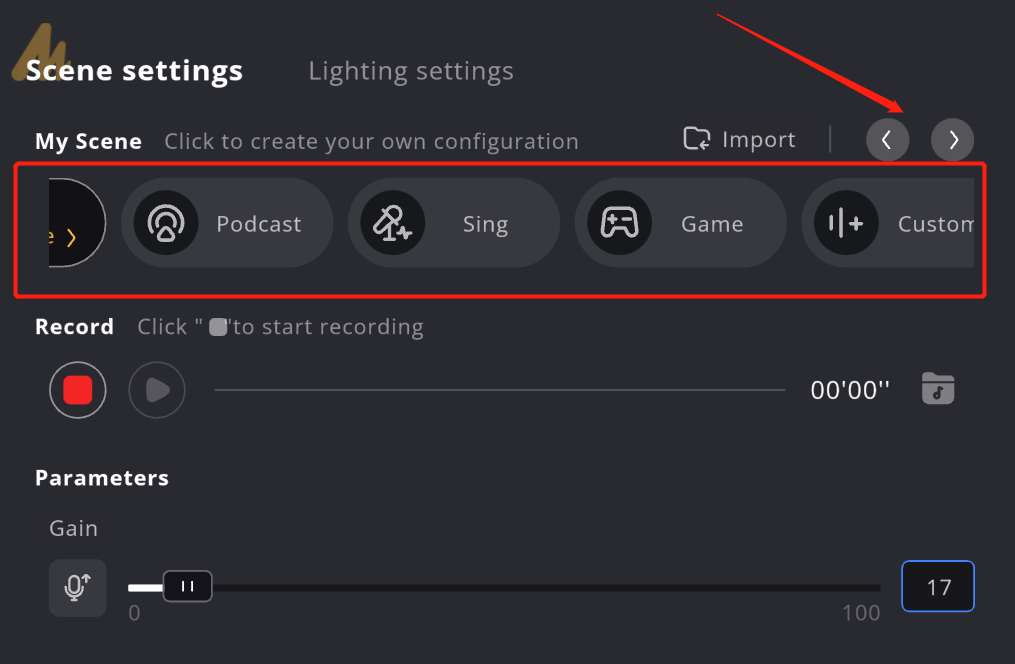
How to create your own scene configuration?
-
If the currently selected option is "Game ", you only need to "click again" to enter the game scene. And then you can click “New scene” to create a new scene modeled after the "Game", you are capable of making more advanced DSP parameter adjustments on this page.
-
It can be created with other scenes. For example, by double-clicking the ICON of the "Interview" scene, you can enter the interview scene.
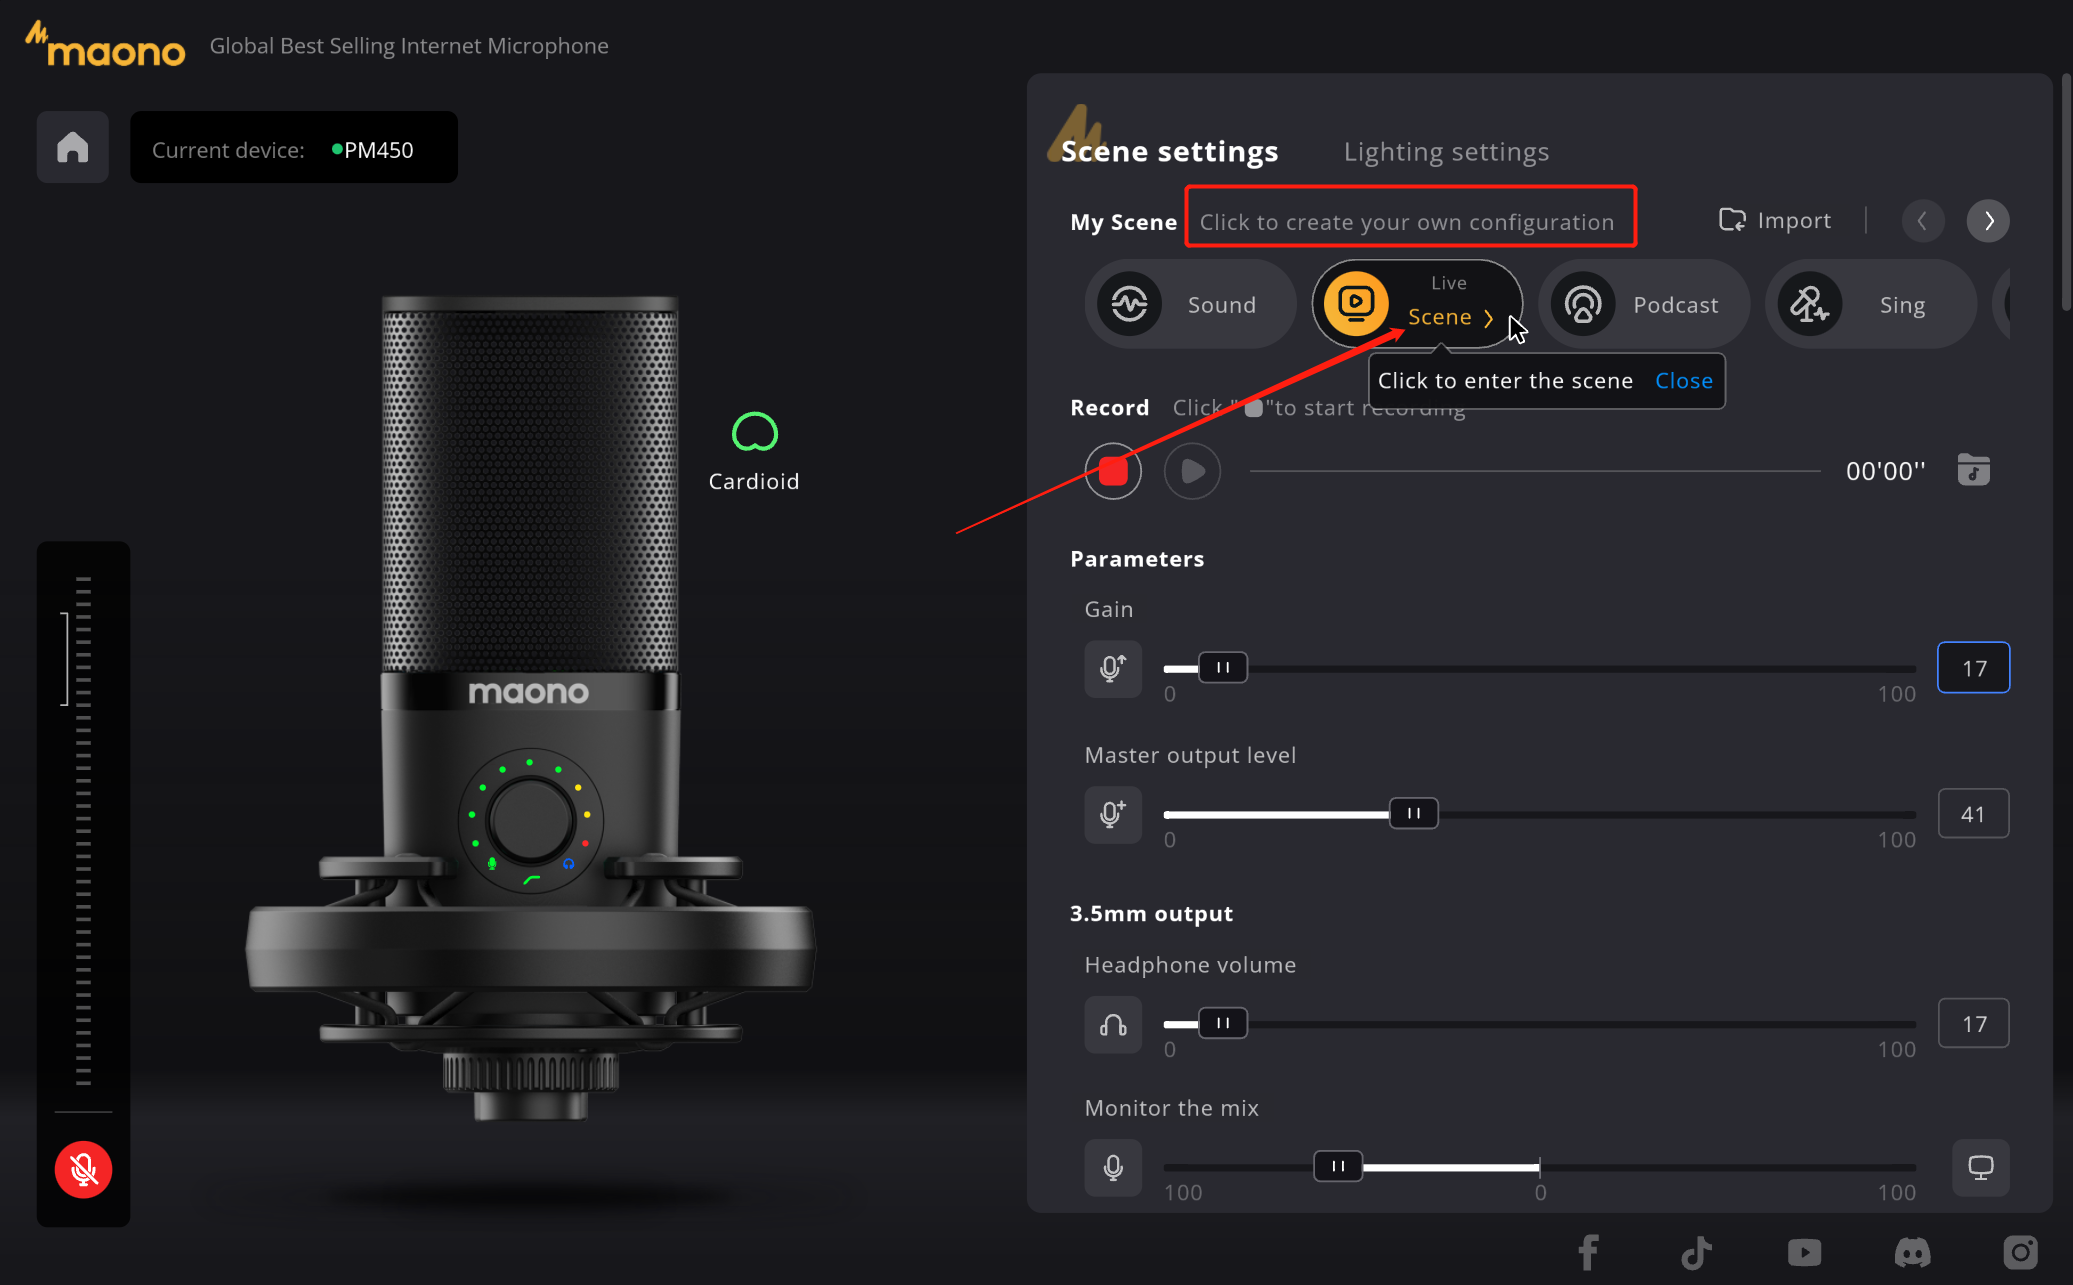
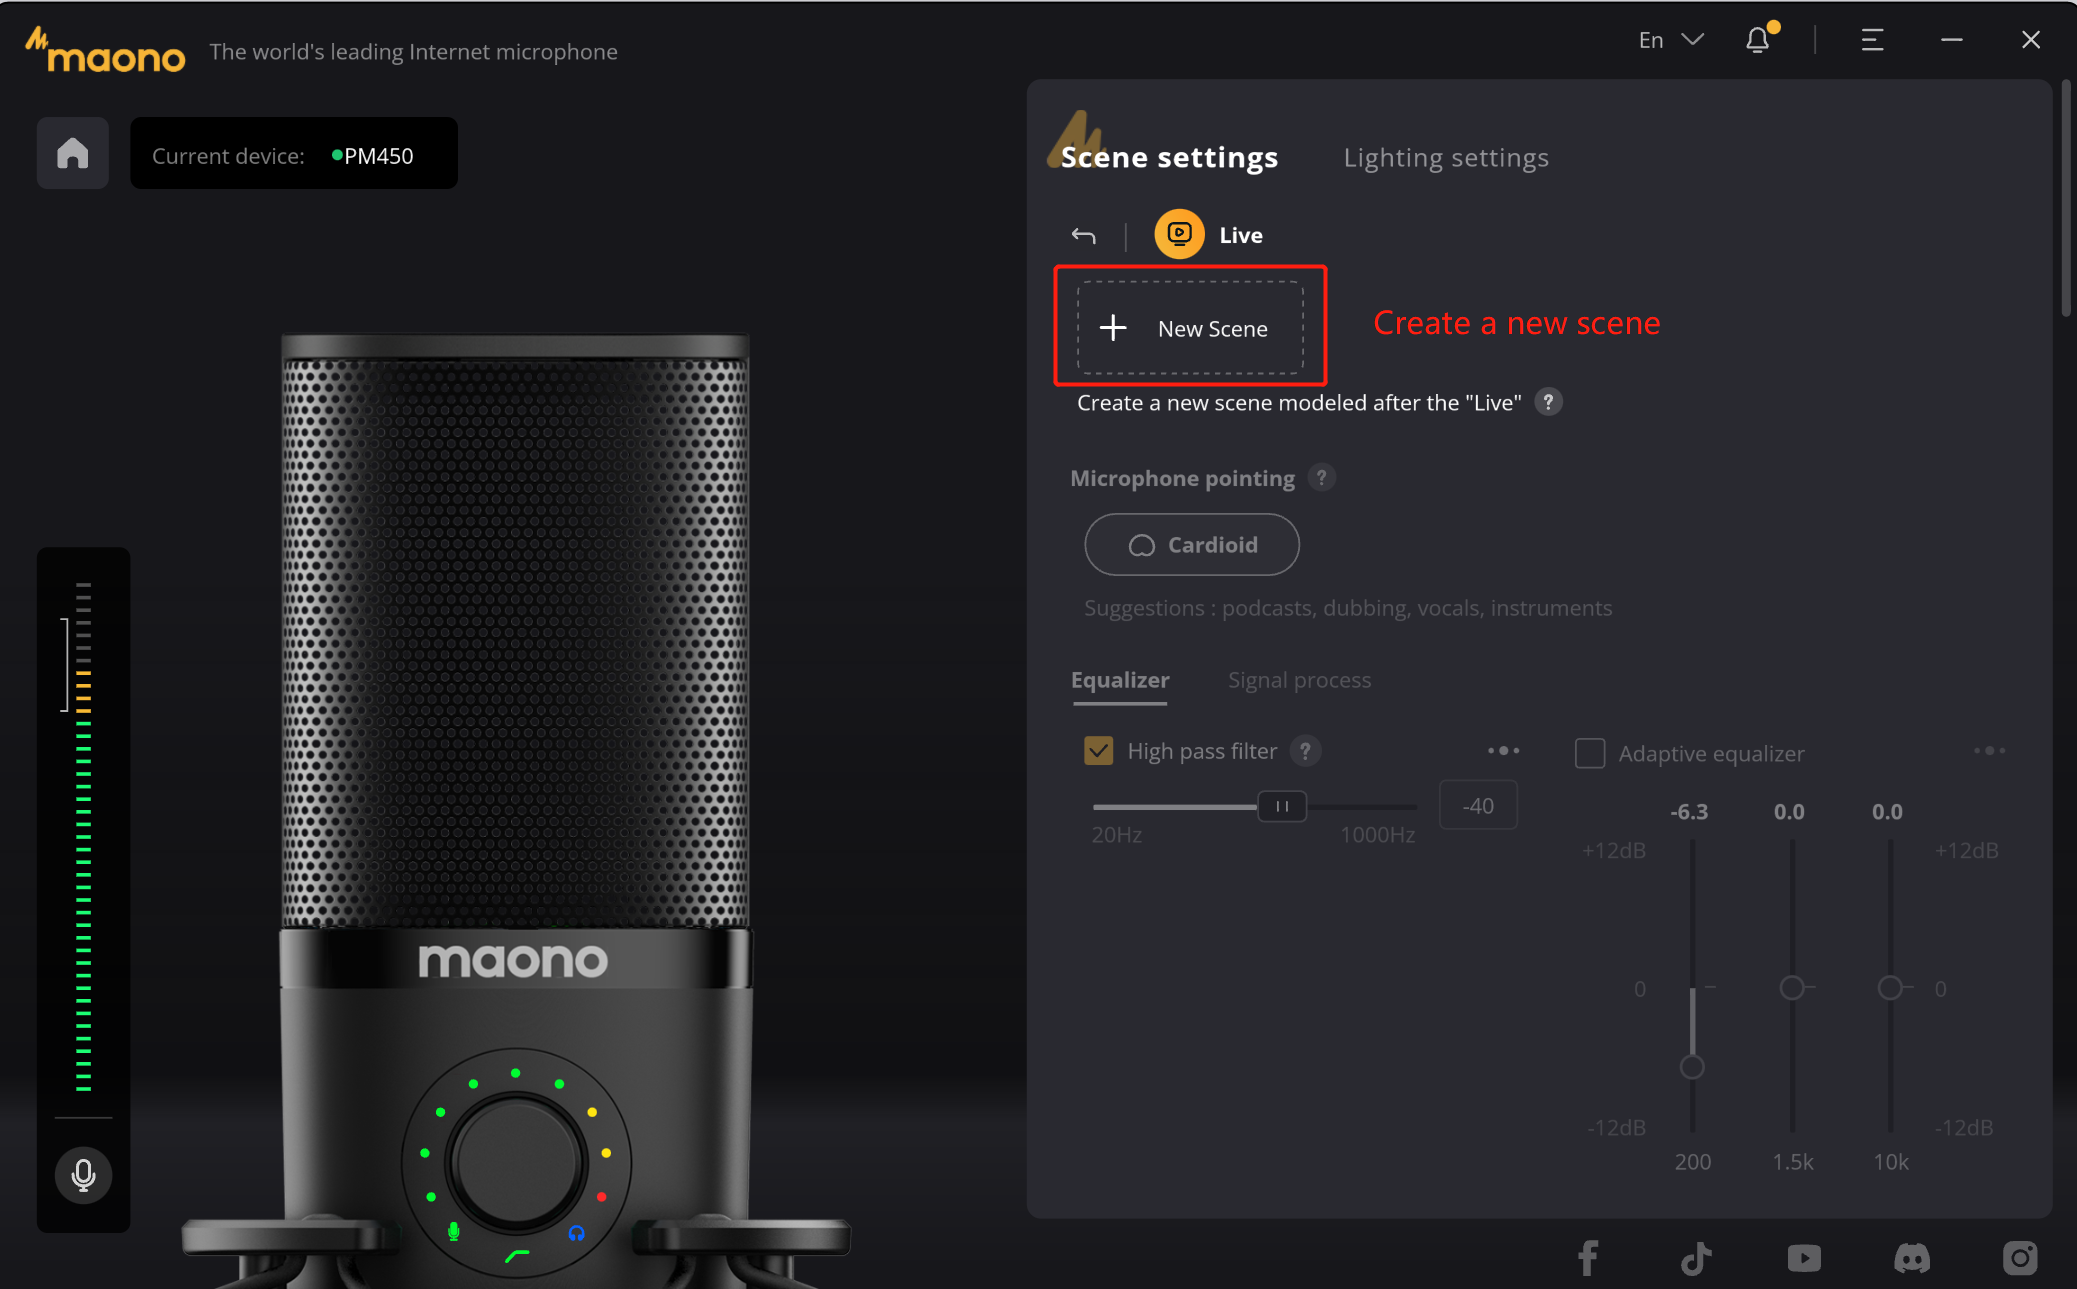
?Tips: First of all, on the right side of the software interface, you can see that we have preset several scene options, we provide the following ways to enter the scene creation:
1.1 Create a new scene modeled after the preset scene
1.2 Custom creation
a. Turn the page of the scene to the last scene preset
b. Double click the "Custom" option to enter the custom scene, which usually provides a completely blank scene
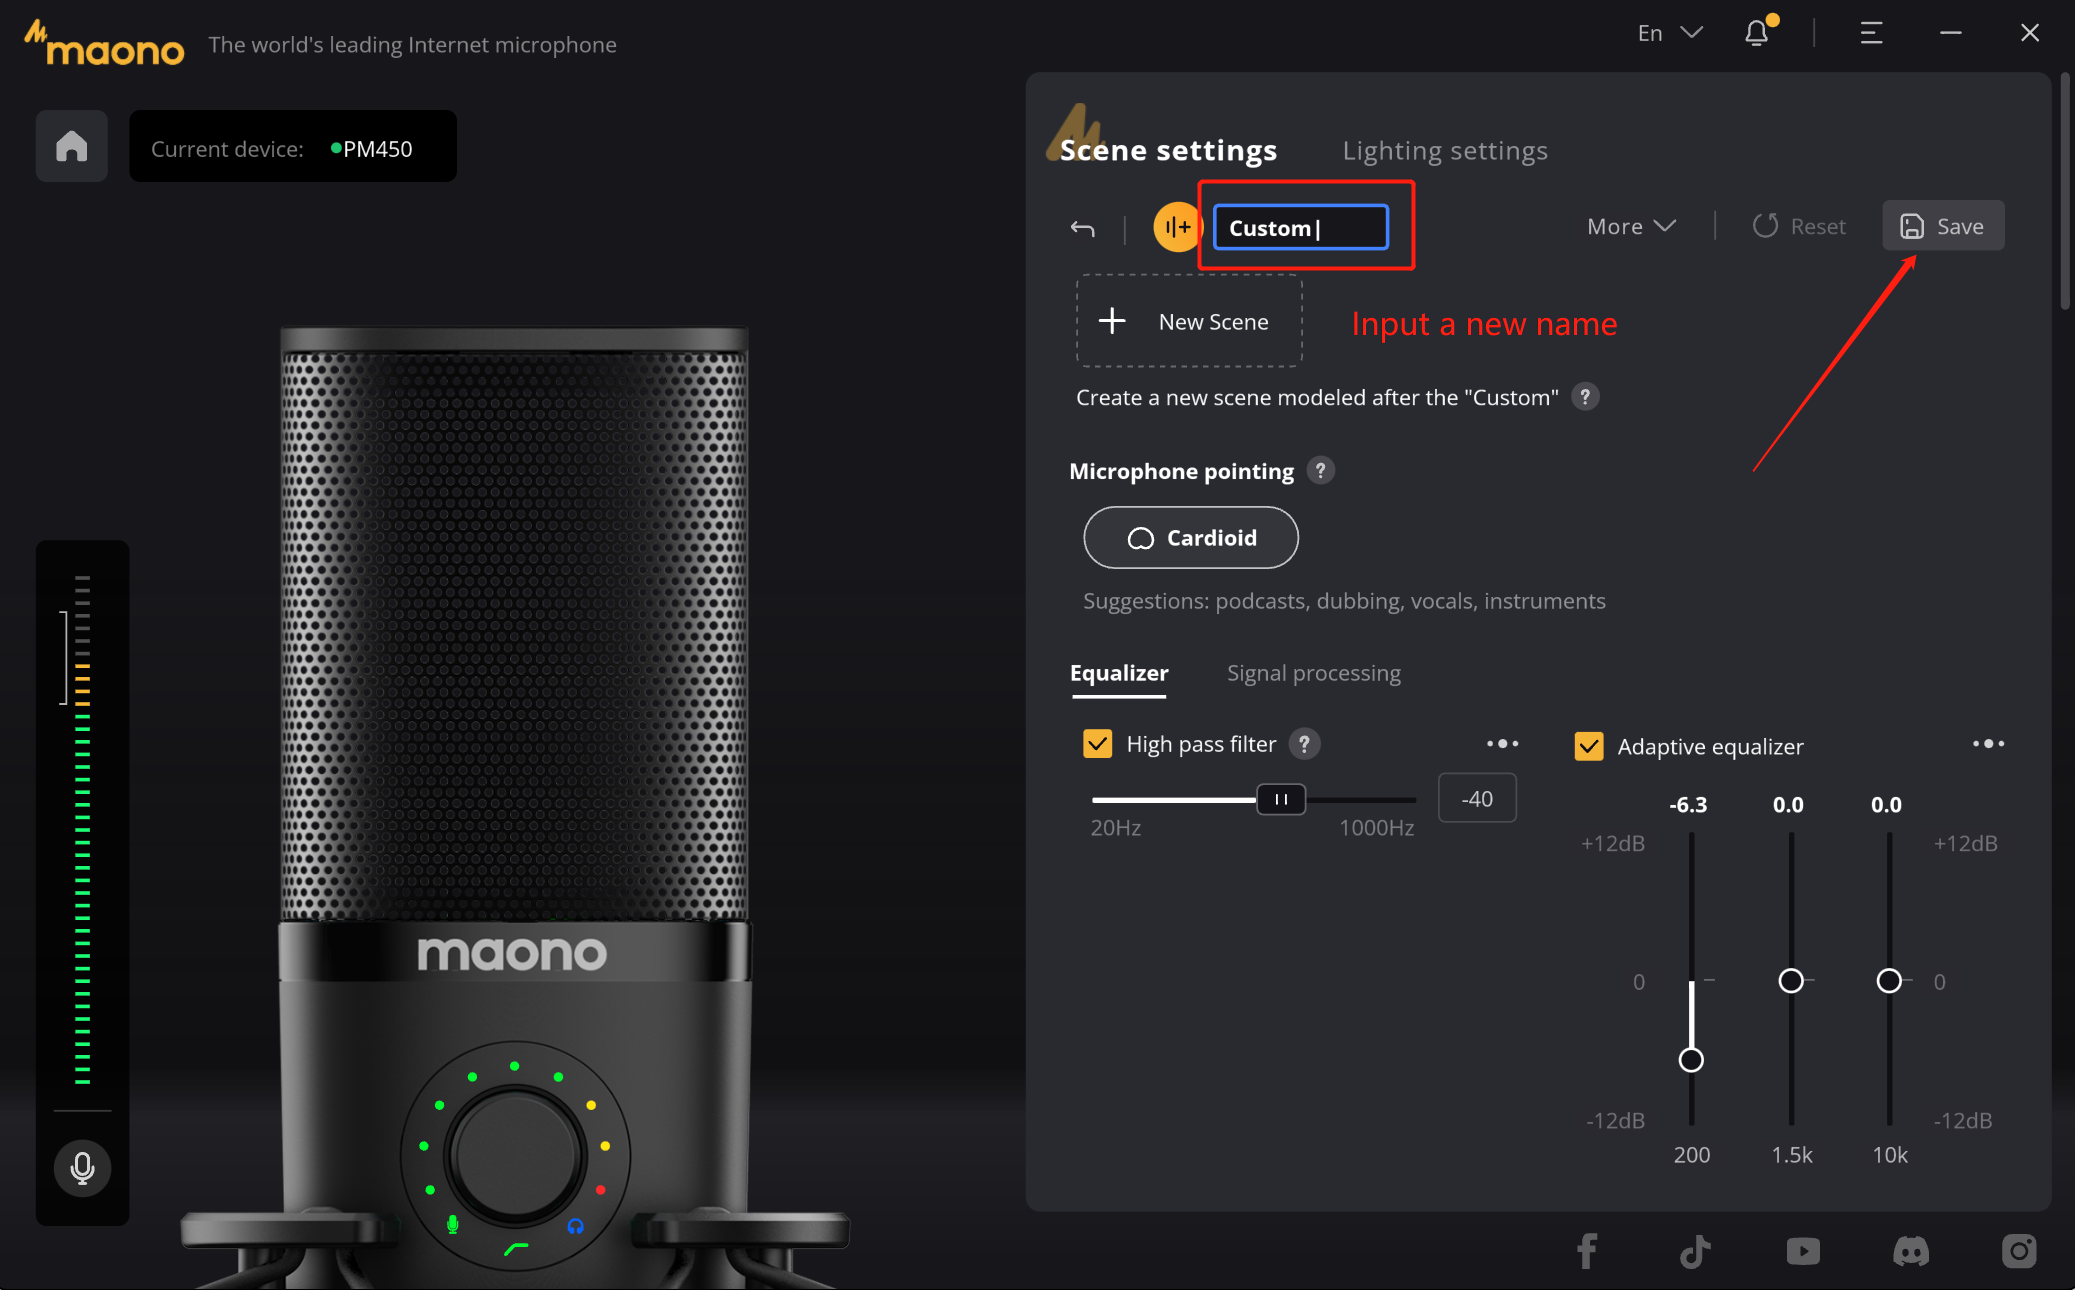
1.3 Start creation
Take the "Game" scene as an example, click "New Scene" to create a copy of the "game scene", the name will be changed to "Custom", and click the name to modify the scene name
1.4 Scene configuration
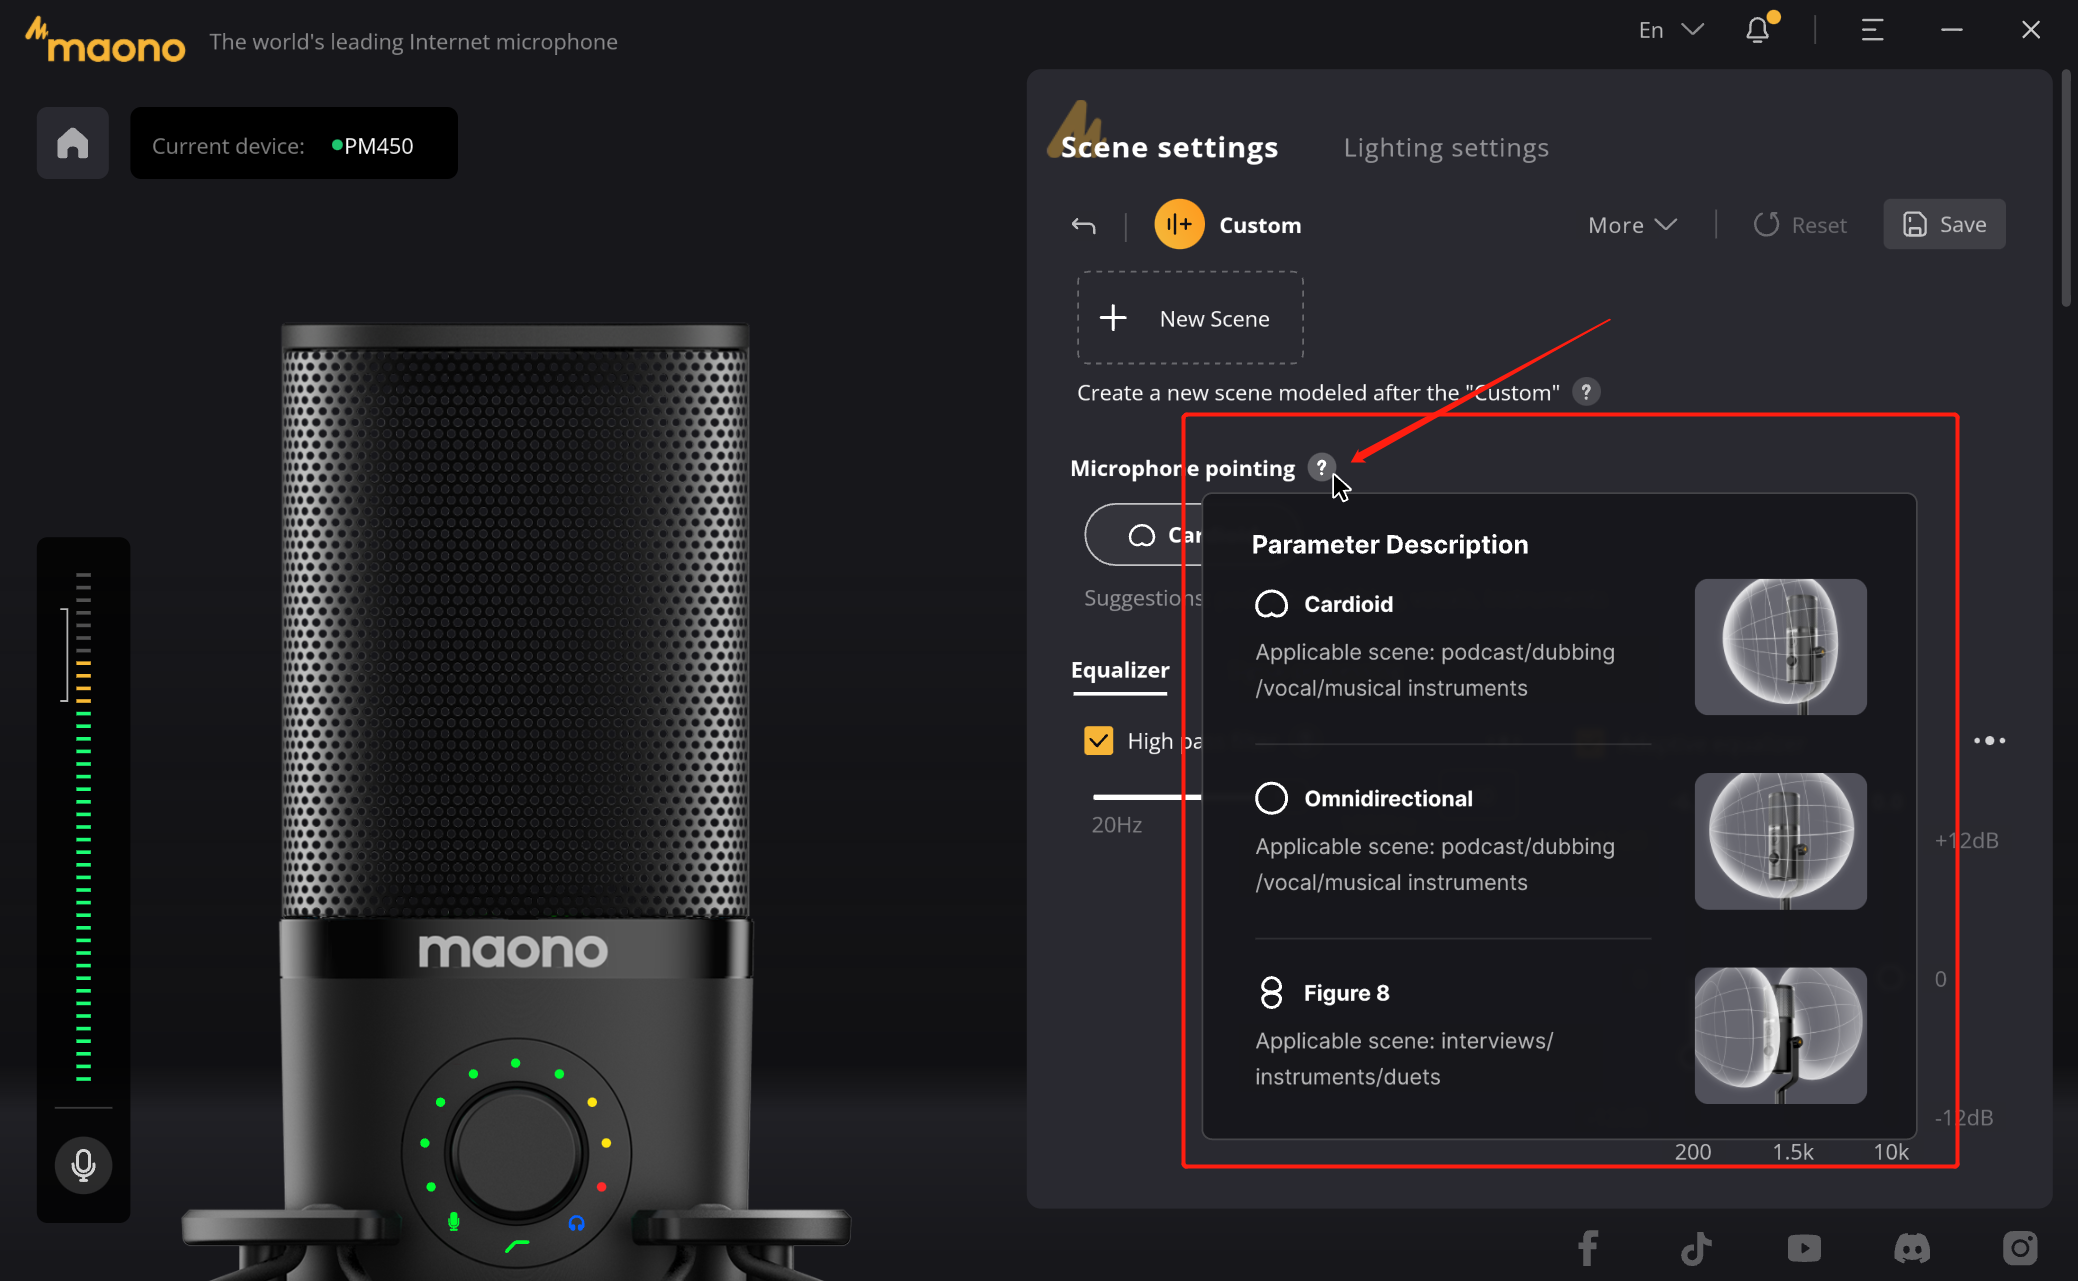
a. Polar pattern
b. DSP Parameters settings
In the scene, we can set the point of the microphone, such as "Cardioid", "Omnidirectional", "Figure 8". Different point has its own suitable scene, when you choose will have the corresponding prompt. In "help" we also provide helps for you to understand the differences between the various points.
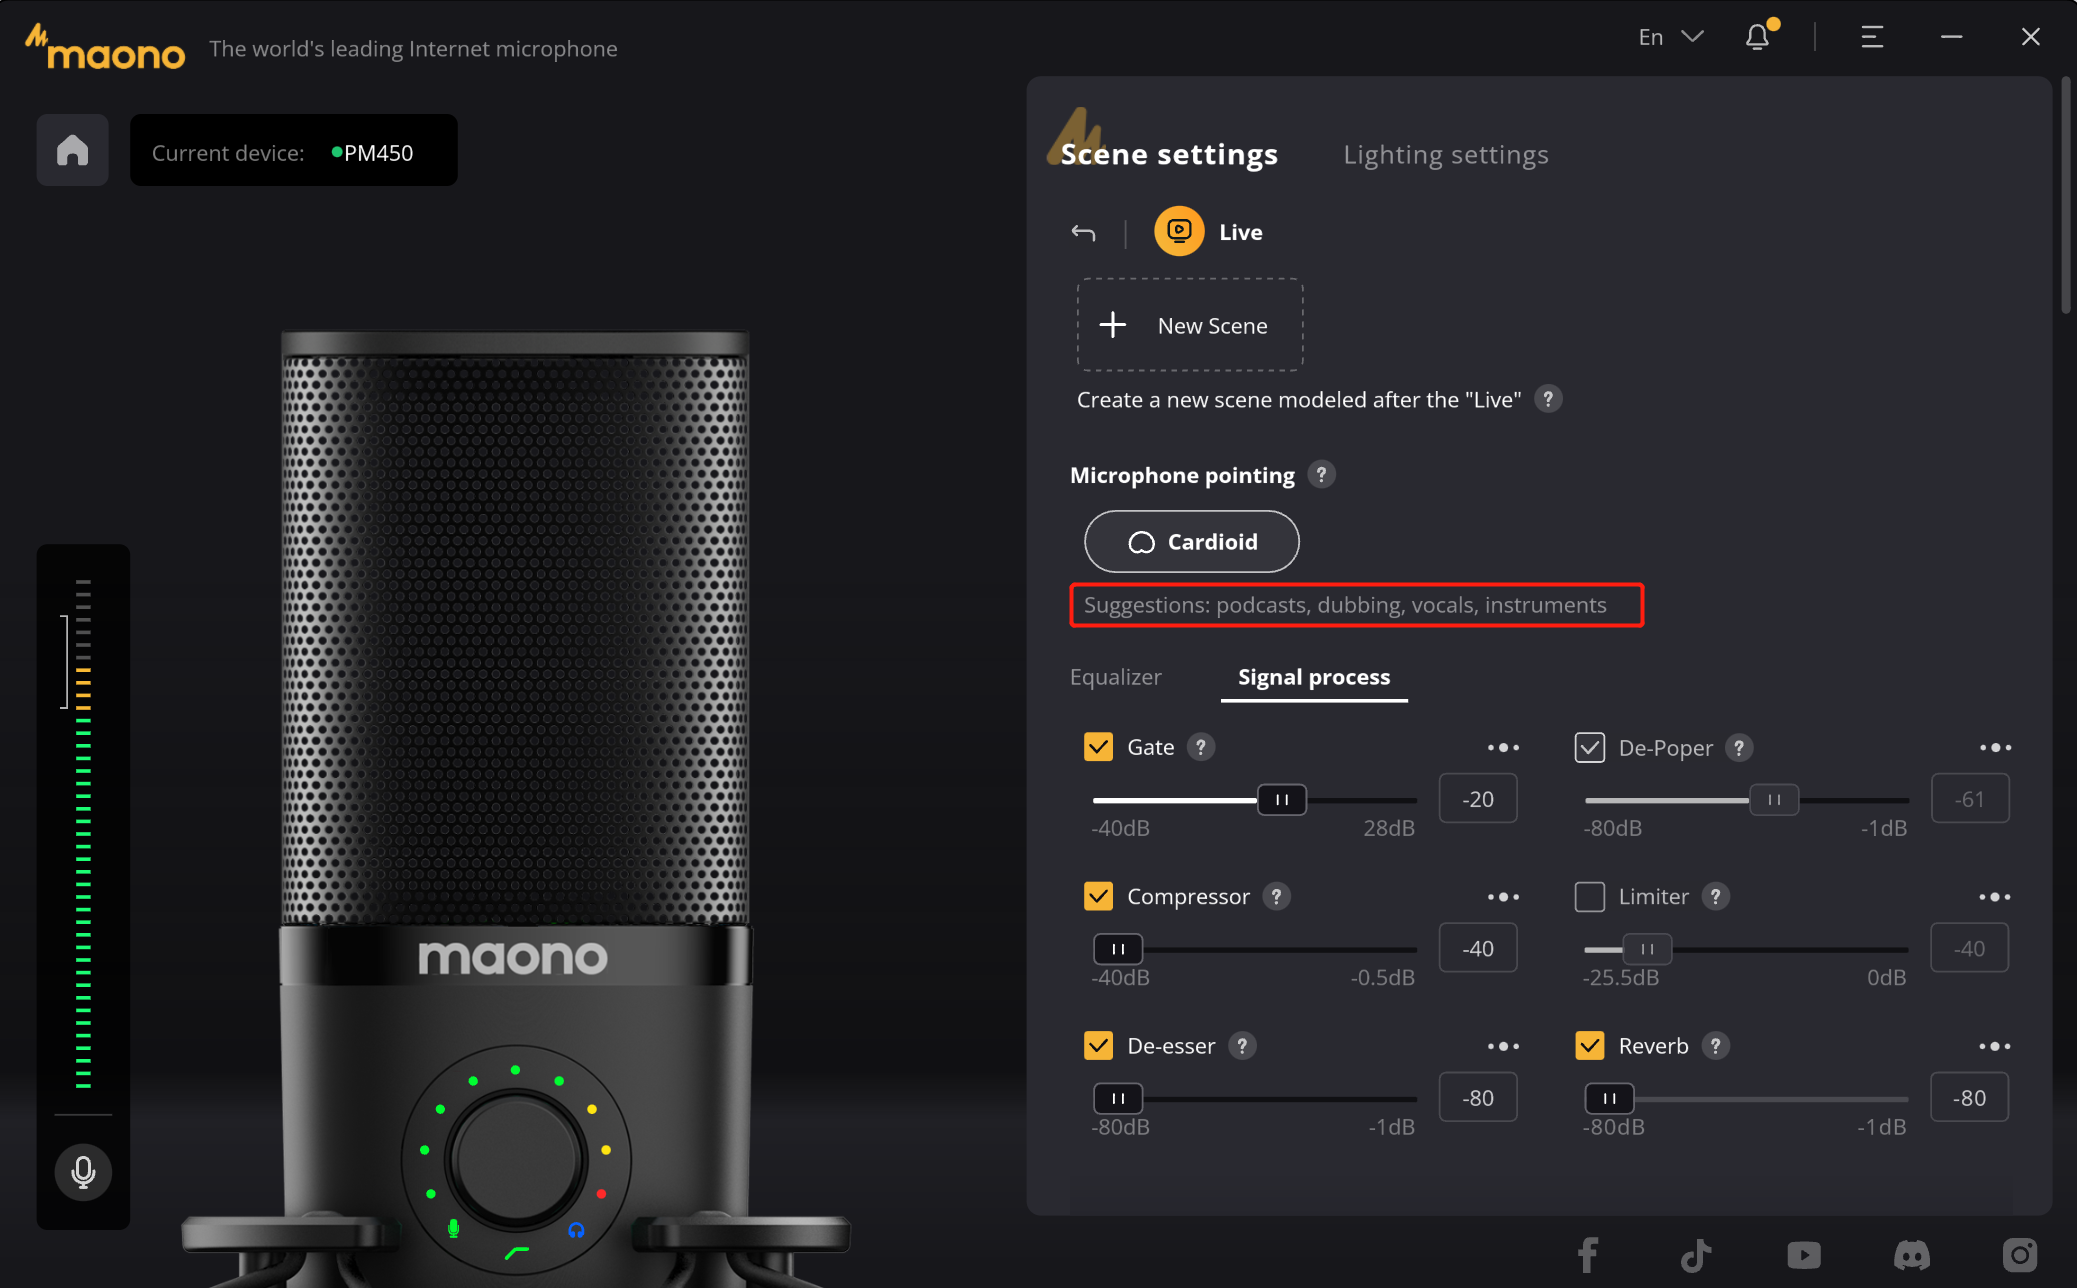
b1. Up to 10 kinds of DSP effects are built in the product, and you can select them when using.
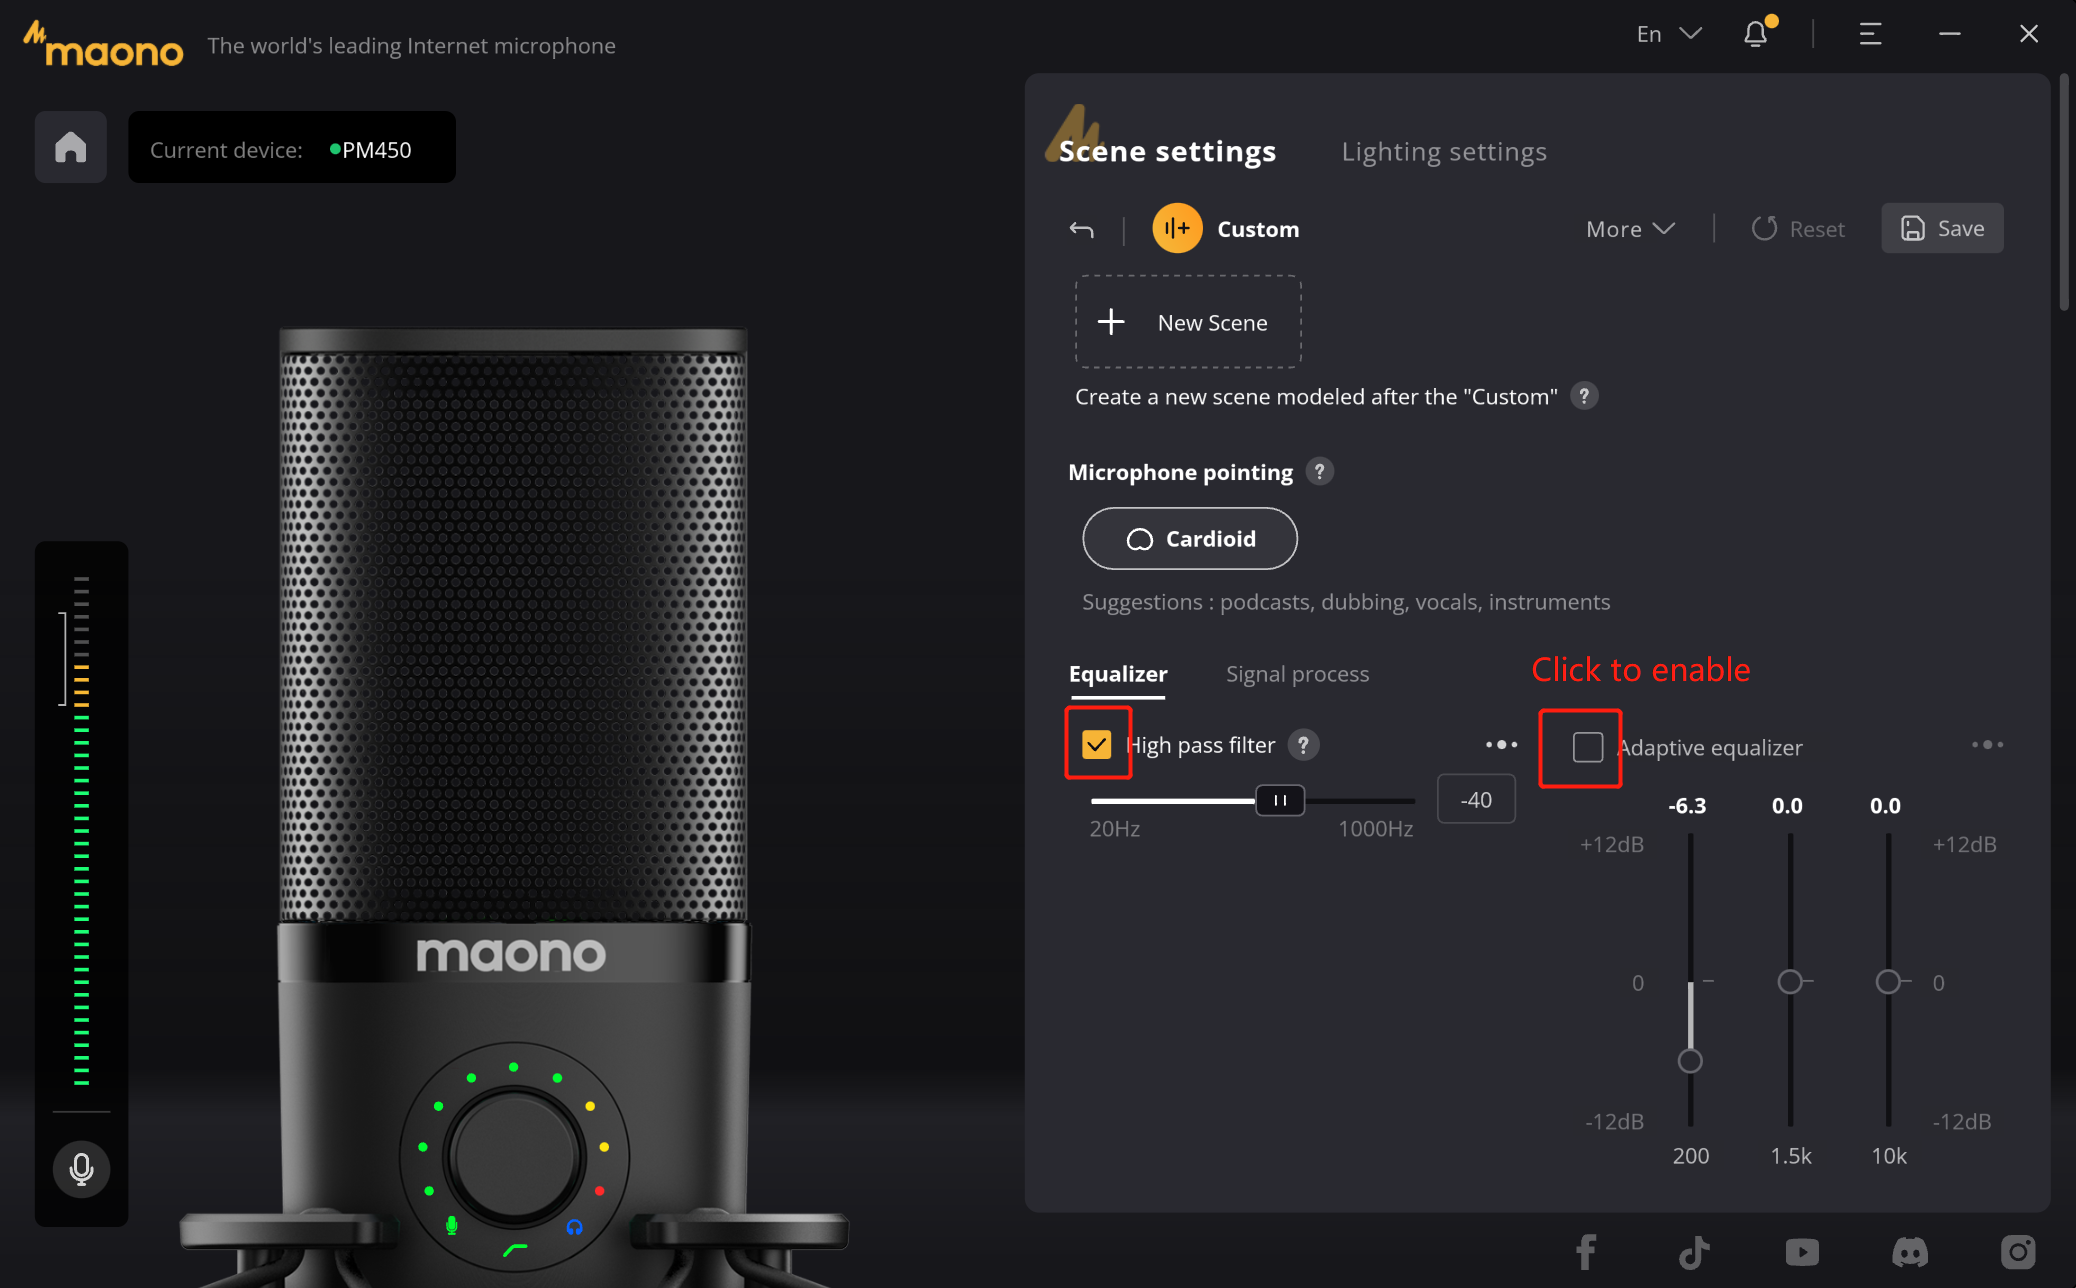
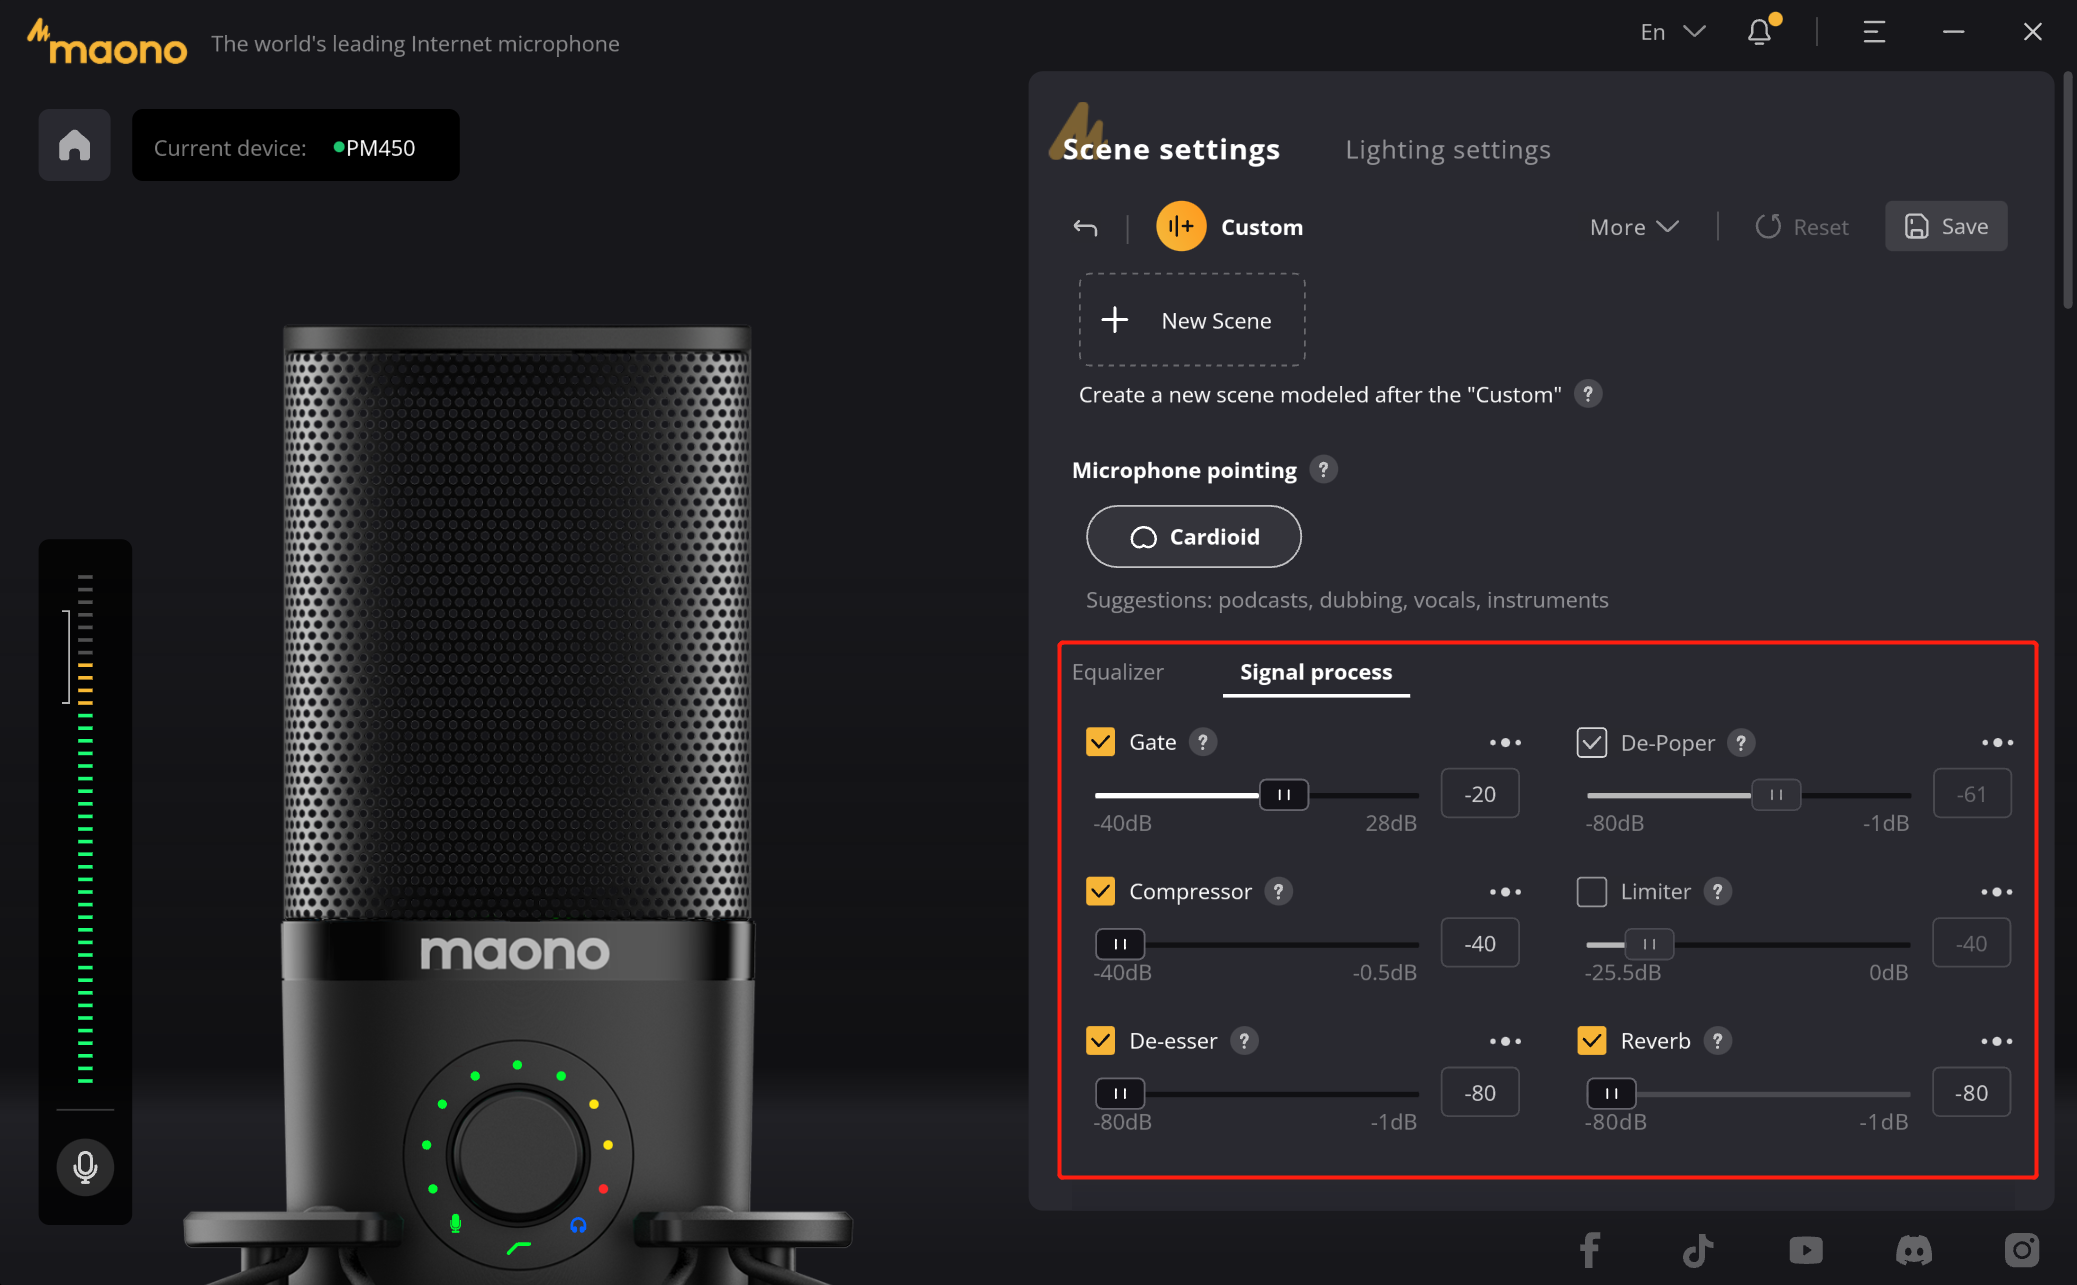
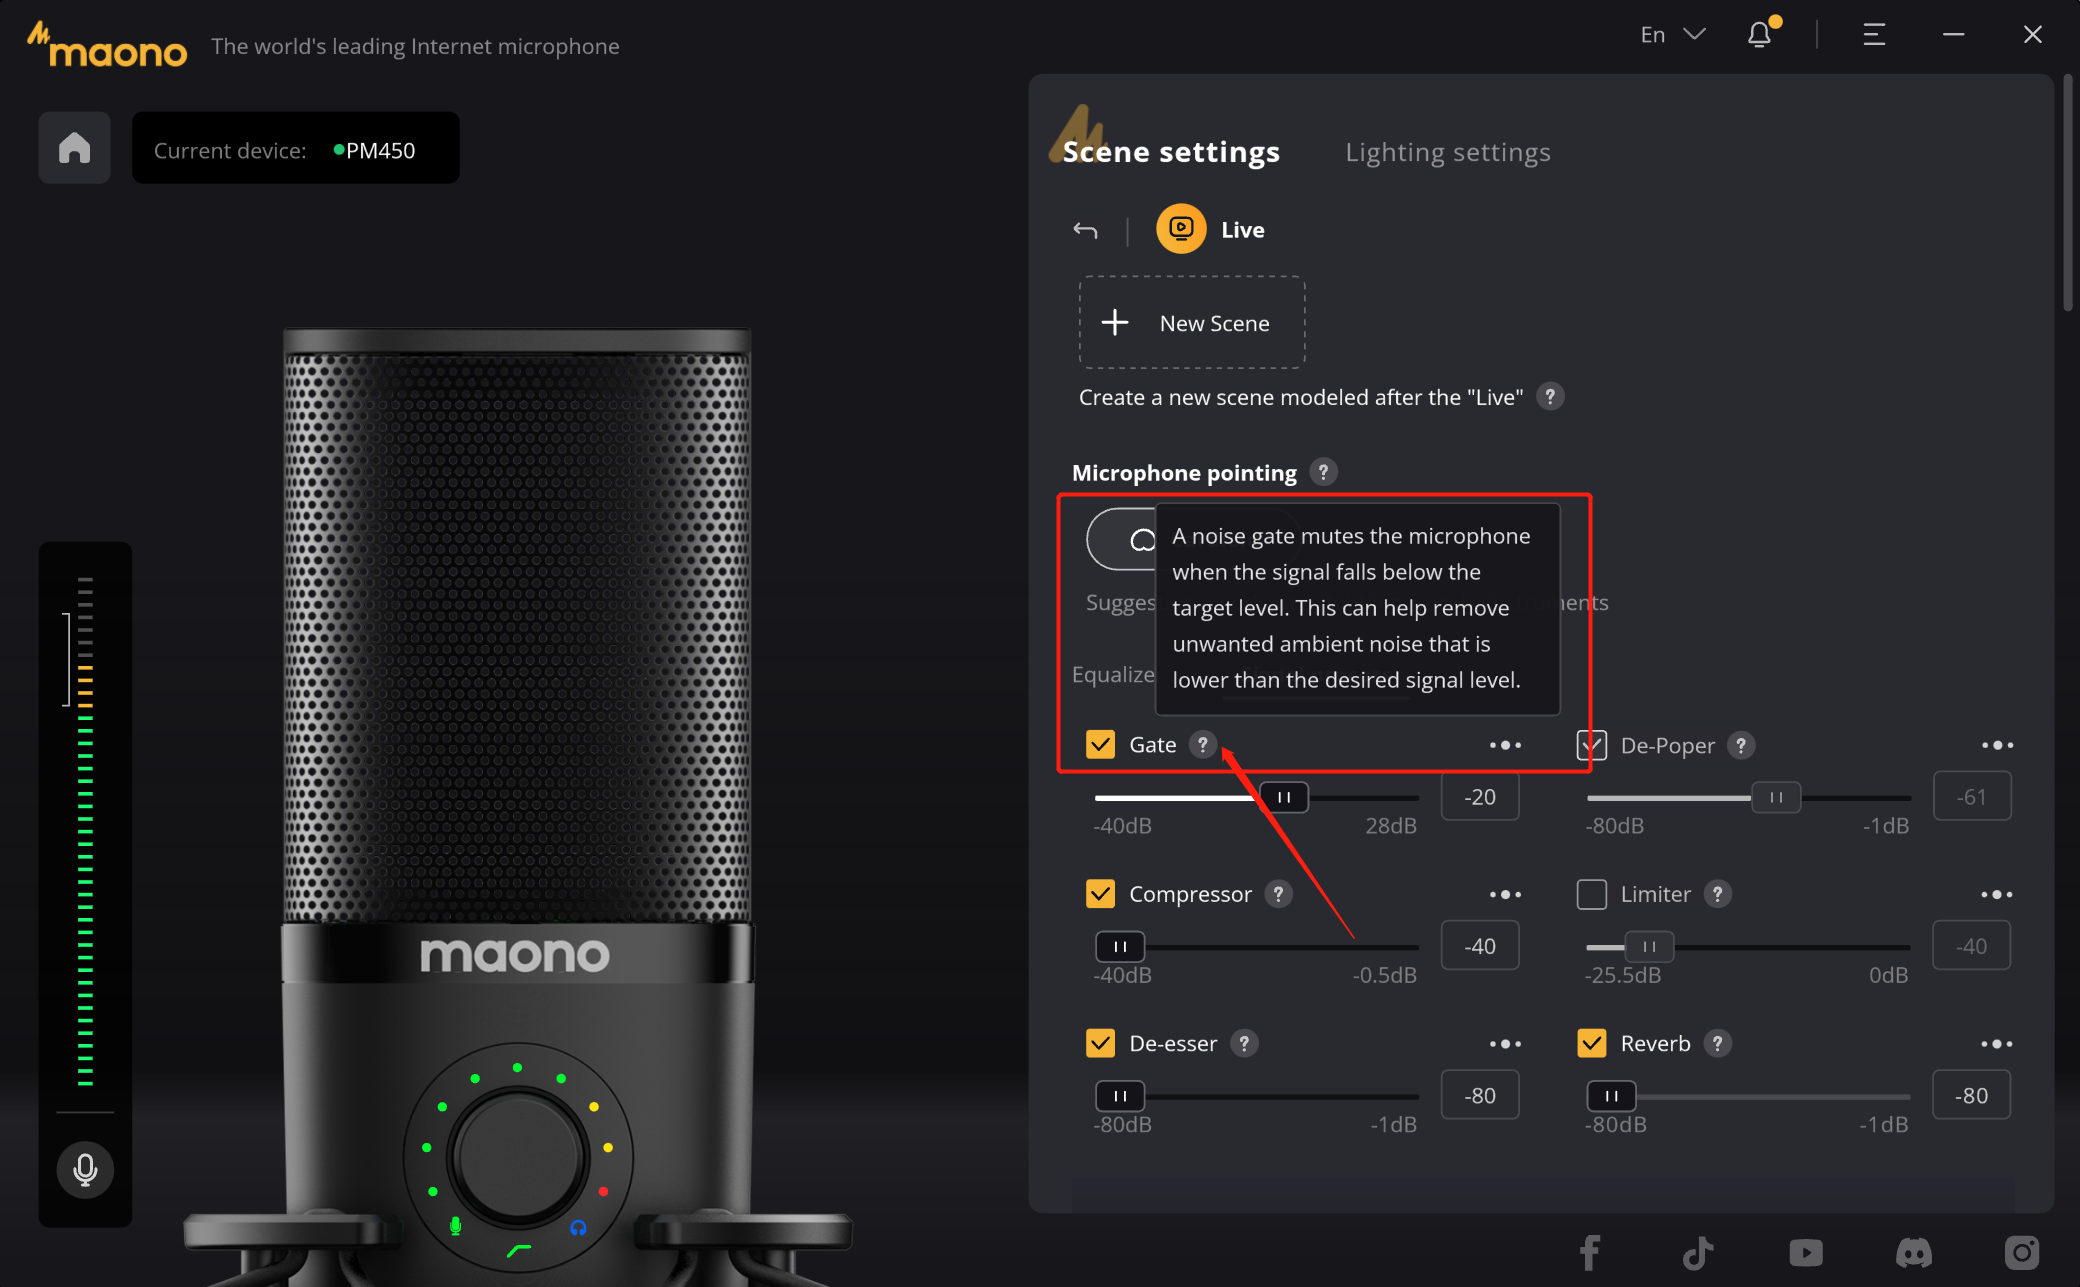
b2. If you need to use a DSP effect but are unsure of its function, you will notice a "?" next to the effect name. Hovering over it will display a text prompt describing its functions.
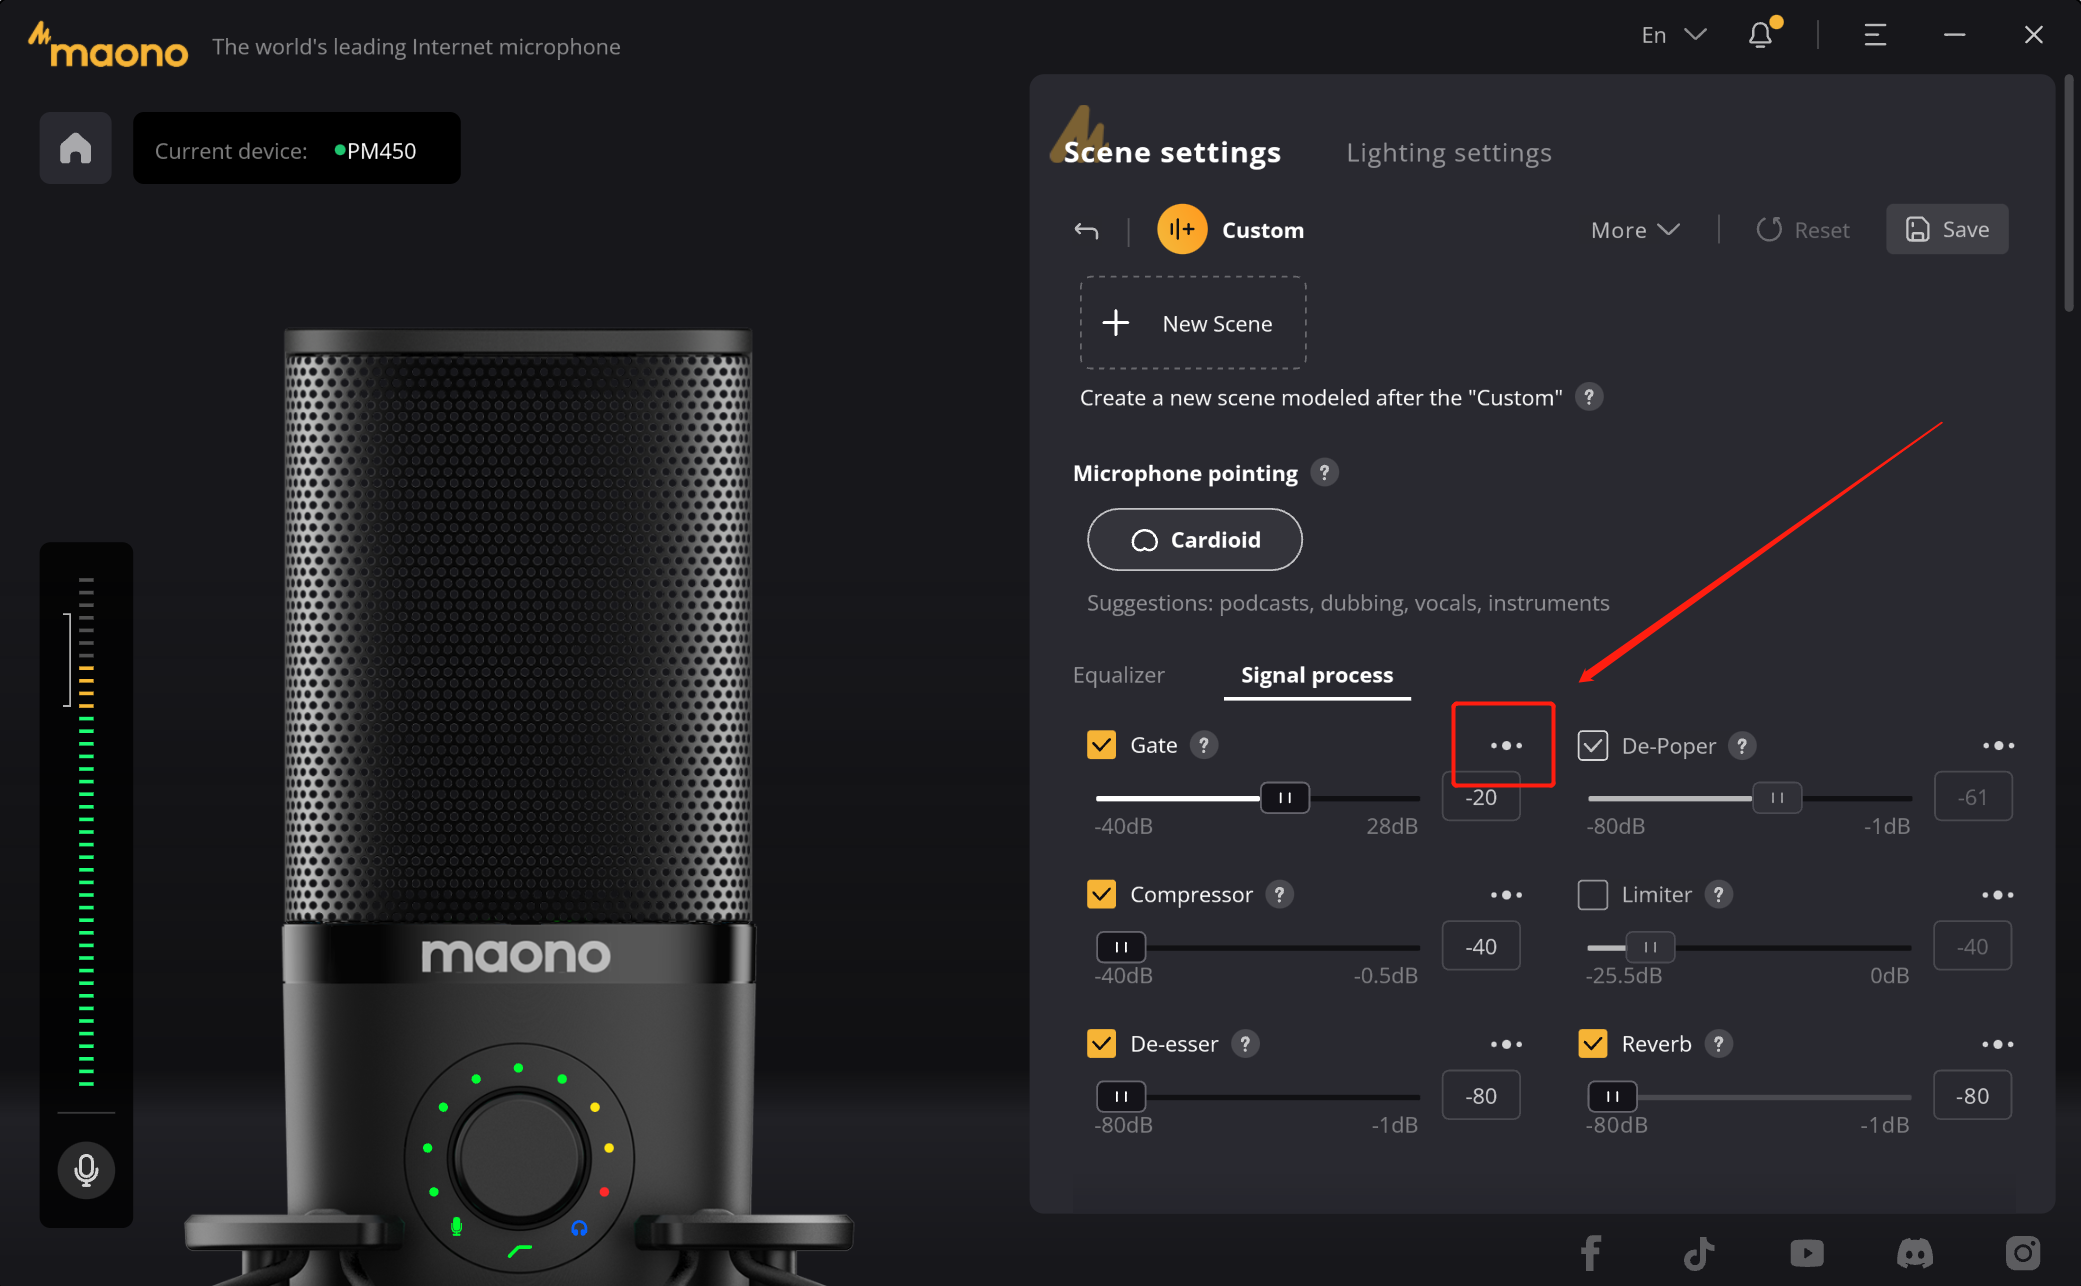
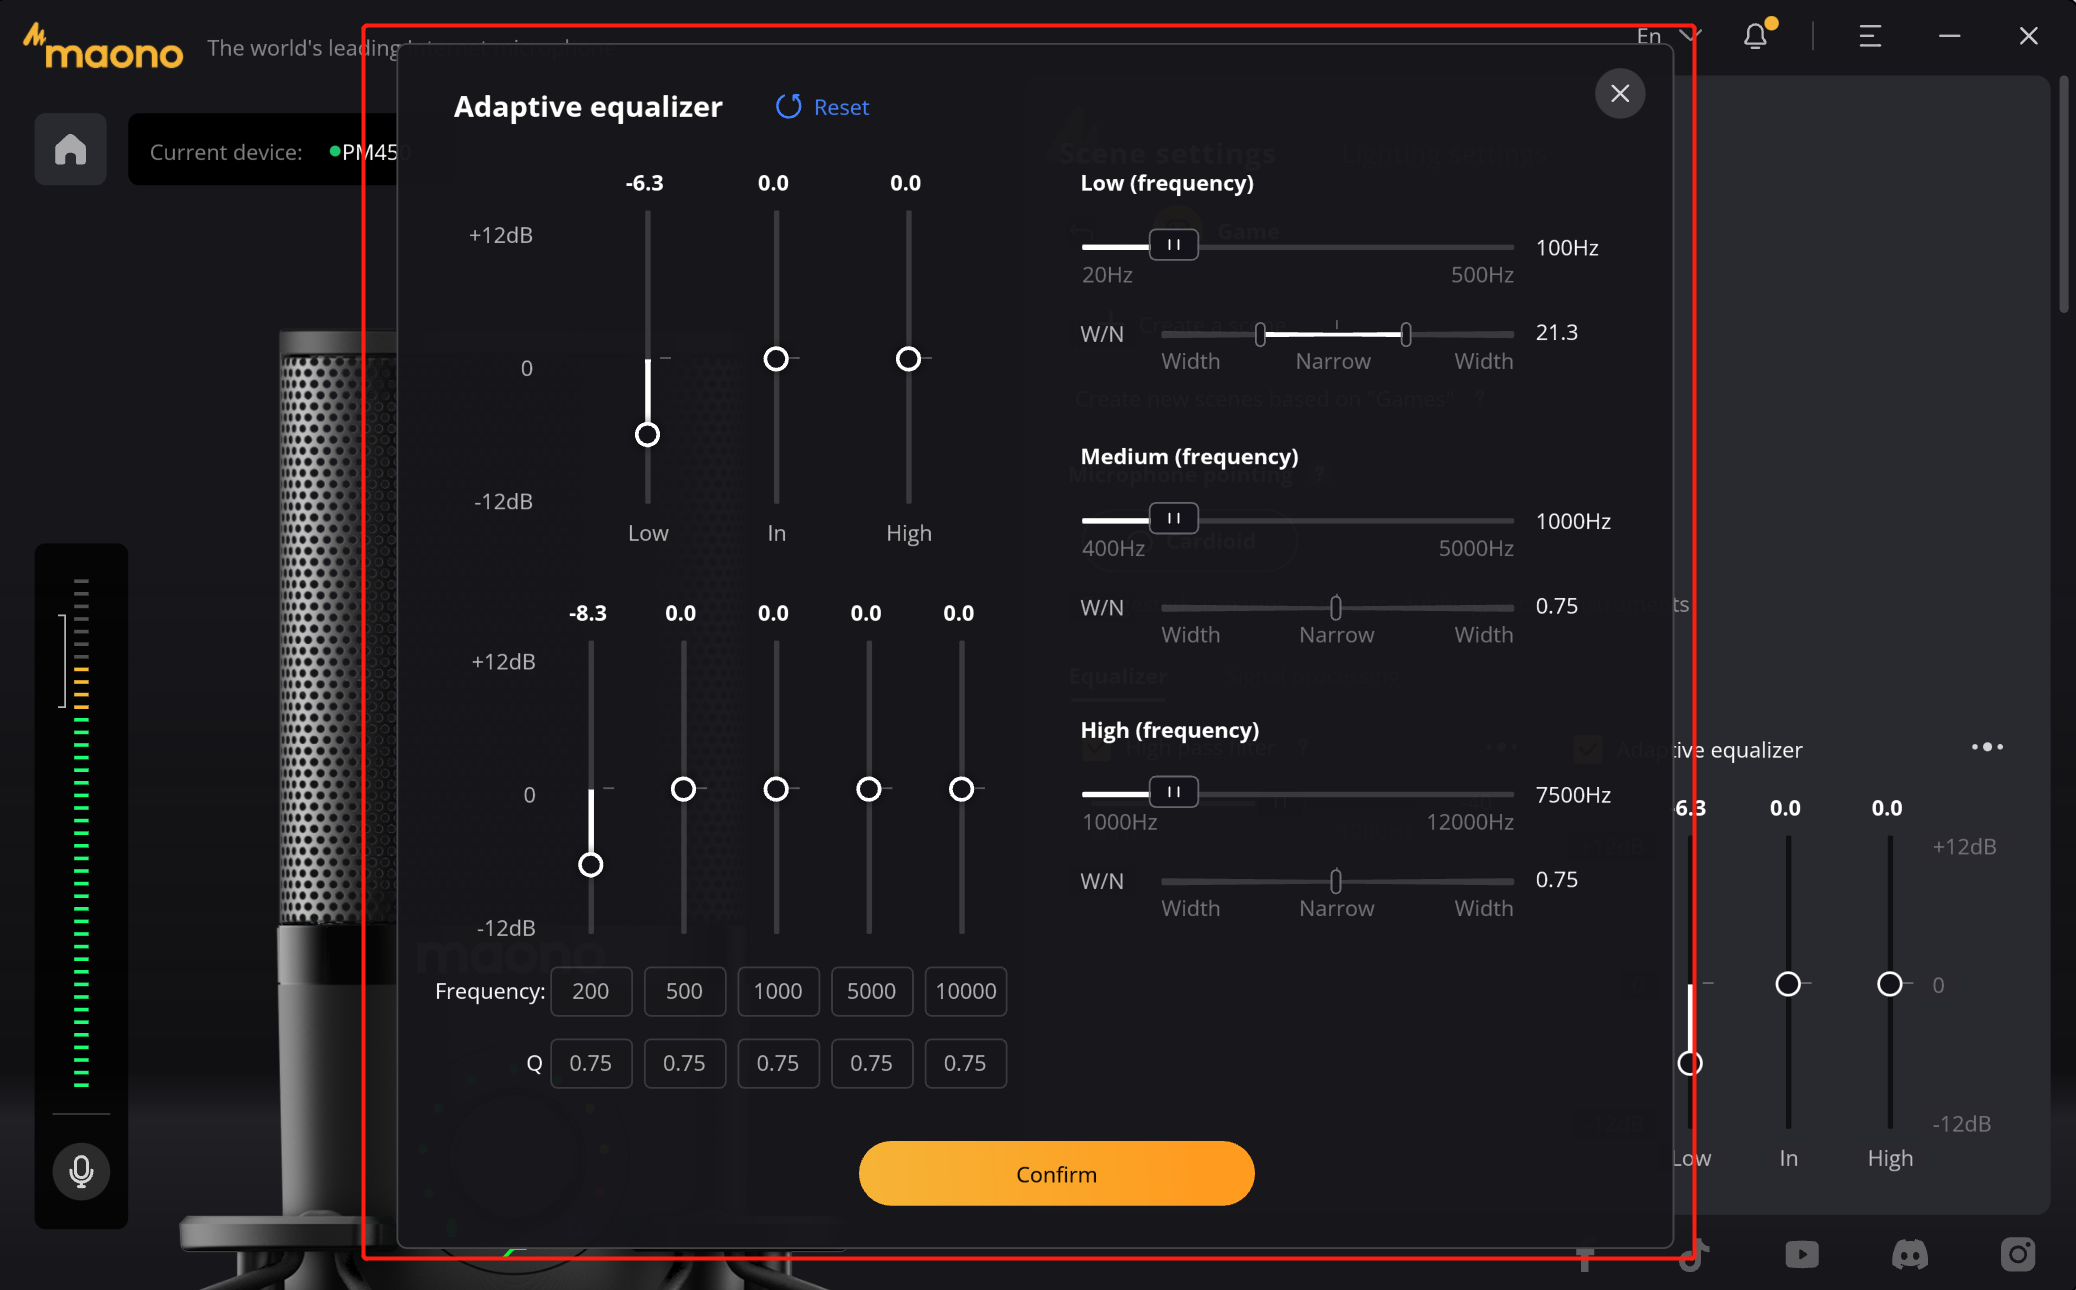
b3. If you are a creator, then you need more professional sound effects, we also have a "···" icon in the upper right corner of each effect device, click on it to open a more detailed adjustment window, in this secondary window you can do more detailed parameter Settings to improve your microphone experience.
These parameters can be adjusted in real time, when you speak, you can hear the sound effect by listening to the headphones.
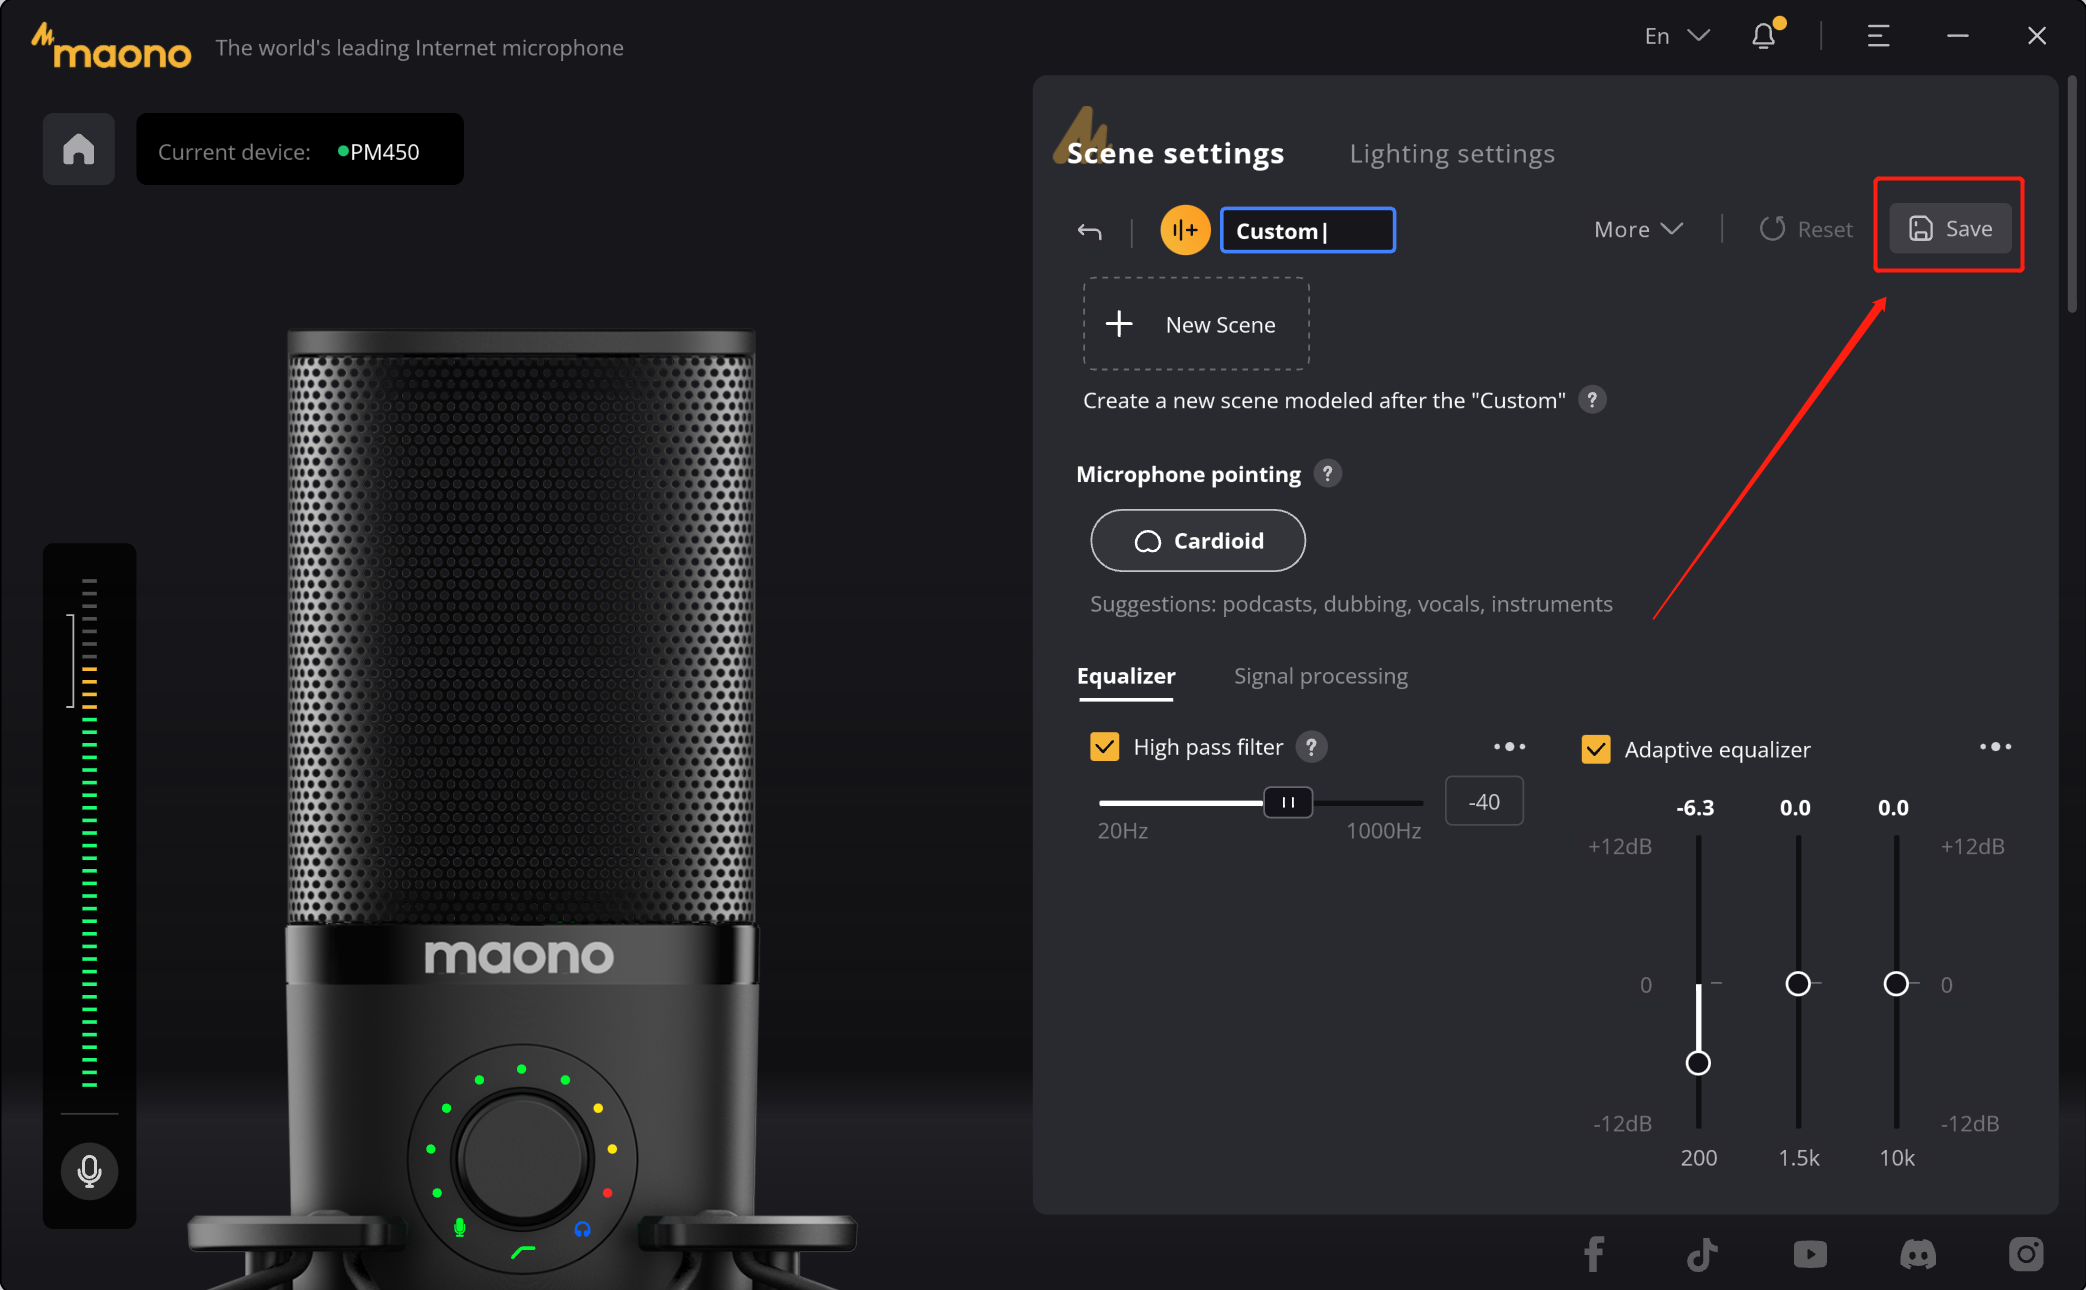
c. Save the scene settings
When you are satisfied with the adjustment of the parameters, you can click the "Save" button in the upper right corner to save the configured parameters, so that you can easily switch the next time.
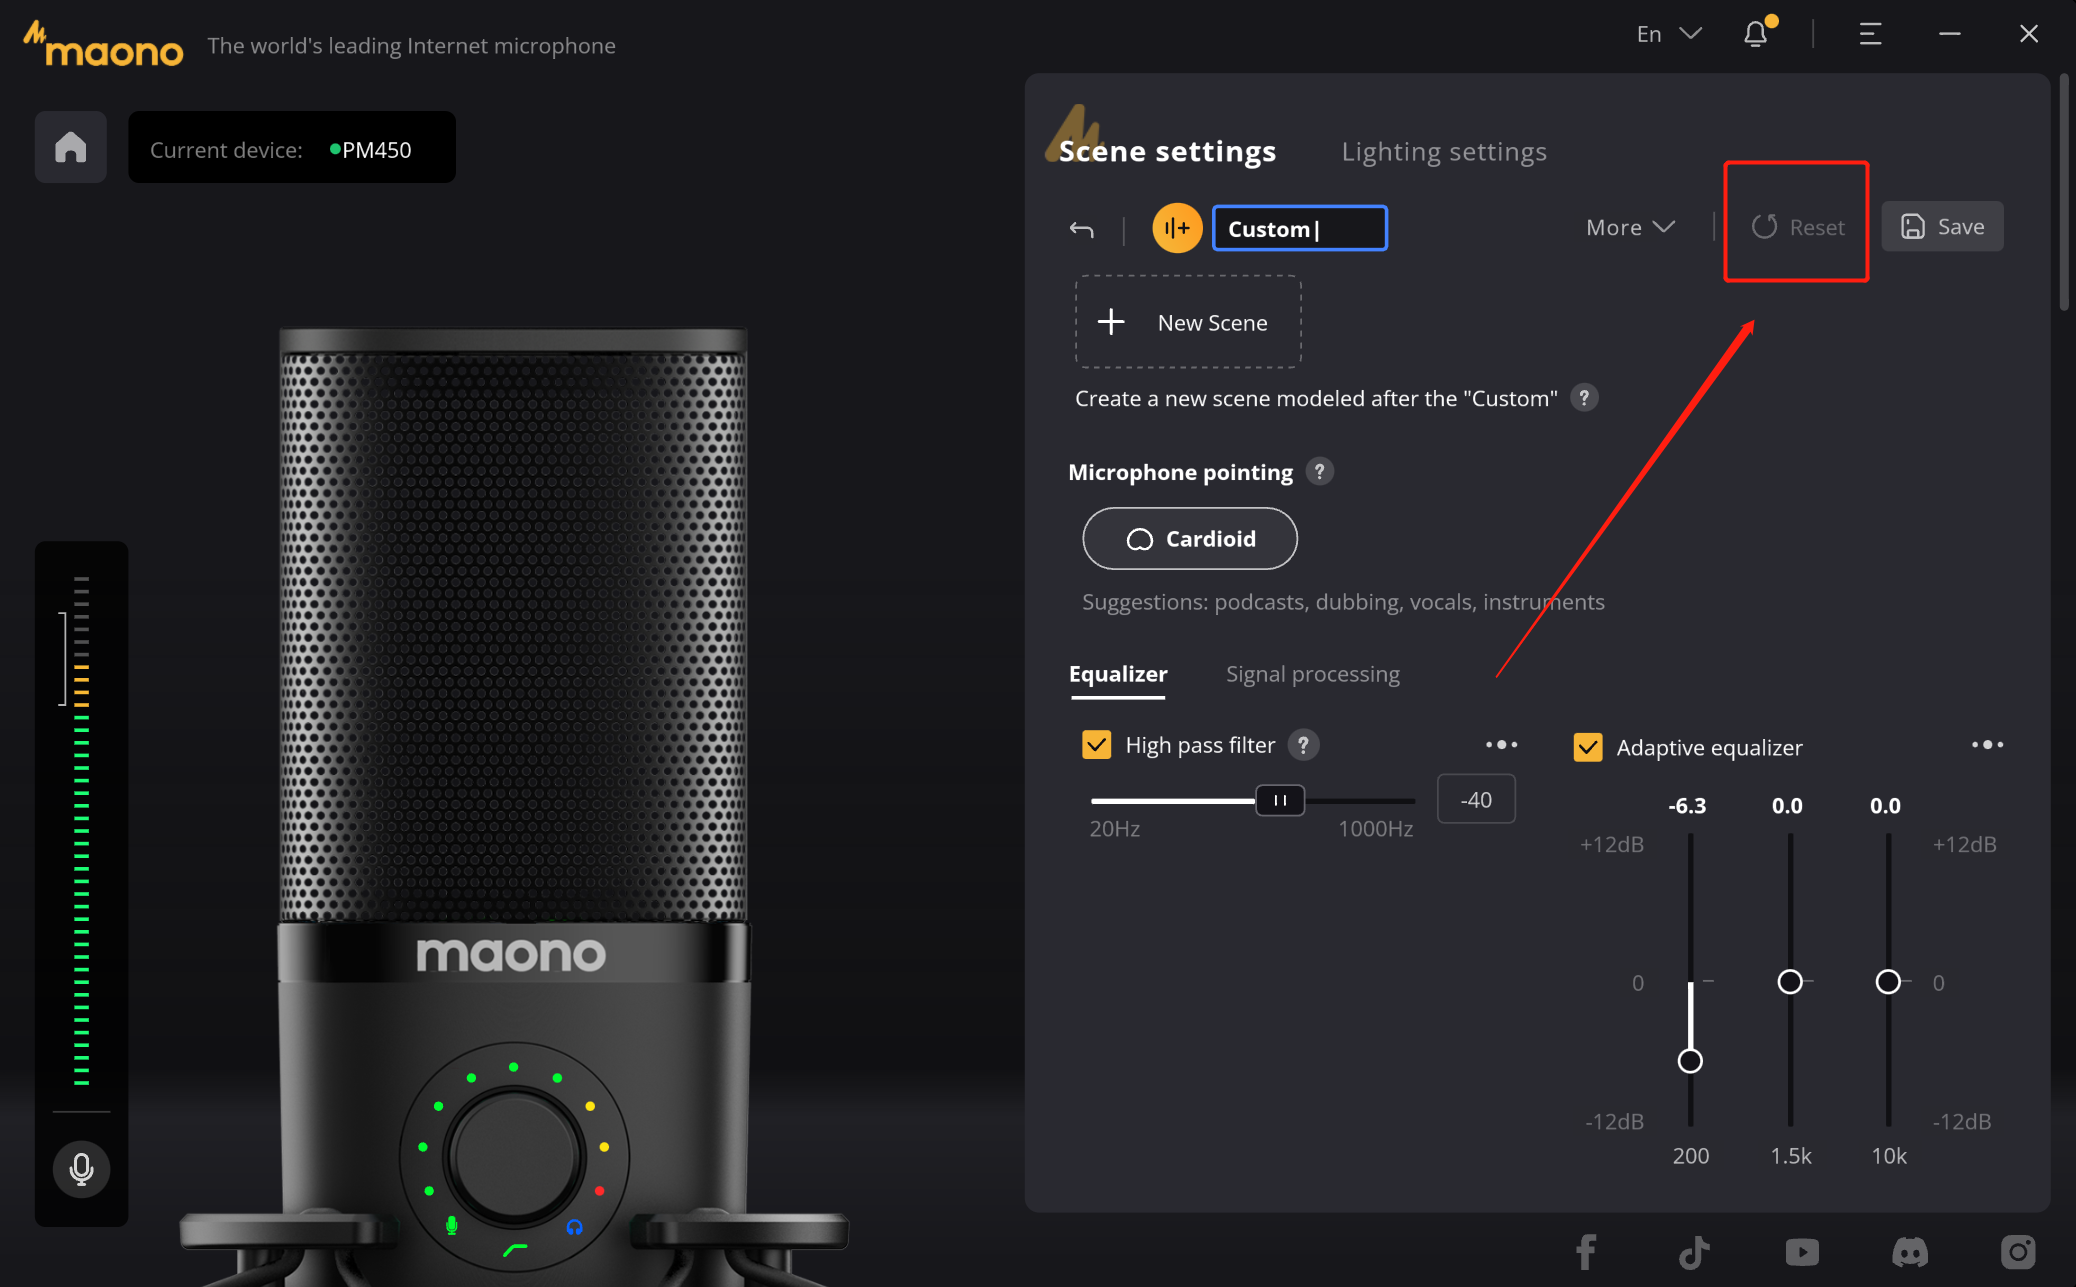
d. Scene reset
If you are not satisfied with the created parameters, then you can use the "Reset" button to restore the configured parameters to their initial state.
e. Delete custom scene
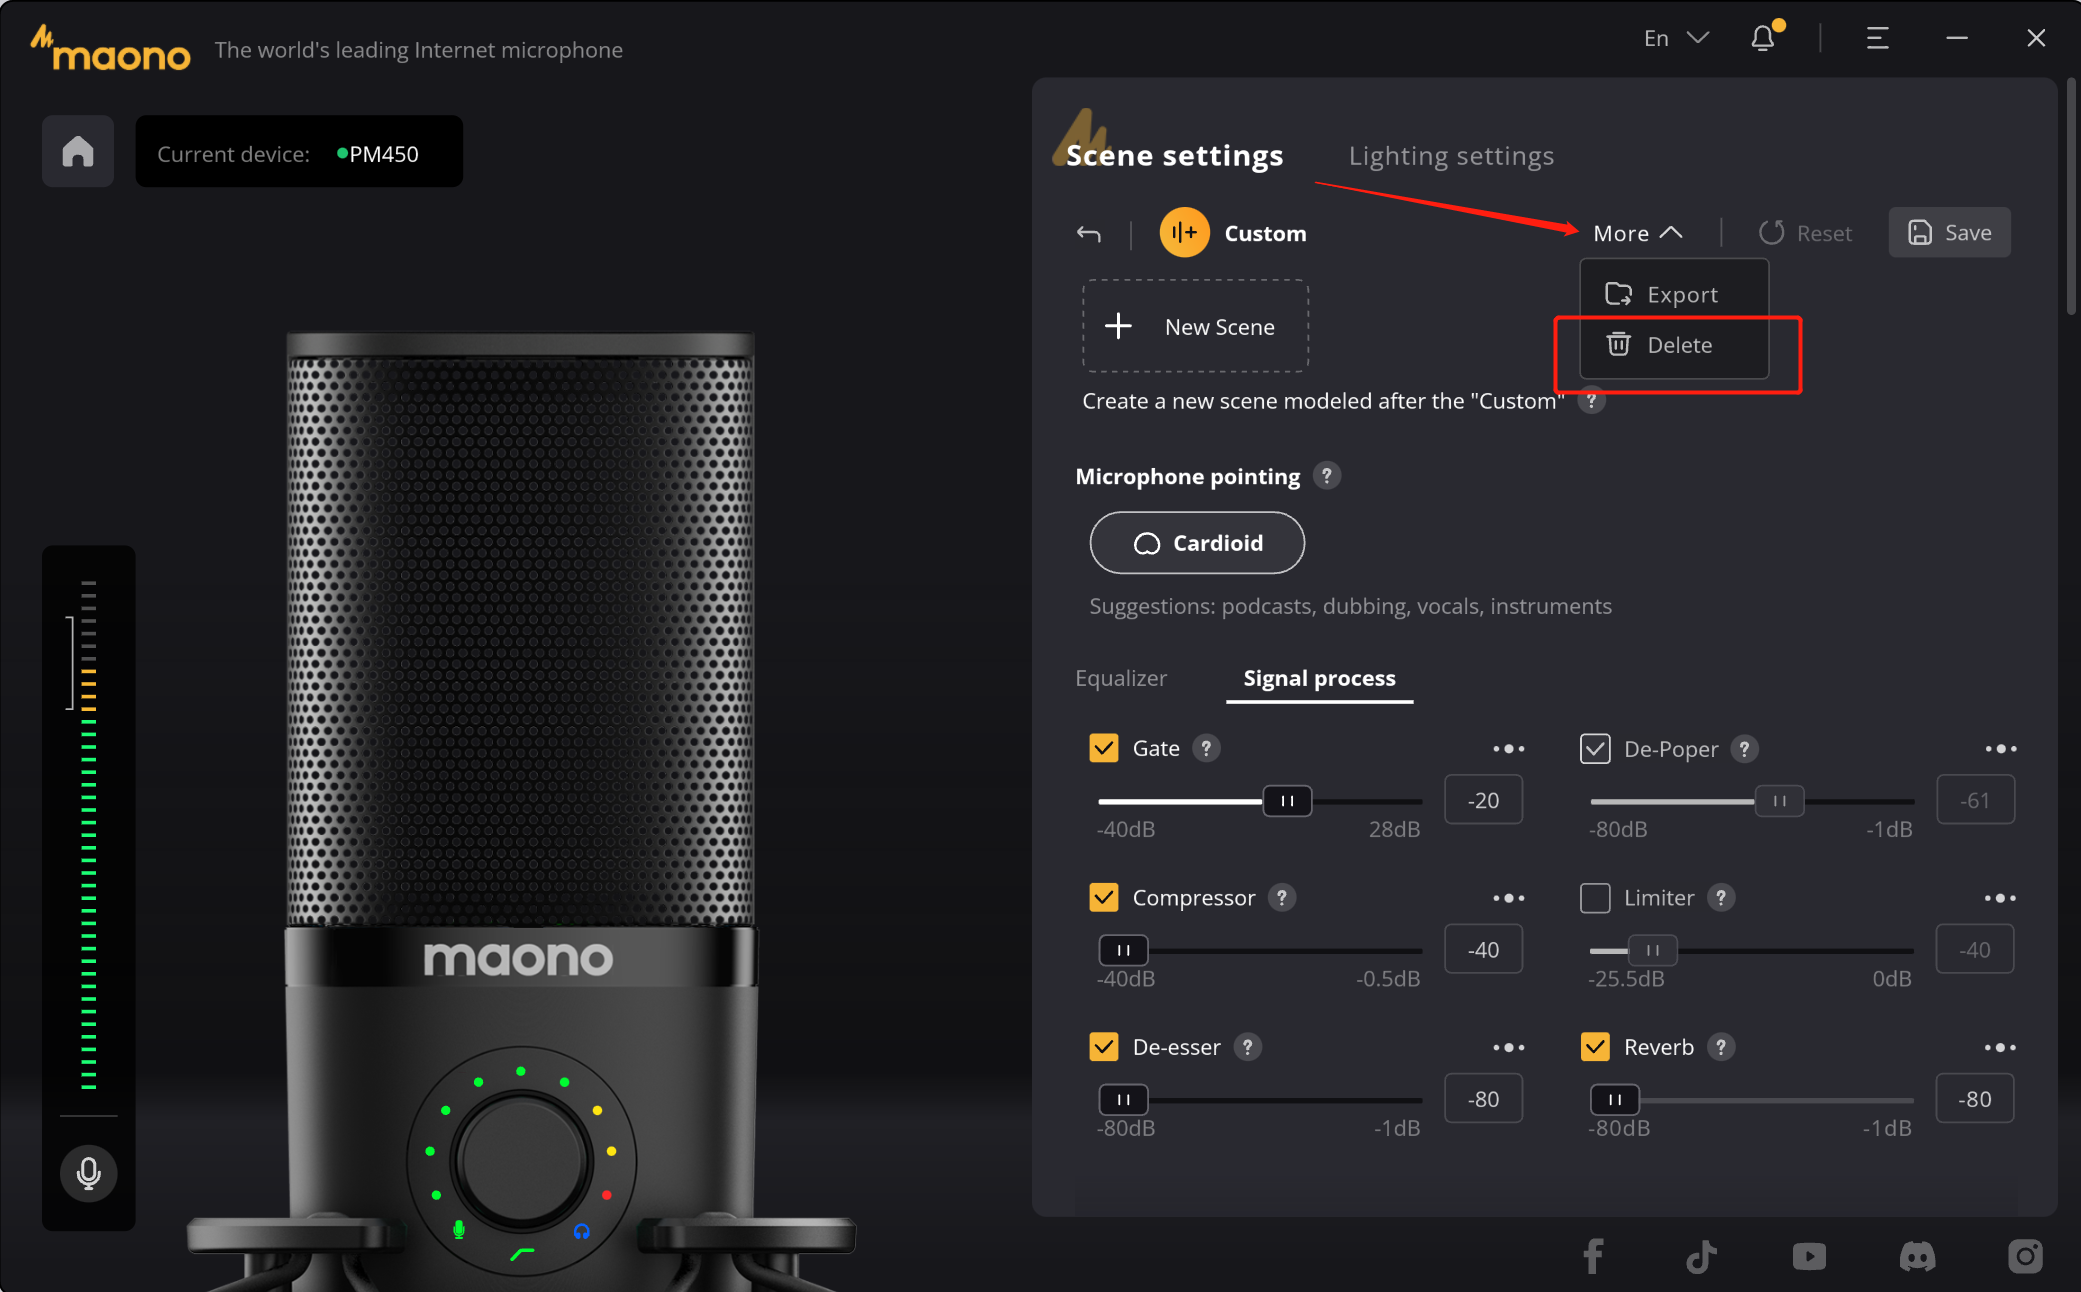
f. Scene setting
If you still need to configure the scene, you can recreate the new scene by following the steps above. The created scene will generate ICON in the "Scene Settings" on the home page. You can change the sound effect of the microphone by switching the scene to match your creation scene. The configured effect device configuration will be applied to the microphone, and the microphone can also ensure its sound effect when working with other live broadcast, broadcast, and recording software.
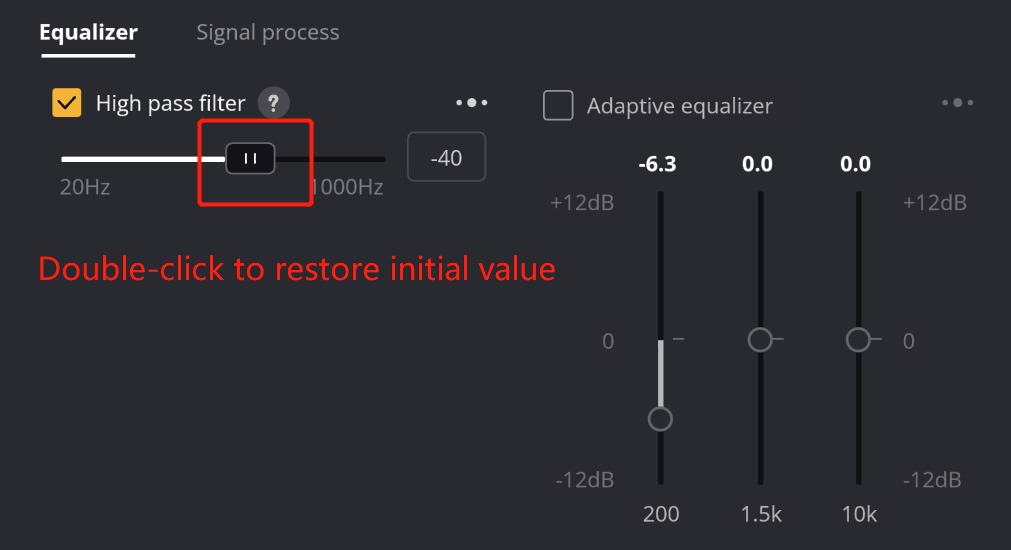
How to reset parameters?
In the adjustment of DSP effect, the slider can easily adjust the value of the effect. We also provide the "double click" function, its effect is when you are not satisfied with the effect of the adjustment can be easily restored to the initial value, so that you can adjust again.
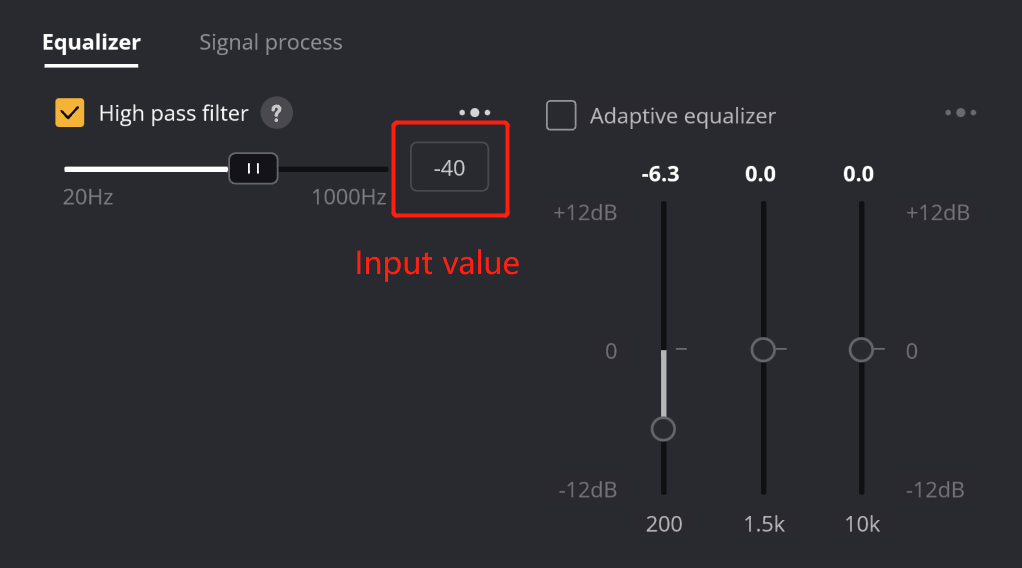
Drag the slider can not find the appropriate value?
In some DSP effects, usually its value is very large or very small, here we take the "high pass filter" as an example, if you need a specific value, drag is not easy to fine tune, here we provide another adjustment method, you can in the value display window, click to enter the input state, directly enter the accurate value. When you click the "Enter" key, the entered value will take effect and the slider will automatically slide to the exact position.
- How to download maono arena
- How to download maono link
- How to create your own scene configuration?
- How to reset parameters?
- Drag the slider can not find the appropriate value?
How to download maono arena
How to download maono link
How to create your own scene configuration?
-
If the currently selected option is "Game ", you only need to "click again" to enter the game scene. And then you can click “New scene” to create a new scene modeled after the "Game", you are capable of making more advanced DSP parameter adjustments on this page.
-
It can be created with other scenes. For example, by double-clicking the ICON of the "Interview" scene, you can enter the interview scene.
?Tips: First of all, on the right side of the software interface, you can see that we have preset several scene options, we provide the following ways to enter the scene creation:
1.1 Create a new scene modeled after the preset scene
1.2 Custom creation
a. Turn the page of the scene to the last scene preset
b. Double click the "Custom" option to enter the custom scene, which usually provides a completely blank scene
1.3 Start creation
Take the "Game" scene as an example, click "New Scene" to create a copy of the "game scene", the name will be changed to "Custom", and click the name to modify the scene name
1.4 Scene configuration
a. Polar pattern
b. DSP Parameters settings
In the scene, we can set the point of the microphone, such as "Cardioid", "Omnidirectional", "Figure 8". Different point has its own suitable scene, when you choose will have the corresponding prompt. In "help" we also provide helps for you to understand the differences between the various points.
b1. Up to 10 kinds of DSP effects are built in the product, and you can select them when using.
b2. If you need to use a DSP effect but are unsure of its function, you will notice a "?" next to the effect name. Hovering over it will display a text prompt describing its functions.
b3. If you are a creator, then you need more professional sound effects, we also have a "···" icon in the upper right corner of each effect device, click on it to open a more detailed adjustment window, in this secondary window you can do more detailed parameter Settings to improve your microphone experience.
These parameters can be adjusted in real time, when you speak, you can hear the sound effect by listening to the headphones.
c. Save the scene settings
When you are satisfied with the adjustment of the parameters, you can click the "Save" button in the upper right corner to save the configured parameters, so that you can easily switch the next time.
d. Scene reset
If you are not satisfied with the created parameters, then you can use the "Reset" button to restore the configured parameters to their initial state.
e. Delete custom scene
f. Scene setting
If you still need to configure the scene, you can recreate the new scene by following the steps above. The created scene will generate ICON in the "Scene Settings" on the home page. You can change the sound effect of the microphone by switching the scene to match your creation scene. The configured effect device configuration will be applied to the microphone, and the microphone can also ensure its sound effect when working with other live broadcast, broadcast, and recording software.
How to reset parameters?
In the adjustment of DSP effect, the slider can easily adjust the value of the effect. We also provide the "double click" function, its effect is when you are not satisfied with the effect of the adjustment can be easily restored to the initial value, so that you can adjust again.
Drag the slider can not find the appropriate value?
In some DSP effects, usually its value is very large or very small, here we take the "high pass filter" as an example, if you need a specific value, drag is not easy to fine tune, here we provide another adjustment method, you can in the value display window, click to enter the input state, directly enter the accurate value. When you click the "Enter" key, the entered value will take effect and the slider will automatically slide to the exact position.
- Why does the app show "Please Connect a USB Device" when using the PD100X, and how do I fix it?
- How to download maono arena
- How to download maono link
- What is the difference between the USB and XLR (Cannon) connection modes of PD100X?
- What is the purpose of adjusting the monitor mix ratio through Maono Link?
- Does PD100X require phantom power of 48V?
- Why doesn't the light come on and the knob not respond in XLR mode with PD100X?
- What should I do if there is noise or static when using PD100X?
Why does the app show "Please Connect a USB Device" when using the PD100X, and how do I fix it?
Please download the application, connect the PD100X microphone, and then click on the upgrade to fix the issue.
How to download maono arena
How to download maono link
What is the difference between the USB and XLR (Cannon) connection modes of PD100X?
The choice of mode depends on your usage needs:
- USB mode is suitable for direct connection to computers or other devices, ideal for live streaming, recording, voice calls, and similar scenarios.
- XLR mode is designed for professional audio equipment, offering higher audio stability and sound quality, typically requiring an external audio interface or mixer.
What is the purpose of adjusting the monitor mix ratio through Maono Link?
Adjusting the monitor mix ratio can help you balance the volume of the microphone and computer audio in your headphones according to personal preference. By clicking on the microphone or computer icon, you can quickly mute one of the sound sources.
- When the slider is in the middle, the microphone and computer sounds in the headphones will be balanced. (? and ? each 50%)
- Moving the slider in either direction will gradually decrease the volume on the other end. This allows you to adjust to the most suitable volume mix ratio for working or entertainment.
For example: If you don't want to hear your own voice while gaming, you can move the slider to the computer side. This way, only the computer's sound will be played in the headphones, and your own voice will be muted.
Does PD100X require phantom power of 48V?
No, PD100X is a dynamic microphone and does not require 48V phantom power.
Why doesn't the light come on and the knob not respond in XLR mode with PD100X?
The XLR mode is designed for professional recording environments, where volume and monitoring controls are typically handled by external devices (such as mixers or audio interfaces), so the microphone itself does not activate lights and knobs.
USB mode is aimed at individual users, offering more integrated functions, allowing the microphone to directly control volume, lights, etc., which is why these functions work properly in USB mode.
Problem Analysis:
1. Design Positioning Difference
The dual-mode microphone is designed to meet the needs of different usage scenarios. XLR mode is typically aimed at professional recording environments and is mainly used in conjunction with external audio equipment (such as mixers, audio interfaces, etc.). In this mode, functions like audio control and monitoring are usually handled by external devices, so the microphone itself does not need to integrate light or knob functions to control volume or monitoring.
2. External Control in XLR Mode
The main purpose of XLR connection is to transmit signals with external professional devices, which usually take care of all audio processing and monitoring. For example, functions like volume control, gain adjustment, monitoring are managed by audio interfaces or mixers. XLR mode does not require the microphone itself to participate in these controls.
3. Function Integration in USB Mode
In USB mode, which is designed for individual users, the microphone offers a more integrated experience, providing a plug-and-play convenience. In this mode, the microphone not only outputs audio signals but also allows for adjustments to volume and gain settings through software control, and even features an integrated knob for fine-tuning. As a result, the microphone's lights and knob function properly in USB mode, offering more convenient control and display features.
What should I do if there is noise or static when using PD100X?
“Sss” electrical noise: Please move away from mice, RGB keyboards, or other devices with strong radiation, as these can affect dynamic microphones.
“Buzz” ambient noise: Please turn on the noise reduction feature.
- How to download maono arena
- How to download maono link
- What is the difference between the USB and XLR (Cannon) connection modes of PD100X RGB?
- What is the purpose of adjusting the monitor mix ratio through Maono Link?
- Does PD100X RGB require phantom power of 48V?
- Why doesn't the light come on and the knob not respond in XLR mode with PD100X RGB?
- What should I do if there is noise or static when using PD100X RGB?
How to download maono arena
How to download maono link
What is the difference between the USB and XLR (Cannon) connection modes of PD100X RGB?
The choice of mode depends on your usage needs:
- USB mode is suitable for direct connection to computers or other devices, ideal for live streaming, recording, voice calls, and similar scenarios.
- XLR mode is designed for professional audio equipment, offering higher audio stability and sound quality, typically requiring an external audio interface or mixer.
What is the purpose of adjusting the monitor mix ratio through Maono Link?
Adjusting the monitor mix ratio can help you balance the volume of the microphone and computer audio in your headphones according to personal preference. By clicking on the microphone or computer icon, you can quickly mute one of the sound sources.
- When the slider is in the middle, the microphone and computer sounds in the headphones will be balanced. (? and ? each 50%)
- Moving the slider in either direction will gradually decrease the volume on the other end. This allows you to adjust to the most suitable volume mix ratio for working or entertainment.
For example: If you don't want to hear your own voice while gaming, you can move the slider to the computer side. This way, only the computer's sound will be played in the headphones, and your own voice will be muted.
Does PD100X RGB require phantom power of 48V?
No, PD100X RGB is a dynamic microphone and does not require 48V phantom power.
Why doesn't the light come on and the knob not respond in XLR mode with PD100X RGB?
The XLR mode is designed for professional recording environments, where volume and monitoring controls are typically handled by external devices (such as mixers or audio interfaces), so the microphone itself does not activate lights and knobs.
USB mode is aimed at individual users, offering more integrated functions, allowing the microphone to directly control volume, lights, etc., which is why these functions work properly in USB mode.
Problem Analysis:
1. Design Positioning Difference
The dual-mode microphone is designed to meet the needs of different usage scenarios. XLR mode is typically aimed at professional recording environments and is mainly used in conjunction with external audio equipment (such as mixers, audio interfaces, etc.). In this mode, functions like audio control and monitoring are usually handled by external devices, so the microphone itself does not need to integrate light or knob functions to control volume or monitoring.
2. External Control in XLR Mode
The main purpose of XLR connection is to transmit signals with external professional devices, which usually take care of all audio processing and monitoring. For example, functions like volume control, gain adjustment, monitoring are managed by audio interfaces or mixers. XLR mode does not require the microphone itself to participate in these controls.
3. Function Integration in USB Mode
In USB mode, which is designed for individual users, the microphone offers a more integrated experience, providing a plug-and-play convenience. In this mode, the microphone not only outputs audio signals but also allows for adjustments to volume and gain settings through software control, and even features an integrated knob for fine-tuning. As a result, the microphone's lights and knob function properly in USB mode, offering more convenient control and display features.
What should I do if there is noise or static when using PD100X RGB?
“Sss” electrical noise: Please move away from mice, RGB keyboards, or other devices with strong radiation, as these can affect dynamic microphones.
“Buzz” ambient noise: Please turn on the noise reduction feature.
- What is the sampling rate and bit depth of the microphone?
- Does the PD200X need to turn on 48v phantom power?
- Correct the whistling sound coming from a mic?
- How to set the microphone after connecting to the computer?
- Microphone is not recognized on the PC?
- USB Microphone not Working on Mac
- Microphone does not work without sound on windows
- How to connect PD200X to Android and iOS
- Use PD200X feel small sound
- Microphone has obvious current sound
- What is the low-cut function of the microphone and what does it do
- What are the power consumption parameters of PD200X
- Why the microphone XLR mode can not use the knob to control the sound, switch the sound effects
- Microphone has obvious humming sound
- Microphone and Maono Link are not connected successfully
What is the sampling rate and bit depth of the microphone?
48kHz/24Bit
Does the PD200X need to turn on 48v phantom power?
Not necessary, because the PD200X is a dynamic microphone
Correct the whistling sound coming from a mic?
- That whistling sound is called an Audio feedback and caused because of an endless loop caused when the mic picks up the sound of the loudspeakers and sends it back to the loudspeakers to amplify and picks up again
- Ways to correct /avoid feedback
- Face the speakers away from the mic or place farther away.
- Lower their volume or mic gain
Use unidirectional cardioid mics which have a rear rejection that means no pickup from back side. Then you can use stage monitors facing you in the middle of the stage. And mic won't pickup them.
- Ring out the speaker - deliberately create feedback by taking the mic closer to the speaker. When feedback happens, check the frequency on a real-time analyser and cut it using channel eq or graphic eq.
- Use a feedback reducer
How to set the microphone after connecting to the computer?
Please check the documentation

Microphone is not recognized on the PC?
- Shut down and restart the computer and leave it for 20 minutes before connecting again
- Update the driver in the device manager, uninstall the driver and re-insert the microphone
- Use on another computer to see if it can be loaded, loaded out again after inserting the computer that can not be identified
- Use the driver master, the brand comes with the software or the brand's official website to update the driver (such as Lenovo, Dell) to avoid the impact of missing drivers

USB Microphone not Working on Mac

Microphone does not work without sound on windows
- Please turn the recording knob to a reasonable range
- Please adjust the Mic gain knob to a reasonable range
- Open microphone permission in privacy settings
- Is the microphone device selection correct, please refer to the detailed documentation.
Please see the documentation for details

How to connect PD200X to Android and iOS
- Android can be connected through OTG adapter or USB-C to USB-C data cable
- iOS can be connected through the adapter cable provided by our company
Use PD200X feel small sound
- PD200X is a dynamic microphone, relatively insensitive, the recommended distance is within 15CM
- Please speak according to the direction shown to avoid the microphone not picking up the human voice
- Using USB mode: Please check whether the microphone gain knob is in a reasonable position and whether the computer is using the device PD200X
- Using XLR mode: please turn up the gain knob on the sound card, please check if the gain of the sound card is enough to push the microphone
Microphone has obvious current sound
- Unplug the microphone data cable, replace the USB port and reconnect it (desktop computer to the USB behind the chassis, do not use a hub or docking station)
- Stay away from audio and electronic products to avoid electronic signal interference. Change to a quiet environment to use the microphone, avoid external ambient sound being picked up by the microphone, troubleshoot the problem first
- Turn off the use of third-party software, use the recorder that comes with the computer to test
- May be the computer or plug board leakage, you can choose to replace a computer test
What is the low-cut function of the microphone and what does it do
- Low-cut is a filter that removes low frequencies from the audio signal.
- Frequencies below a defined frequency (usually between 20 Hz and 150 Hz) are removed from the filter, removing some of the low frequency noise for a cleaner sound
What are the power consumption parameters of PD200X
5V / 140mA-0.8W
Why the microphone XLR mode can not use the knob to control the sound, switch the sound effects
- USB mode and XLR mode are completely separate, control the sound, light function is controlled by the USB mode, need power to use
- XLR mode output for the pure original sound, switch and sound effects by the sound card control
Microphone has obvious humming sound
- Microphone gain is too high, the microphone is sensitive, resulting in picking up more ambient sound, please reduce the microphone gain, it will improve the sound quality
- PD200X is a condenser microphone, the microphone is sensitive, the microphone will pick up ambient sound while bringing more sound details, please keep a distance from your computer, cooling fan rotation and operation will generate noise
- USB port or data cable is bad, please replace the connection cable or USB jack (desktop computer please connect to the USB port behind the case)
Microphone and Maono Link are not connected successfully
- Please check the connection of the audio cable to the computer, unplug it and reconnect it
- Check if the microphone works properly on the computer
- If not resolved, please contact us via email:
support@maono.com
- What is the purpose of 192kHz/24bit?
- What are the differences between the USB and XLR connection modes of the PD300X?
- What is the purpose of adjusting the monitoring mix ratio in Maono Link?
- How do I use the custom EQ feature in Maono Link?
- Does the PD300X require 48V phantom power?
- Why isn’t Maono Link compatible with Windows 7 for the PD300X?
- Why don’t the lights and knobs on the PD300X work in XLR mode?
- How can I troubleshoot noise or static issues with the PD300X?
What is the purpose of 192kHz/24bit?
The combination of 192kHz sampling rate and 24-bit audio output delivers exceptional audio quality and precision, ensuring that sound reproduction during production, recording, and playback is more authentic and detailed.
This high-quality output is especially suitable for high-end audio production and applications requiring flawless sound, such as music recording, broadcasting, and post-production.
What are the differences between the USB and XLR connection modes of the PD300X?
The choice depends on your usage needs:
- USB mode: Ideal for direct connection to computers or other devices, suitable for scenarios like live streaming, recording, and voice calls.
- XLR mode: Designed for professional audio equipment, offering higher audio stability and quality. This mode typically requires an external audio interface or mixer.
What is the purpose of adjusting the monitoring mix ratio in Maono Link?
Adjusting the monitoring mix ratio allows you to balance the volume of the microphone and computer audio in your headphones based on your personal preference. By clicking on the microphone or computer icons, you can quickly mute either audio source.
- When the slider is centered, you’ll hear a balanced mix of both the microphone and computer audio in your headphones (? and ? at 50% each).
- Moving the slider toward one side decreases the volume of the other source, enabling you to find the perfect mix for work or entertainment.
Example: If you’re gaming and don’t want to hear your own voice, move the slider toward the computer side. This way, only the computer audio will play in your headphones, while your microphone audio will be muted.
How do I use the custom EQ feature in Maono Link?
Please click the link below for a detailed guide:
Does the PD300X require 48V phantom power?
No, the PD300X is a dynamic microphone and does not require 48V phantom power.
Why isn’t Maono Link compatible with Windows 7 for the PD300X?
The PD300X utilizes the latest Maono Link 3.0 software framework to deliver an enhanced user experience.
This software is only supported on Windows 10 and later versions.
The Maono Link 2.0 version (used for products like PD200X and PD100X) remains unaffected.
Why don’t the lights and knobs on the PD300X work in XLR mode?
The XLR mode is designed for professional recording environments, where volume and monitoring controls are typically managed by external devices (e.g., mixers or audio interfaces). As a result, the microphone’s lights and knobs are not active in this mode.
The USB mode, on the other hand, is designed for personal users and includes integrated functions, enabling the microphone to directly control volume, lighting, and other features.
Analysis:
1. Design Purpose Differences
Dual-mode microphones are designed to cater to various use scenarios. The XLR mode is primarily for professional recording, connecting to external audio equipment like mixers or audio interfaces. In this mode, audio control and monitoring are handled externally, so the microphone does not need built-in controls like lighting or knobs.
2. External Control in XLR Mode
The primary purpose of XLR connections is to transmit signals to external professional devices. These devices are responsible for all audio processing and monitoring, including volume control, gain adjustment, and monitoring. Therefore, the microphone itself doesn’t handle these functions in XLR mode.
3. Integrated Features in USB Mode
USB mode is designed for personal users with a more integrated experience. It offers plug-and-play functionality, allowing users to control volume, gain, and more through built-in knobs or software. Consequently, the microphone’s lights and knobs function normally in USB mode, providing a convenient and user-friendly experience.
How can I troubleshoot noise or static issues with the PD300X?
- “Hissing” electrical noise: Avoid placing the microphone near mice, RGB keyboards, or other devices with strong electromagnetic radiation, as these can interfere with dynamic microphones.
- “Buzzing” environmental noise: Enable the noise reduction feature.

- What is the sampling rate and bit depth of the microphone?
- Does the PD400X need to turn on 48v phantom power?
- Correct the whistling sound coming from a mic?
- How to set the microphone after connecting to the computer?
- Microphone is not recognized on the PC?
- USB Microphone not Working on Mac?
- Microphone does not work without sound on windows?
- How to connect PD400X to Android and iOS?
- Use PD400X feel small sound?
- Microphone has obvious current sound
- What is the low-cut function of the microphone and what does it do
- What are the power consumption parameters of PD400X
- Why the microphone XLR mode can not use the knob to control the sound, switch the sound effects
- Microphone has obvious humming sound
- Microphone and Maono Link are not connected successfully
What is the sampling rate and bit depth of the microphone?
48kHz/24Bit
Does the PD400X need to turn on 48v phantom power?
Not necessary, because the PD400X is a dynamic microphone
Correct the whistling sound coming from a mic?
- That whistling sound is called an Audio feedback and caused because of an endless loop caused when the mic picks up the sound of the loudspeakers and sends it back to the loudspeakers to amplify and picks up again
- Ways to correct /avoid feedback
- Face the speakers away from the mic or place farther away.
- Lower their volume or mic gain
Use unidirectional cardioid mics which have a rear rejection that means no pickup from back side. Then you can use stage monitors facing you in the middle of the stage. And mic won't pickup them.
- Ring out the speaker - deliberately create feedback by taking the mic closer to the speaker. When feedback happens, check the frequency on a real-time analyser and cut it using channel eq or graphic eq.
- Use a feedback reducer
How to set the microphone after connecting to the computer?
Please check the documentation
![]()
Microphone is not recognized on the PC?
- Shut down and restart the computer and leave it for 20 minutes before connecting again
- Update the driver in the device manager, uninstall the driver and re-insert the microphone
- Use on another computer to see if it can be loaded, loaded out again after inserting the computer that can not be identified
- Use the driver master, the brand comes with the software or the brand's official website to update the driver (such as Lenovo, Dell) to avoid the impact of missing drivers
USB Microphone not Working on Mac?
Please check the documentation
Microphone does not work without sound on windows?
- Please turn the recording knob to a reasonable range
- Please adjust the Mic gain knob to a reasonable range
- Open microphone permission in privacy settings
- Is the microphone device selection correct, please refer to the detailed documentation.
Please see the documentation for details
How to connect PD400X to Android and iOS?
- Android can be connected through OTG adapter or USB-C to USB-C data cable
- iOS can be connected through the adapter cable provided by our company
Use PD400X feel small sound?
- PD400X is a dynamic microphone, relatively insensitive, the recommended distance is within 15CM
- Please speak according to the direction shown to avoid the microphone not picking up the human voice
- Using USB mode: Please check whether the microphone gain knob is in a reasonable position and whether the computer is using the device PD400X
- Using XLR mode: please turn up the gain knob on the sound card, please check if the gain of the sound card is enough to push the microphone
Microphone has obvious current sound
- Unplug the microphone data cable, replace the USB port and reconnect it (desktop computer to the USB behind the chassis, do not use a hub or docking station)
- Stay away from audio and electronic products to avoid electronic signal interference. Change to a quiet environment to use the microphone, avoid external ambient sound being picked up by the microphone, troubleshoot the problem first
- Turn off the use of third-party software, use the recorder that comes with the computer to test
- May be the computer or plug board leakage, you can choose to replace a computer test
What is the low-cut function of the microphone and what does it do
- Low-cut is a filter that removes low frequencies from the audio signal.
- Frequencies below a defined frequency (usually between 20 Hz and 150 Hz) are removed from the filter, removing some of the low frequency noise for a cleaner sound
What are the power consumption parameters of PD400X
5V / 130mA-0.7W
Why the microphone XLR mode can not use the knob to control the sound, switch the sound effects
- USB mode and XLR mode are completely separate, control the sound, light function is controlled by the USB mode, need power to use
- XLR mode output for the pure original sound, switch and sound effects by the sound card control
Microphone has obvious humming sound
- Microphone gain is too high, the microphone is sensitive, resulting in picking up more ambient sound, please reduce the microphone gain, it will improve the sound quality
- PD400X is a condenser microphone, the microphone is sensitive, the microphone will pick up ambient sound while bringing more sound details, please keep a distance from your computer, cooling fan rotation and operation will generate noise
- USB port or data cable is bad, please replace the connection cable or USB jack (desktop computer please connect to the USB port behind the case)
Microphone and Maono Link are not connected successfully
- Please check the connection of the audio cable to the computer, unplug it and reconnect it
- Check if the microphone works properly on the computer
- If not resolved,
please contact us via email:support@maono.com
- PS22 Routing Tool(Driver must be installed to use PS22)
- PS22 software driver installation failed
- PS22 Return to Initial Version
- PS22 has no Bluetooth function, no reverb, no noise reduction function.
- PS22 doesn't have software driver for MacOS version.
- What DAWs are available and how do I download them?
- What does the 3.5mm jack on the PS22 do?
- How do I connect a smartphone to the PS22?
- The power indicator is off
PS22 Routing Tool(Driver must be installed to use PS22)
With this drive, the sound card can be recognized and used on the computer. It is a necessary driver for using PS22 on the computer.
PS22 software driver installation failed
Please close your anti-virus software and then reinstall the driver.
PS22 Return to Initial Version
PS22 has no Bluetooth function, no reverb, no noise reduction function.
PS22 is a sound card designed for recording, if you need sound effects, please add them in your DAW.
PS22 doesn't have software driver for MacOS version.
MacOS built-in driver, no need to install, you can use it directly.
What DAWs are available and how do I download them?
There are PreSonus Studio One, Cockos Reaper 6, Ableton Live, FL Studio, Apple Logic Pro, Steinberg Cubase, you can visit the official website to download the software.
What does the 3.5mm jack on the PS22 do?
3.5mm TRRS output - Duplicates the main output signal. Can be used to connect to a phone to do live streaming via a TRRS to TRRS cable (not included)
How do I connect a smartphone to the PS22?
You can connect your phone to the PS22 using the USB-C socket.
Note: iOS only supports iPhone 15, iPhone 16 and above
The power indicator is off
Is the [POWER SOURCE] switch set properly?
The power indicator does not light when power is not supplied to the device.Move the [POWER SOURCE] switch to the [5V DC] jack side when using AC adapter or move the switch to [USB-C] jack side for bus-powered supply (computer only)
- Cannot boot
- No sound from accompaniment music
- No sound from headphones
- No sound from the microphone
- No sound in live broadcast
- Echo issues
- Side chain function not working
- The noise reduction effect is not good
- Can not be used on iPhone
- This audio interface can not be used with a USB/XLR to XLR/USB C microphone even though using an adapter
- Can not be used with guitar
- Before powering on
- How to connect to a computer
- How to connect to the smartphone
- How to set the volume of preset sound effects and customize sound effects
- The light on the audio interface can be turned off
- Bluetooth transmission is a one-way transmission
- If you can monitor your voice, but your audience cannot hear your voice
- For now, the monitoring function cannot be turned off
- How to upload custom sound effects
Cannot boot
• Please check if the podcast console has power, please charge it, and then turn it on.
• You need to long-press the " " for more than three seconds to turn it on.
No sound from accompaniment music
• Please check whether the external audio source is connected to the 'Music Input' interface of the podcast console.
• Please check whether the 'Music' volume control knob on the right is turned on.
• Please check the volume of the accompaniment device.
• Turn on LOOP BACK
No sound from headphones
• Please check whether the headphone cable is inserted into the correct interface. It should be inserted into the "headset" or "Output" interface.
• Please check whether is the "Monitor" of the sound card upwards. You can gradually increase the volume by sliding it up.
• Plug headphones into OUTPUT or HEADSET jack
No sound from the microphone
• Please check whether the microphone is correctly connected to the microphone interface. If not, please try again.
• Please check whether the microphone knob on the left is turned on. Turn the knob clockwise to increase the microphone volume slowly.
• Please check whether is the "monitor fader" of the sound card upwards. You can gradually increase the volume by pushing it up.
• Please confirm with your microphone dealer whether your microphone can be used with this podcast console, or consult us for the recommended microphone model.
No sound in live broadcast
• Please check whether the "recording" knob on the podcast console is turned on, and rotate the "recording
• knob" clockwise to slowly increase the volume of the live broadcast.
• Please check whether the podcast console "MAONO AU-AM200" has been set as the default playback and recording device of the live broadcast software. If not, please set refer to the " Live Streaming on the Computer " part.
Echo issues
Turn off or turn down ECHO effect
Side chain function not working
It doesn't work on a voice call, it works on podcast or live streaming
The noise reduction effect is not good
Please keep 2 inches away from your mouth to the microphone
Can not be used on iPhone
We don't provide an extra OTG adapter, you should connect your phone with the microphone through the OTG adapter which is included in your iPhone package
This audio interface can not be used with a USB/XLR to XLR/USB C microphone even though using an adapter
This audio interface just can only be used with a microphone which comes with a 3.5mm plug
Can not be used with guitar
It should be connected with a 3.5mm to 6.35mm adapter, then to guitar
Before powering on
Please turn down all the volume temporarily
How to connect to a computer
• Please use line 1 to connect the USB-C port of the Audio interface, and use line 2 to connect to the computer. (Note: Do not fold the wire during use to avoid damage.)
• Please check the computer's sound settings after the connection is complete. Both the input and output are' MAONO AU-AM200 '(right-click the speaker on the right side of the desktop to open the sound settings)
• When you need to record the computer accompaniment sound, please turn on the loopback function.
How to connect to the smartphone
For the smartphone used for podcast/ Streaming, please insert THE POD1/2/3 interface; for the smartphone used for playing accompaniment, please insert the Music Input jack. In addition, you can also play accompaniment Music through the Bluetooth connection of the smartphone.
How to set the volume of preset sound effects and customize sound effects
OPENING is the volume down key, and LAUGHTER is the volume up key.
The light on the audio interface can be turned off
You need to press the light button on the side of the sound card 6 times, and the light of each button will slowly diminish to disappear.
Bluetooth transmission is a one-way transmission
which cannot be input and output simultaneously. (The Bluetooth is only for wireless accompaniment playback)
If you can monitor your voice, but your audience cannot hear your voice
You need to turn up the REC knob above the audio mixer to output the sound.
For now, the monitoring function cannot be turned off
We are working on an upgraded version that can turn off the monitoring function, so stay tuned
How to upload custom sound effects
Recording: Turn the product on, connect it with either one microphone, external audio input device, Bluetooth device. Turn on the"LOOPBACK" mode. Hold any custom key until the button light flashes to start recording. The audio input will be recorded and saved. Release the button to end the recording.
Note: If you do not release your hand during recording, the recording will stop automatically when there is not enough space, and the light will automatically turn off.
- Cannot boot
- The sound card is dead, how to charge it?
- Sound card recording without sound
- I want to input the accompaniment via Bluetooth, how does it work?
- Side chain function not working
- Why is there little or no sound with shure sm7B and Rode PodMic dynamic microphones
- Can I connect my USB microphone to the Maonocaster E2
- Can I use Bluetooth headphones with the Maonocaster E2?
- Do you need to use a Gain Booster when using dynamic mics with the Maocaster E2?
- Can not be used on iPhone
- How to connect to a Guiter
- How to connect to a computer
- How to record sound effects, how long is the time to record sound effects?
- What software can be used with the sound card on Windows 10?
- On/Off switch of buttons backaround light
- Microphone gain switch setting
- Voice cracked
- How to adjust the knobs on the audio interface
- Can't hear sound through headphones
- The sound you hear from the headphone is different from the recorded sound from the smartphone/computer
- How to input accompaniment via Bluetooth
- When you live stream, the audience can't hear the music, but you can hear it through headphones
- The sound recorded by mobile phone/computer is the only vocal from microphone, no music sound
Cannot boot
• Please check if the podcast console has power, please charge it, and then turn it on.
•You need to long-press the for more than three seconds to turn it on.
The sound card is dead, how to charge it?
•connect to the computer that is charging the device
•Use ordinary 5V 1A or 5V 2A size phone charging head
Sound card recording without sound
Please turn the recording knob to the appropriate range
I want to input the accompaniment via Bluetooth, how does it work?
•Powering on the sound card, the Bluetooth indicator will blink, Bluetooth search and
automatically pair with the paired mobile phone, then the indicator light turned to solid
•Long press the Bluetooth button for 2 seconds, the indicator will turn off and end pairing
Side chain function not working
It doesn't work on a voice call, it works on podcast or live streaming
Why is there little or no sound with shure sm7B and Rode PodMic dynamic microphones
•The switch on the side does not select the correct gain.
•The maonocaster E2 sound card has the built-in gain that provides sufficient gain for all microphone types, including low output dynamic microphones. When in use, you can adjust the switch on the side to select gain 50dB or 60dB to choose the gain multiplier and get the best results
Can I connect my USB microphone to the Maonocaster E2
No, the Maonocaster E2 does not support the connection of USB microphones.
Can I use Bluetooth headphones with the Maonocaster E2?
No, the E2 is not a USB host device and will therefore not allow the connection of Bluetooth headphones.
Do you need to use a Gain Booster when using dynamic mics with the Maocaster E2?
The Maonocaster E2's microphone channels feature studio-quality preamps that can provide enough gain for all microphone types, including low-output dynamic microphones. You can change the gain multiplier of the side microphone setting to get the right effect for your use
Can not be used on iPhone
We don't provide an extra OTG adapter, you should connect your phone with the microphone through OTG adapter which is included in your iPhone package
How to connect to a Guiter
Recording can be achieved by using 6.35MM plugged into the instrument port
How to connect to a computer
Take out the cable from the box, connect the computer and sound card ends respectively, after the connection is completed, please check the computer's sound settings. Input and output are set to "MAONO AME2" (right-click the speaker icon on the right side of the desktop to open the sound settings)
How to record sound effects, how long is the time to record sound effects?
Press the A/B/C button to record a 1-minute audio effect, and press the Loop Button to repeat playing an audio effect. Press the other 8 buttons to record the 20s(Max)audio effect.
•By default, there is no customized audio effect.
•Recording: with an audio card on, connect it to mic/external audio input device/Bluetooth devices, and long-press any custom button for more than 3 seconds. Release press until the indicator slowly blinks and enters recording mode. Short press the button again to stop recording or record until the indicator stops blinking, which indicates max time length audio is recorded.
•Note: Each custom audio effect button has limited storage, when there is no storage left, it will stop recording and the indicator will go off automatically.
What software can be used with the sound card on Windows 10?
AU, Audacity, sound forge
On/Off switch of buttons backaround light
The lamp is on by default, hold the power button for 1s to turn off light
Microphone gain switch setting
•Please set the 'MIC1 SETTING' on the side of the audio interface to the correct position
• The microphone in the package needs to be placed in the 40dB gear
• If you need to connect your own microphone, please according to your microphone's sensitivity or contact us.
Voice cracked
• Please adjust the 'MIC1 SETTING' on the side of the audio interface to 40dB
• Adjust 'MIC①' to the middle gear
• Adjust the 'LOW/MID/HI' to the middle gear
• Adjust 'OUTPUT' to the middle gear
• Please be 7-8in away from the microphone for the best recording experience
How to adjust the knobs on the audio interface
You can adjust each knob to the middle before using
• AUX: Adjusts the input accompaniment sound
• LOW/MID/HI: Adjust the high and low parts of the vocal input from the microphone
•INST: Adjusts the volume of the instrument input from the 'INST' jack
• PITCH: Interesting voice change adjustments
• MONITOR: Adjust the volume of your monitor through headphones
•OUTPUT: Adjust the volume of the output to your phone/computer
•MIC①②: Adjust the volume of the microphone input
• PAD VOL: Adjusts the volume of the custom effect created by your input
• DEPTH: Adjusts the depth of the reverb
• DECAY TIME: Adjust the reverb time
Can't hear sound through headphones
• Please adjust 'MIC①②' to increase the sound of the microphone
• Adjust 'MONITOR' to increase the monitoring sound
• Adjust 'AUX' to increase the sound of the accompaniment music
•Adjust 'OUTPUT' to increase the sound output to the smartphone/computer
The sound you hear from the headphone is different from the recorded sound from the smartphone/computer
• The monitored sound from headphones and the recorded sound are controlled by different knobs
•Adjust 'MONITOR', adjust the monitoring sound from the headphone
•Adjust 'OUTPUT', adjust the sound output to the smartphone/computer
How to input accompaniment via Bluetooth
•Powering on the sound card, Bluetooth indicator will blink, Bluetooth search and
automatically pair with paired mobile phone, then indicator light turned to solid
•Long press Bluetooth button for 2 seconds, indicator will turn off and end pairing
When you live stream, the audience can't hear the music, but you can hear it through headphones
• Make sure the 'OUTPUT' knob is on and turn up the output volume
• Turn on the 'LOOPBACK' button
The sound recorded by mobile phone/computer is the only vocal from microphone, no music sound
• Please make sure that the phone connected to the 'Live output' or the computer connected to the 'USBC' is correctly recognized
• Please check if the DRY/WET button is off
• please turn on the LOOPBACK button, if you want to record to your computer
- 1. How to fix the issue of LED flashing on audio interface buttons such as "Side Chain"/"Noise Reducer"/"Voice Changer"/"Direct Monitor"
- 2. When you live stream, the audience can't hear the music, but you can hear it through headphones
- 3. How to connect to the computer
- 4. How to connect Android phones, iPhone 15 and above, and USB-C ports iPads
- 5. How to connect an iPhone with a lighting port
- 6. How to use the various knobs, buttons, and faders on an audio interface
- 7. Why is there no sound even though the microphone has been successfully connected to the G1 NEO?
- 8. To solve the problem of current noise in the audio interface
- 9. How to use the "Direct Monitor" and "Loopback" compound buttons
- 10. Can't hear sound through headphones
- 11. Cannot boot
- 12. Voice cracked
- 13. How to record sound effects, how long is the time to record sound effects?
- 14. How to input accompaniment via Bluetooth
- 15. Can I connect my USB microphone to the Maonocaster G1 NEO?
- 16. Can I use Bluetooth headphones with the Maonocaster G1 NEO?
- 17. How to use the headset
- 18. Is it necessary to use an additional gainer when using a dynamic microphone
- 19. Why does the headset work properly when I plug both a headset and a microphone into the G1 NEO, but the microphone does not work?
- 20. Side chain function not working?
- 21. G1 Neo sound card is not recognized/cannot be recognized when used on a computer
1. How to fix the issue of LED flashing on audio interface buttons such as "Side Chain"/"Noise Reducer"/"Voice Changer"/"Direct Monitor"
Please click on the link below to find the file named "G1 NEO Firmware Update" and download it. Then connect the G1 NEO to the computer and use this file to update the firmware.
G1 NEO Firmware Update.zip
If the problem persists, please take a video showing your situation and send it to us. Our support team will assist you as soon as possible.
2. When you live stream, the audience can't hear the music, but you can hear it through headphones
1. Please check if the "loopback" button is on;
2. Please check if your live streaming device is connected correctly. For details, please refer to the answers to the three questions in this section that describe the connection method.
——How to connect to the computer
——How to connect Android phones, iPhone 15 and above, and USB-C ports iPads
——How to connect an iPhone with a lighting port
3. Please use the local recorder/voice memo of the live streaming device to record and check if the music can be recorded successfully;
4. If the music is successfully recorded by the recorder, it means that the problem lies in the settings of the live streaming platform. Please check the settings of the live streaming platform;
5. If the music is not successfully recorded by the recorder, please try to change the cable connecting G1 NEO and the live streaming device.
3. How to connect to the computer
1. Please use the included USB cable to connect G1 NEO to your computer. Please note that the USB-C port with the computer/mobile phone logo on G1 NEO is connected, not the DC-5V port
2. After the connection is completed, please check the sound settings of the computer. The default input and output are "Maonoaster G1 NEO" (right-click the speaker on the right side of the desktop to open the sound settings)
4. How to connect Android phones, iPhone 15 and above, and USB-C ports iPads
1. Please connect an external power supply to the DC-5V port of G1 NEO;
2. Please use the included USB cable to connect G1 NEO to your Android phone. Please note that you should connect to the USB-C port on G1 NEO with the computer/phone logo, not the DC-5V port.
5. How to connect an iPhone with a lighting port
1. Please connect the external power supply to the DC-5V port of G1 NEO;
2. Please use the included USB cable to connect to another USB-C port of G1 NEO;
3. Please use an official Apple USB-A to lightning adapter to connect G1 NEO to your iPhone
6. How to use the various knobs, buttons, and faders on an audio interface
48V: Provides 48V phantom power for driving XLR condenser microphones. There is no need to turn on this button when using a dynamic microphone;
Bluetooth: Turn on or off the Bluetooth function of the audio interface
Microphone: Adjust the microphone input volume
Music: Adjust the accompaniment input volume
Microphone Mute: Turn on to mute the microphone, turn off to reactivate the microphone
Music Mute: Turn on to mute the accompaniment, turn off to reactivate the accompaniment
Gain: Adjust the microphone gain
Reverb: Adjust the reverberation. The more you turn it to the right, the deeper the reverberation
Headphones: Adjust the sound monitored through the headphones
Noise Reducer: Noise reduction button, there are first-level noise reduction and second-level noise reduction
Voice Changer: Interesting sound change adjustment, there are five levels: default, female, male, baby, and robot
Direct Monitor (loopback): Short press to turn on or off microphone monitoring, long press to turn on or off loopback
Loopback: Turn on to output the sound input to the audio interface from your computer to your computer. After turning it off, the sound on your computer can be input to the audio interface, but it will no longer be output
Side Chain: Turn on to highlight the human voice and reduce background music during live broadcasts, turn off to restore music
Sound Pad: Customize sound effect buttons, each button can add 20s of your favorite sound
RGB: Adjust the color of the 4 sound pads and the light strip on the side of the audio interface, a total of 12 modes
7. Why is there no sound even though the microphone has been successfully connected to the G1 NEO?
1. Please check the compatibility of your microphone. USB microphones and 3.5mm microphones are not compatible with G1 NEO;
2. Please check whether you have turned on the 48V button. XLR condenser microphones require 48V phantom power to drive;
3. Please check whether the microphone volume fader is adjusted to the appropriate position;
4. Please check whether the "Gain" knob is turned up to a large enough level;
5. Please check whether the headset is connected to the G1 NEO headset jack. Inserting a headset will disable the XLR port.
8. To solve the problem of current noise in the audio interface
1. Please do not hold the microphone by hand, please fix the microphone on the stand.
2. Check the connection status of the cable and the microphone interface is firmly connected.
3. Do not use a hub! First change the computer USB port connected by the audio interface, if it is a desktop computer, please connect to the USB port on the back of the host.
4. The noise of the audio interface itself or the environmental noise in normal use, the solution is to use it in a quieter environment.
5. The microphone gain is too high or the environment is noisy, causing the ambient noise picked up by the microphone to exceed the audio interface's noise reduction threshold. The solution is to reduce the microphone gain.
6. The interface of the computer device you are using is old or poorly grounded, or the power circuit connected to it is old, causing leakage and continuous current noise. Please try another computer device in a different environment or switch to a mobile phone for testing.
7. Electronic devices with strong radiated signals in the vicinity of the microphone, for example: wireless routers/video lamps, will produce interference noise. Please use the microphone in a different environment, for example: if the current location is the living room, please use it in the bedroom instead.
8. The noise caused by software incompatibility, please change to use the computer recorder for recording, and close third-party software to avoid software conflicts or noise caused by effects.
9. If you use it on a mobile device, Apple devices must use MFI-certified cables, and other brands should use original cables as much as possible.
10. If none of the above solves the problem, please record audio and take photos or videos of the audio cable connection. Send them to us so we can assess your problem
9. How to use the "Direct Monitor" and "Loopback" compound buttons
1. Short press this compound button to turn monitoring on or off, long press this compound button to turn loopback on or off.
2. You can determine the monitoring and loopback status by the color of the LED indicator on the compound button.
10. Can't hear sound through headphones
1. Please adjust the "Headphones" knob to increase the sound of the headphones;
2. Please adjust the "Microphone" fader and the "Gain" knob to increase the sound of the microphone;
3. Please adjust the "Music" fader to increase the sound of the background music;
4. Please turn on the "Direct Monitor" button;
5. If you use an XLR condenser microphone, please turn on the "48V" button;
6. Please turn on the volume switch of the accompaniment device.
11. Cannot boot
1. The G1 NEO audio interface does not contain a battery, please connect the audio interface to a power source. If you are using a computer, directly connect the computer to the USB-C port with the computer/mobile phone logo; if you are using a mobile phone, please add an additional power source to the DC-5V port of the audio interface;
2. Press and hold the power button for three seconds to turn on the device.
12. Voice cracked
1. Adjust the microphone volume fader to 75%;
2. Adjust the "Headphones" knob to 75%;
3. Adjust the "Gain" knob on the audio interface little by little according to your hearing until you are satisfied with the sound quality. At this time, the "Gain" knob position is the best position for the microphone you are currently using. Once it is set to the best position, there is no need to adjust the "GAIN" knob unless you change to a new microphone.
13. How to record sound effects, how long is the time to record sound effects?
The 4 sound pads on the G1 NEO can record 20s of sound effects.
The product does not have custom sound effects input when it leaves the factory, and users need to input them before they can use them.
Recording method: When the G1 NEO is turned on, connect a microphone, an external audio speaker accompaniment input device, or a Bluetooth device, and short-press any custom button. The light flashes slowly, indicating that it is in the recording state. The G1 NEO will record through the sound effects of the above channels. Record the appropriate length of audio according to actual needs, short-press to stop recording, or wait until the light goes out and then press the button to record the longest sound allowed.
How to erase the recorded sound effects: Long press any custom sound effect button, and the light flashes quickly to indicate that the sound effect erasure stage has begun. When the light stops flashing, it means that the sound effect has been erased.
14. How to input accompaniment via Bluetooth
1. Please press and hold the Bluetooth button for 2 seconds to turn on the Bluetooth function of G1 NEO;
2. At this time, the blue indicator light on the Bluetooth button flashes, and Bluetooth is working normally and waiting to be connected;
3. Turn on the Bluetooth of the music device and actively search for G1 NEO to complete the pairing connection. After the connection, the blueindicator light of the Bluetooth button is on;
4. Press and hold the Bluetooth button for more than 2 seconds, the Bluetooth button light will turn off from being on, and all Bluetooth pairings will be automatically turned off.
15. Can I connect my USB microphone to the Maonocaster G1 NEO?
No, the Maonocaster G1 NEO does not support the connection of USB microphones.
16. Can I use Bluetooth headphones with the Maonocaster G1 NEO?
No, the G1 NEO is not a USB host device and will therefore not allow the connection of Bluetooth headphones.
17. How to use the headset
Plug the headset directly into the 3.5mm jack with the headset symbol on the audio interface.
Please note that the audio interface only supports CTIA standard 3.5mm TRRS plug headsets.
18. Is it necessary to use an additional gainer when using a dynamic microphone
Maonocaster G1 NEO has built-in gain to provide sufficient gain for all microphone types, including low output dynamic microphones. The GAIN knob on the panel can be adjusted to the right position when in use to get the right effect
19. Why does the headset work properly when I plug both a headset and a microphone into the G1 NEO, but the microphone does not work?
Plugging in a headset will disable the XLR port.
20. Side chain function not working?
It doesn't work on a voice call, it works on podcast or live streaming
21. G1 Neo sound card is not recognized/cannot be recognized when used on a computer
Ⅰ. Shut down and re-turn on the computer, wait about 20 minutes before connecting again.
Ⅱ. Update the driver in the device manager. If it doesn’t work, uninstall the driver and reinsert the microphone
Ⅲ. Use it on another computer to see if it can be loaded. If it can be recognized, insert it into the computer that cannot be recognized again. If it is not recognized, please contact us at angela@maono.com.
Ⅳ. Use Driver Master, the brand’s own software or the brand’s official website to update the driver (such as Lenovo, Dell) to avoid the impact of driver loss.
- To solve the problem of current noise in the audio interface
- Voice cracked
- How to connect speakers?
- Microphone gain switch setting
- Microphone gain switch setting
- How to adjust the knobs on the audio interface
- Can't hear sound through headphones
- The sound you hear from the headphone is different from the recorded sound from the smartphone/computer
- Cannot boot
- How to connect to the computer
- How to input accompaniment via Bluetooth
- When you live stream, the audience can't hear the music, but you can hear it through headphones
- The sound recorded by mobile phone/computer is the only vocal from microphone, no music sound
- Why is there little or no sound with shure sm7B and Rode PodMic dynamic microphones
- Is it necessary to use an additional gainer when using a dynamic microphone
- Can not be used on iPhone
- How to connect to a Guiter
- How to record sound effects, how long is the time to record sound effects?
- What software can be used with the audio interface on Windows 10?
- Side chain function not working?
- Can I connect my USB microphone to the Maonocaster AMC2 NEO?
- Can I use Bluetooth headphones with the Maonocaster AMC2 NEO?
- 使いたい:パソコンで音楽を再生、スマホ(iphone)で配信をする
To solve the problem of current noise in the audio interface
1. Please do not hold the microphone by hand, please fix the microphone on the stand.
2. Check the connection status of the cable and the microphone interface is firmly connected.
3. Do not use a hub! First change the computer USB port connected by the audio interface, if it is a desktop computer, please connect to the USB port on the back of the host.
4. The noise of the audio interface itself or the environmental noise in normal use, the solution is to use it in a quieter environment.
5. The microphone gain is too high or the environment is noisy, causing the ambient noise picked up by the microphone to exceed the audio interface's noise reduction threshold. The solution is to reduce the microphone gain.
6. The interface of the computer device you are using is old or poorly grounded, or the power circuit connected to it is old, causing leakage and continuous current noise. Please try another computer device in a different environment or switch to a mobile phone for testing.
7. Electronic devices with strong radiated signals in the vicinity of the microphone, for example: wireless routers/video lamps, will produce interference noise. Please use the microphone in a different environment, for example: if the current location is the living room, please use it in the bedroom instead.
8. The noise caused by software incompatibility, please change to use the computer recorder for recording, and close third-party software to avoid software conflicts or noise caused by effects.
9. If you use it on a mobile device, Apple devices must use MFI-certified cables, and other brands should use original cables as much as possible.
10. If none of the above solves the problem, please record audio and take photos or videos of the audio cable connection. Send them to us so we can assess your problem
Voice cracked
- Please set the GAIN on the front of the audio interface to the correct position, following your ear's sense of hearing.
- Please adjust VOL to 75%.
- Please adjust HEADPHONES to 75%.
- Please adjust OUTPUT to 75%.
- Please set the microphone 7-8in away for the best recording experience.
How to connect speakers?
You can connect active speakers through the 'Headphone' interface.
Microphone gain switch setting
- Please set the GAIN on the front of the audio interface to the correct position to follow your ear's sense of hearing.
- Once it is set to the correct position, there is no need to adjust the GAIN button.
Microphone gain switch setting
- Please set the GAIN on the front of the audio interface to the correct position to follow your ear's sense of hearing.
- Once it is set to the correct position, there is no need to adjust the GAIN button.
How to adjust the knobs on the audio interface
You can adjust each knob to the middle before using
- AUX: Adjusts the input accompaniment sound
- GAIN: adjusts the microphone gain
- Pitch presets: Interesting sound change adjustment
- HEADPHONES: adjust the sound you monitor through the headphones
- OUTPUT: Adjust the volume of the output to your phone/computer
- VOL: Adjusts the sound of the microphone input
- Reverb Presets: Adjusts the reverb
- SIDE CHAIN: Highlight the human voice and lower the background music during the live broadcast
- Music Only: Eliminate vocals from background music and keep the original sound of the music
- Direct Monitor: Turn on or off microphone monitoring
- Loopback: on the computer, not open, can monitor, but can not record on the computer
- Noise Reducer: noise reduction button, there is a level of noise reduction and secondary noise reduction
- ABC SOUND PAD: Customize button
Can't hear sound through headphones
- Please adjust VOL to increase the sound of the microphone
- Please adjust HEADPHONES to increase the sound of the monitor
- Please adjust AUX to increase the sound of backing music
- Please adjust OUTPUT to increase the sound output of the phone
- Please adjust GAIN to increase the microphone gain
The sound you hear from the headphone is different from the recorded sound from the smartphone/computer
- Monitored sound and recorded sound are controlled by different knobs
- Adjust HEADPHONES to adjust the monitored sound
- Adjust the OUTPUT to adjust the sound output of the phone
Cannot boot
- Please check if the podcast console has power, please use the charging port to charge.Whether it is fully charged for 3 hours.
- You need to long-press the for more than three seconds to turn it on.
How to connect to the computer
- Please connect the USB-C port of Maonocaster to your computer with the USB cable included in the package
- Please check the sound settings of your computer after the connection is done. The default input and output are 'Maonoaster C2 neo' (right-click on the speaker on the right side of the desktop to open the sound settings)
How to input accompaniment via Bluetooth
- After powering on, the Bluetooth indicator light flashes, Bluetooth works normally and actively searches and pairs the connected phones with, long light after connection
- Long press the Bluetooth button for more than 2 seconds, the Bluetooth button light changes from always on to off and automatically turns off all Bluetooth pairing.
When you live stream, the audience can't hear the music, but you can hear it through headphones
- Make sure the USB & LINE OUTPUT knob is on and turn up the output volume
- Long press the Direct monitor button to open the LOOPBACK button
The sound recorded by mobile phone/computer is the only vocal from microphone, no music sound
- Please make sure that the phone connected to LINE OUT or the computer connected to USB-C is recognized correctly.
- Please check if Side Chain is turned on by the short press, please turn it off
- Record to computer, long press and hold the “Direct monitor ”button to open the LOOPBACK button
Why is there little or no sound with shure sm7B and Rode PodMic dynamic microphones
- The correct gain is not selected on the GAIN
- Shure SM7B microphone has a sensitivity of -59dB and the Rode podmic has a gain of -57dB. You need to set the GAIN of the audio interface to the right position to get better recording results
Is it necessary to use an additional gainer when using a dynamic microphone
AMC2 Maonocaster has built-in gain to provide sufficient gain for all microphone types, including low output dynamic microphones. The GAIN knob on the panel can be adjusted to the right position when in use to get the right effect
Can not be used on iPhone
We do not provide additional OTG adapters, you should connect your phone and AMC2 via OTG (the adapter must be the original official Apple adapter)
How to connect to a Guiter
Recording can be achieved by using 6.35MM plugged into the instrument port, but it is not recommended, because AMC2 NEO is a two-in-one interface for microphones and instruments, and only one of them can be used, not both.
How to record sound effects, how long is the time to record sound effects?
- A/B/C three buttons can record 20s of sound effects.
- The products from the factory are not entered into the customized sound effects, and users need to be entered by themselves before they can be used.
- Recording method: In the start-up state, the AMC2 NEO is connected to a microphone, or an external audio speaker accompaniment input device, or connected to a Bluetooth device, short press any of the custom keys, see the light flash slowly, release your finger, this time for the recording state,the AMC2 NEO will be recorded through the above channel sound effects, according to the actual demand for recording the appropriate length of audio, short press to stop recording, you can also wait until the lights go out to record the longest sound allowed to be recorded by the button
What software can be used with the audio interface on Windows 10?
AU, Audacity, etc...
Side chain function not working?
It doesn't work on a voice call, it works on podcast or live streaming
Can I connect my USB microphone to the Maonocaster AMC2 NEO?
No, the Maonocaster AMC2 NEO does not support the connection of USB microphones.
Can I use Bluetooth headphones with the Maonocaster AMC2 NEO?
No, the AMC2 NEO is not a USB host device and will therefore not allow the connection of Bluetooth headphones.
使いたい:パソコンで音楽を再生、スマホ(iphone)で配信をする
- Why is there a delay in hearing the sound in headphones
- Where do I download the software for mac?
- Can I bring two headsets for face-to-face interview for this product?
- Are you able to save recording to an SD card?
Why is there a delay in hearing the sound in headphones
AM100 no latency, you use the software in the computer real-time monitoring function of the delay, it is recommended to adjust the parameters of the application, or use the computer's own recorder to record
Where do I download the software for mac?
We publish audio import software programs compatible with Windows and macOS in our "Manuals and Drivers". They are placed in the same location. You can check them carefully. If you can't find them, you can contact our support and they will answer your questions
Can I bring two headsets for face-to-face interview for this product?
AU-AM100 has two monitor jacks and two microphone jacks, can meet two people at the same time using monitor headphones and microphones
Are you able to save recording to an SD card?
AU-AM100 doesn't have an SD card interface. If you want to save to an SD card, we recommend that you use a computer to record, and then transfer the recorded audio files from the computer to the SD card
- USB Device not Working on Mac
- Fix Sound Problems on PC
- USB not Recognized
USB Device not Working on Mac
Please check the documentation
Fix Sound Problems on PC
Please check the documentation
USB not Recognized
Please check the documentation
- USB Device not Working on Mac
- Fix Sound Problems on PC
- USB not Recognized
USB Device not Working on Mac
Please check the documentation
Fix Sound Problems on PC
Please check the documentation
USB not Recognized
Please check the documentation
- USB Device not Working on Mac
- Fix Sound Problems on PC
- USB not Recognized
USB Device not Working on Mac
Please check the documentation
Fix Sound Problems on PC
Please check the documentation
USB not Recognized
Please check the documentation
- Microphone does not work without sound on windows
- What is the value of the sampling rate of the microphone
- How to set up the connection computer
- Correct the whistling sound coming from a mic?
- Microphone is not recognized on the PC
- USB Microphone not Working on Mac
Microphone does not work without sound on windows
you can refer the attachment: Fix sound problems on PC
What is the value of the sampling rate of the microphone
192kHz/24Bit
How to set up the connection computer
you can refer the attachment: How to connect the microphone to the computer
Correct the whistling sound coming from a mic?
That whistling sound is called Audio feedback and caused because of an endless loop caused when the mic picks up the sound of the loudspeakers (stage monitors or pa speakers) and sends it back to the loudspeakers to amplify and pick up again, resulting in 1 particular frequency getting boosted depending upon the resonance of the room, the speakers, etc.
Ways to correct /avoid feedback?
1. Face the speakers away from the mic or place them farther away.
2. Lower their volume or mic gain
3. Use unidirectional cardioid mics which have a rear rejection that means no pickup from back side. Then you can use stage monitors facing you in the middle of the stage. And the mic won't pick up them.
4. Ring out the speaker - deliberately create feedback by taking the mic closer to the speaker. When feedback happens, check the frequency on a real-time analyzer and cut it using channel eq or graphic eq.
5. Use a feedback reducer
Microphone is not recognized on the PC
you can refer the attachment : USB not Recognized
USB Microphone not Working on Mac
you can refer the attachment : USB Microphone not Working on Mac
- How to use Maono Link software with Wave T1 Mini?
- How to pair Wave T1 Mini with a phone?
- Wave T1 Mini battery life is less than 8 hours. Why?
- Wave T1 Mini isn’t working after connecting to a phone.
- How to connect Wave T1 Mini Camera Version to a camera?
- How to reduce background noise when using Wave T1 Mini with a camera?
- How to adjust volume and gain for Wave T1 Mini?
- How to charge Wave T1 Mini?
- Does the Type-C version support iPhone 15/16?
- What is the maximum transmission range of Wave T1 Mini?
- How to pair transmitter and receiver?
- Does Wave T1 Mini support noise reduction? How to enable it?
- Audio volume is too low. How to fix?
- How to play recorded audio/video externally?
- Can the Camera Version connect to a phone?
- Why isn’t the 2-second hold photo function working?
How to use Maono Link software with Wave T1 Mini?
Connecting to a Phone
After removing the transmitter and receiver from the charging case, connect the receiver to the bottom data port of your phone. The app will load the settings interface once the transmitter and receiver are successfully paired.
Note: Currently not available on Huawei HarmonyOS.
For other small-brand devices:
Click the link below to download Maono Link:
How to pair Wave T1 Mini with a phone?
- Phone Version: Remove the transmitter and receiver, press and hold the transmitter’s power button for 2 seconds to turn it on, then connect the receiver to the phone’s bottom data port. A steady blue light indicates successful pairing.
- All-in-One Version: The transmitter and receiver automatically power on and pair when removed from the charging case. Connect the receiver to the phone’s bottom data port using the included USB-C to USB-C cable (steady blue light confirms pairing).
For iPhone 14 and earlier models, use the appropriate adapter.
Wave T1 Mini battery life is less than 8 hours. Why?
In standard mode, battery life reaches 8 hours. With noise reduction enabled, battery consumption increases (approximately 5 hours). This is normal due to additional processing power required.
Wave T1 Mini isn’t working after connecting to a phone.
For some OPPO/VIVO phones, enable OTG in phone settings before connecting the microphone. Also, set the default recording device to external device.
As shown below:
How to connect Wave T1 Mini Camera Version to a camera?
- Attach the receiver to the camera’s cold shoe mount.
- Use the included 3.5mm TRS cable to connect the receiver’s audio output to the camera’s microphone input (usually red). Adjust gain settings based on camera brand:Canon: Manual recording mode, gain set to Level 1.
- Sony: Recording volume at 2dB.
- Nikon: Microphone sensitivity set to 3.
How to reduce background noise when using Wave T1 Mini with a camera?
- Set the receiver’s gain to Level 3 (High) and adjust camera settings as follows:Canon: Manual recording mode, gain Level 1.
- Sony: Recording volume at 2dB.
- Nikon: Microphone sensitivity set to 3.
How to adjust volume and gain for Wave T1 Mini?
- Camera Version: Use the receiver’s physical switch (High/Medium/Low).
- Phone Version: Adjust gain via the Maono Link app.
How to charge Wave T1 Mini?
- When the transmitter/receiver’s LED blinks red slowly:Two-Transmitter Kit: Remove devices, peel off the insulating film, and place them in the charging case.
Note: Phone version receiver does not require charging.
- Single-Transmitter Kit: Use the magnetic charger for the transmitter. Charge the case via the included cable if low on power.
Does the Type-C version support iPhone 15/16?
Yes, the Type-C version is compatible with iPhone 15/16.
What is the maximum transmission range of Wave T1 Mini?
Up to 100 meters in open, interference-free environments.
How to pair transmitter and receiver?
- Phone Version:Connect receiver to phone. Hold receiver’s pairing button for 6 seconds.
- With transmitter off, hold its pairing button for 6 seconds.
- Blue blinking indicates pairing mode; steady blue light confirms success.
- Camera Version:With devices off, hold pairing buttons on both receiver and transmitter for 6 seconds.
- Rapid blue blinking during pairing; steady light indicates success.
Does Wave T1 Mini support noise reduction? How to enable it?
Press the noise reduction button on the transmitter/receiver (green light indicates activation). Adjust levels (Weak/Medium/Strong/Ultra) or customize via Maono Link app.
Audio volume is too low. How to fix?
- Camera Version: Adjust the receiver’s volume knob. Check connections and settings.
- Phone Version: Use real-time gain adjustment in Maono Link app.
How to play recorded audio/video externally?
Enable "Phone Speaker" in the Maono Link app.
Can the Camera Version connect to a phone?
Yes. Use the included USB-C to USB-C cable to connect the receiver to the phone.

Why isn’t the 2-second hold photo function working?
Ensure the phone is actively in photo/video mode (camera app open)
- Guide Manual
- How to connect Wave T5 to a mobile phone?
- How can Wave T5 be worn?
- How to connect the Wave T5 Camera Edition to a camera?
- What to do if there is noticeable background noise when using Wave T5 with a camera?
- How to adjust the volume and gain settings on the Wave T5?
- How to charge Wave T5?
- Does the Wave T5 Type-C mobile version support iPhone 15 & 16?
- What is the maximum transmission distance of the Wave T5?
- What is the purpose of the Magnetic sheet necklace included in the Wave T5 packaging?
- How to pair the Transmitter and Receiver of Wave T5?
- Does Wave T5 support noise cancellation? How to enable it?
- How to use the Windscreen with Wave T5?
- What should I pay attention to when using the Back clip on Wave T5?
- What if the volume of the Wave T5 is too low? How to adjust?
- Why doesn't the level display in Maono Link change with gain adjustments?
- How to upgrade the firmware on Wave T5?
- How to play back recorded audio or video from Wave T5?
- Can the Camera Edition connect to a mobile phone?
- Why isn't the "Hold 2s Mute Button to Take Photo" feature working?
- How to check the battery status of Wave T5:
Guide Manual
How to connect Wave T5 to a mobile phone?
After removing the Transmitter and Receiver from the Charging box, they will automatically power on and pair. A solid blue light indicates successful connection. Then, use the C-to-C adapter cable included in the package to connect the Receiver to the phone’s bottom data port.
For iPhone 14 and earlier models, the connection method is the same, the only difference is the type of adapter cable.
How can Wave T5 be worn?
Back clip: Attach the Back clip to the Transmitter and wear it directly on your collar.
Magnetic sheet: Use the Magnetic sheet to secure the Transmitter on your collar, ideal for users who prefer not to use the Back clip.
How to connect the Wave T5 Camera Edition to a camera?
Mount the Receiver using the Back clip onto the cold shoe of your camera, then use the supplied 3.5mm TRS camera cable to connect the audio output port of the Receiver to the camera's microphone input (typically marked in red). After connection, it is recommended to adjust the gain settings based on the camera brand for optimal audio quality:
- Canon cameras:Set the recording mode to manual and adjust the gain to the first notch on the left.
- Sony cameras:Set the recording volume to 2dB.
- Nikon cameras:Set the microphone sensitivity to 3.
What to do if there is noticeable background noise when using Wave T5 with a camera?
This is related to the camera’s recording settings. First, set the Transmitter’s microphone gain to the 3rd (high) level.
We recommend adjusting the camera’s gain settings for optimal sound quality:
- Canon cameras:Set the recording mode to manual and adjust the gain to the first notch on the left.
- Sony cameras:Set the recording volume to 2dB.
- Nikon cameras:Set the microphone sensitivity to 3.
How to adjust the volume and gain settings on the Wave T5?
- Camera Edition:
You can adjust the volume using the volume knob on the Receiver to one of three levels: high, medium, or low.
- Mobile Edition:
You can adjust the gain in real-time via the Maono Link app to ensure the best audio performance.
How to charge Wave T5?
When the indicator light on the Transmitter or Receiver flashes red slowly, it indicates low battery. Follow these steps to charge:
- Two Transmitters and One Receiver Kit:
After removing the Transmitter and Receiver, peel off the protective film from the bottom and place them into the Charging box for charging.
Tip: The mobile version’s Receiver does not require charging.
- One Transmitter and One Receiver Kit:
After removing the Transmitter and Receiver, peel off the protective film and use the Magnetic charging cable to charge the Transmitter. If the Charging box is low on power, use the included charging cable to charge the Charging box.
Does the Wave T5 Type-C mobile version support iPhone 15 & 16?
Yes, the Wave T5 Type-C version supports iPhone 15/16.
What is the maximum transmission distance of the Wave T5?
In an open, interference-free environment, the Wave T5’s maximum transmission distance can reach up to 300 meters.
What is the purpose of the Magnetic sheet necklace included in the Wave T5 packaging?
The Magnetic sheet necklace is ideal for fitness influencers or users who wish to display actions without wearing clothes, as it helps to secure the microphone to the necklace. It is also useful when it is inconvenient to clip the microphone to clothing.
How to pair the Transmitter and Receiver of Wave T5?
- Mobile Edition:
Connect the Receiver to the phone and press and hold the pairing button on the Receiver for 6 seconds.
With the Transmitter powered off, press and hold the pairing button on the Transmitter for 6 seconds to enter pairing mode.
During pairing, the status indicator will flash blue. Once pairing is successful, the indicator will turn solid blue. - Camera Edition:
With the Receiver powered off, press and hold the pairing button on the Receiver for 6 seconds.
Similarly, with the Transmitter powered off, press and hold the pairing button on the Transmitter for 6 seconds to enter pairing mode.
During pairing, the status indicator will flash blue rapidly. Once pairing is successful, the indicator will turn solid blue.
Does Wave T5 support noise cancellation? How to enable it?
Press the power button on either the Receiver or Transmitter to toggle the noise cancellation feature on or off. The indicator light will turn green when enabled.
Noise cancellation levels can be adjusted via the Maono Link app, with options for weak, medium, and strong presets, or you can customize the settings.
How to use the Windscreen with Wave T5?
- Installation:Expand the diameter of the Windscreen and easily attach it to the microphone.
- Removal:To remove it, simply pull gently.
What should I pay attention to when using the Back clip on Wave T5?
Please note the following:
- Clothing thickness:Avoid using the Back clip with thick clothing (e.g., down jackets, thick sweaters, etc.), as overly thick clothes may result in insufficient magnetic force, causing the microphone to fall off.
- Intense activities:When engaging in intense activities (e.g., jumping, fast running), be cautious with the Back clip to avoid reduced magnetic strength, which could affect the microphone’s stability.
- Storage:All magnetic products contain magnets. It’s recommended to keep magnets away from items like credit cards, hard drives, memory cards, etc.
What if the volume of the Wave T5 is too low? How to adjust?
- Camera Edition ?:
On the Wave T5 Receiver, you can adjust the volume using the volume knob. The default volume is set to medium, and you can adjust it as needed. If the volume is too low, check if the connection between the microphone and Receiver is secure, and ensure the device settings are correct. - Mobile Edition ?:
You can adjust the output volume in real-time using the gain adjustment function in the Maono Link app.
Why doesn't the level display in Maono Link change with gain adjustments?
Currently, the level display function does not adjust with gain changes, but we will address this issue in a future firmware update.
How to upgrade the firmware on Wave T5?
In the settings screen, click the icon in the top right corner to check the current firmware version. You can also restore factory settings.
Click the "Upgrade Now" button to download and update to the latest firmware.
Note⚠️: During the upgrade process, make sure the Maono Link app remains open and avoid using the phone.
How to play back recorded audio or video from Wave T5?
Enable the phone's playback feature in the Maono Link app to play back the recorded material.
Can the Camera Edition connect to a mobile phone?
Yes, the Camera Edition can be connected to a mobile phone. Use the C-to-C adapter cable included in the package to connect the Receiver to the phone.

Why isn't the "Hold 2s Mute Button to Take Photo" feature working?
For this feature to work, the phone must be in the camera or video recording interface.
How to check the battery status of Wave T5:
Please refer to the following tips

- How to solve the connection light keeps blinking, but no successful connection
- Can I use it on my camera via an adapter cable?
- How to charge the charging box
- Wireless microphone charging how no response
- What does the low-cut function do?
- How do I connect the Maono WM821's windshields?
- Why the microphone is not connected successfully, the sound is not input to the phone
- WM821 recording sound is very small, how to adjust
- What is the difference between the WM821's Merged(MIX) and Split(AB) recording modes?
How to solve the connection light keeps blinking, but no successful connection
When the transmitter starts the connection function, it cannot connect to the receiver, try to use the phone
SIM card pin inserted into RESET hole and pressed for 2 seconds to start the reset function, then try to connect.
Can I use it on my camera via an adapter cable?
yes
How to charge the charging box
The use of conventional cell phone charger can be charged, rechargeable battery, computer USB port
Wireless microphone charging how no response
Please tear off the bottom of the insulation tape
What does the low-cut function do?
Low-cut function can shield the surrounding noise, ambient sound, so that the sound is more clean
How do I connect the Maono WM821's windshields?
Align windshields and microphone jacks, then push in the direction of the Maono logo to complete the installation
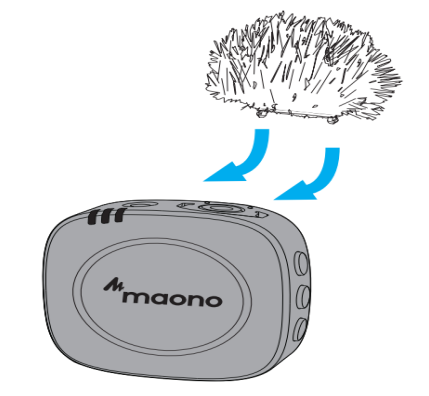
Why the microphone is not connected successfully, the sound is not input to the phone
1. Please check if the connection is correct, TRRS (Four rings) connects to the phone, TRS (three rings) connects to the microphone
2. Please connect the audio cable to the microphone OUTPUT jack
3. When using the phone does not have a 3.5 MM headset hole, please connect the phone through the On the Go adapter cable, On the Go adapter cable, please use the original, to avoid connection failure and poor sound quality problems
WM821 recording sound is very small, how to adjust
1. Your wireless microphone is not successfully connected to the phone, you can use the recorder to record the sound, and then gently tap near the charging port, if there are sound fluctuations, the microphone is not successfully connected, please reconnect the device
2.WM821 has 6 volume levels, short press the receiver A or B button to adjust the volume of the corresponding transmitter
What is the difference between the WM821's Merged(MIX) and Split(AB) recording modes?
1.The receiver can switch between "Merged(MIX)" and "Split(AB)" by pressing the power switch button.
2.This allows you to record each transmitter onto separate channels on the output ('Split' mode) or combine the two into a single output ('Merged' mode). When it's in 'Split' mode, there will be two output level meters, when it's in 'Merged' mode, there will be just one.
- How to solve the connection light keeps blinking, but no successful connection
- Can I use it on my camera via an adapter cable?
- Can the WM820 B2 and C2 microphones record a separate channel?
- Can I use the adapter to transfer C2 to Apple phone?
How to solve the connection light keeps blinking, but no successful connection
When the transmitter starts the connection function, it cannot connect to the receiver, try to use the phone
SIM card pin inserted into RESET hole and pressed for 3 seconds to start the reset function, then try to connect.
Can I use it on my camera via an adapter cable?
Cannot
Can the WM820 B2 and C2 microphones record a separate channel?
Cannot,This feature is supported on WM821, and you can purchase WM821
Can I use the adapter to transfer C2 to Apple phone?
Cannot